The following installation guide will provide you with instructions to install and setup the Boax Store Virtuemart template for the latest version of Joomla 4.x and Virtuemart for Joomla 4.x
Table of Contents:
- Template Usage
- Template Support
- Joomla & Virtuemart Installation
- Template Package Contents
- Installing The Joomla Template
- How Do I Set The Template As The Default Joomla Template
- How Do I Setup The Virtuemart Template
- Template Module Positions
- How Do I Access The Template Settings
- How Do I Create The Custom Modules
- How Do I Set Up Front Page Tabs
- How Do I Add The Read More Button To The Custom Module
- Top Menu Module Settings
- How Do I Set Up Ribbon On Top Menu Item
- How Do I Set Up The Built-in Mega Menu
- How do I set up an off-canvas area
- How can I hide/show modules on different devices
- Double images animation for products module
- How do I turn on Jump To Top button
- How Do I Setup The Slide Show
- Create Images For the Slideshow
- Create A Custom Module Position For Each New Slideshow Image
- How Do I Add More Images To The Slide Show
- Slideshow Settings
- How Do I Setup The Login & Registration Buttons
- How Do I Setup The Our Partner & Brands
- How Do I Setup The Contact Us Module
- How Do I Setup The Footer Menu
- How Do I Add The Footer Copyright Text To The Template
- How Do I Set Up Products/Manufacturers Slider Module
- How Do I Set Up Products/Manufacturers Slider Module Centered
- How Do I Set Up Pop Up Boxes
- How Do I Set Up The Testimonials Box
- How Do I Add An Items To The Testimonials Box
- How Do I Set Up The Theme settings
- How Do I Set Up The Product Ribbons
Template Usage
Before using or installing this template please read the https://www.virtuemarttemplates.net/terms-of-service.html which you have agreed to before downloading the template at the https://www.virtuemarttemplates.net website
Template Support
Please note we only provide support for using and setting up the Joomla template you have downloaded at the website.
If you need support for the template please using one of the following options
We recommend you install the template quick start package which will give you an exact copy of the template you can see running at the https://demoj4.virtuemarttemplates.net/boaxstore/ site and it will save you a lot of time setting up the template. The template quick start package is also very useful to understand how we have setup Joomla & virtuemart for the template.
Log into the https://www.virtuemarttemplates.net visit the knowledge base which includes lots of useful information about how to use and setup the template.
Log into the https://www.virtuemarttemplates.net website and open a support ticket and our support team will be happy to help you with any questions you may have about using or setting up the template
If you need support for Joomla or Virtuemart please visit one of the following websites
Joomla documentation website https://docs.joomla.org
Joomla forum https://forum.joomla.org
Joomla tutorials https://www.joomlatutorials.com
Virtuemart documentation website https://docs.virtuemart.net
Virtuemart tutorials https://docs.virtuemart.net/tutorials.html
Virtuemart forum https://forum.virtuemart.net
Joomla & Virtuemart Installation
Before installing this template you need to do the following.
Note: If you use the template quick start package the quick start package will install both Joomla and Virtuemart for you plus the Joomla template.
Download and install the latest version of Joomla 4.x from the https://www.joomla.org website at your website
Download and install the latest version of Virtuemart for Joomla 4.x from https://dev.virtuemart.net/projects/virtuemart/files
Template Package Contents
This template package includes the following.
Template zip file for latest version of Joomla 3.10 and 4.x and Virtuemart which can be installed automatically via your Joomla administrator area.
Adobe Photoshop file.
Template Install Instructions
Template Quick Start Installer for Joomla 3.10 & Joomla 4.x plus Virtuemart and the template setup for you
Template images directory which includes the images we have used in the template
Installing The Joomla Template
To install the Joomla template complete the following
Log into the Joomla administrator area of your website
Select the System menu and Extensions on the Install box.
Select the Browse button and choose the template zip file located in the Joomla 4.x directory included in the zip file you have downloaded from the website to your computer
Select the Open button

How Do I Set The Template As The Default Joomla Template
From your Joomla administrator area select the System and Site Tepmplate Styles
Select the check box next to the Joomla template you have installed
Select the button Default

How Do I Setup The Virtuemart Template
To setup the virtuemart template complete the following
Log into your Joomla administrator
Select the components menu and Virtuemart
Select Virtuemart configuration tab and the configuration menu
Select the Templates tab
Setup the virtuemart template as show in the screen shot below

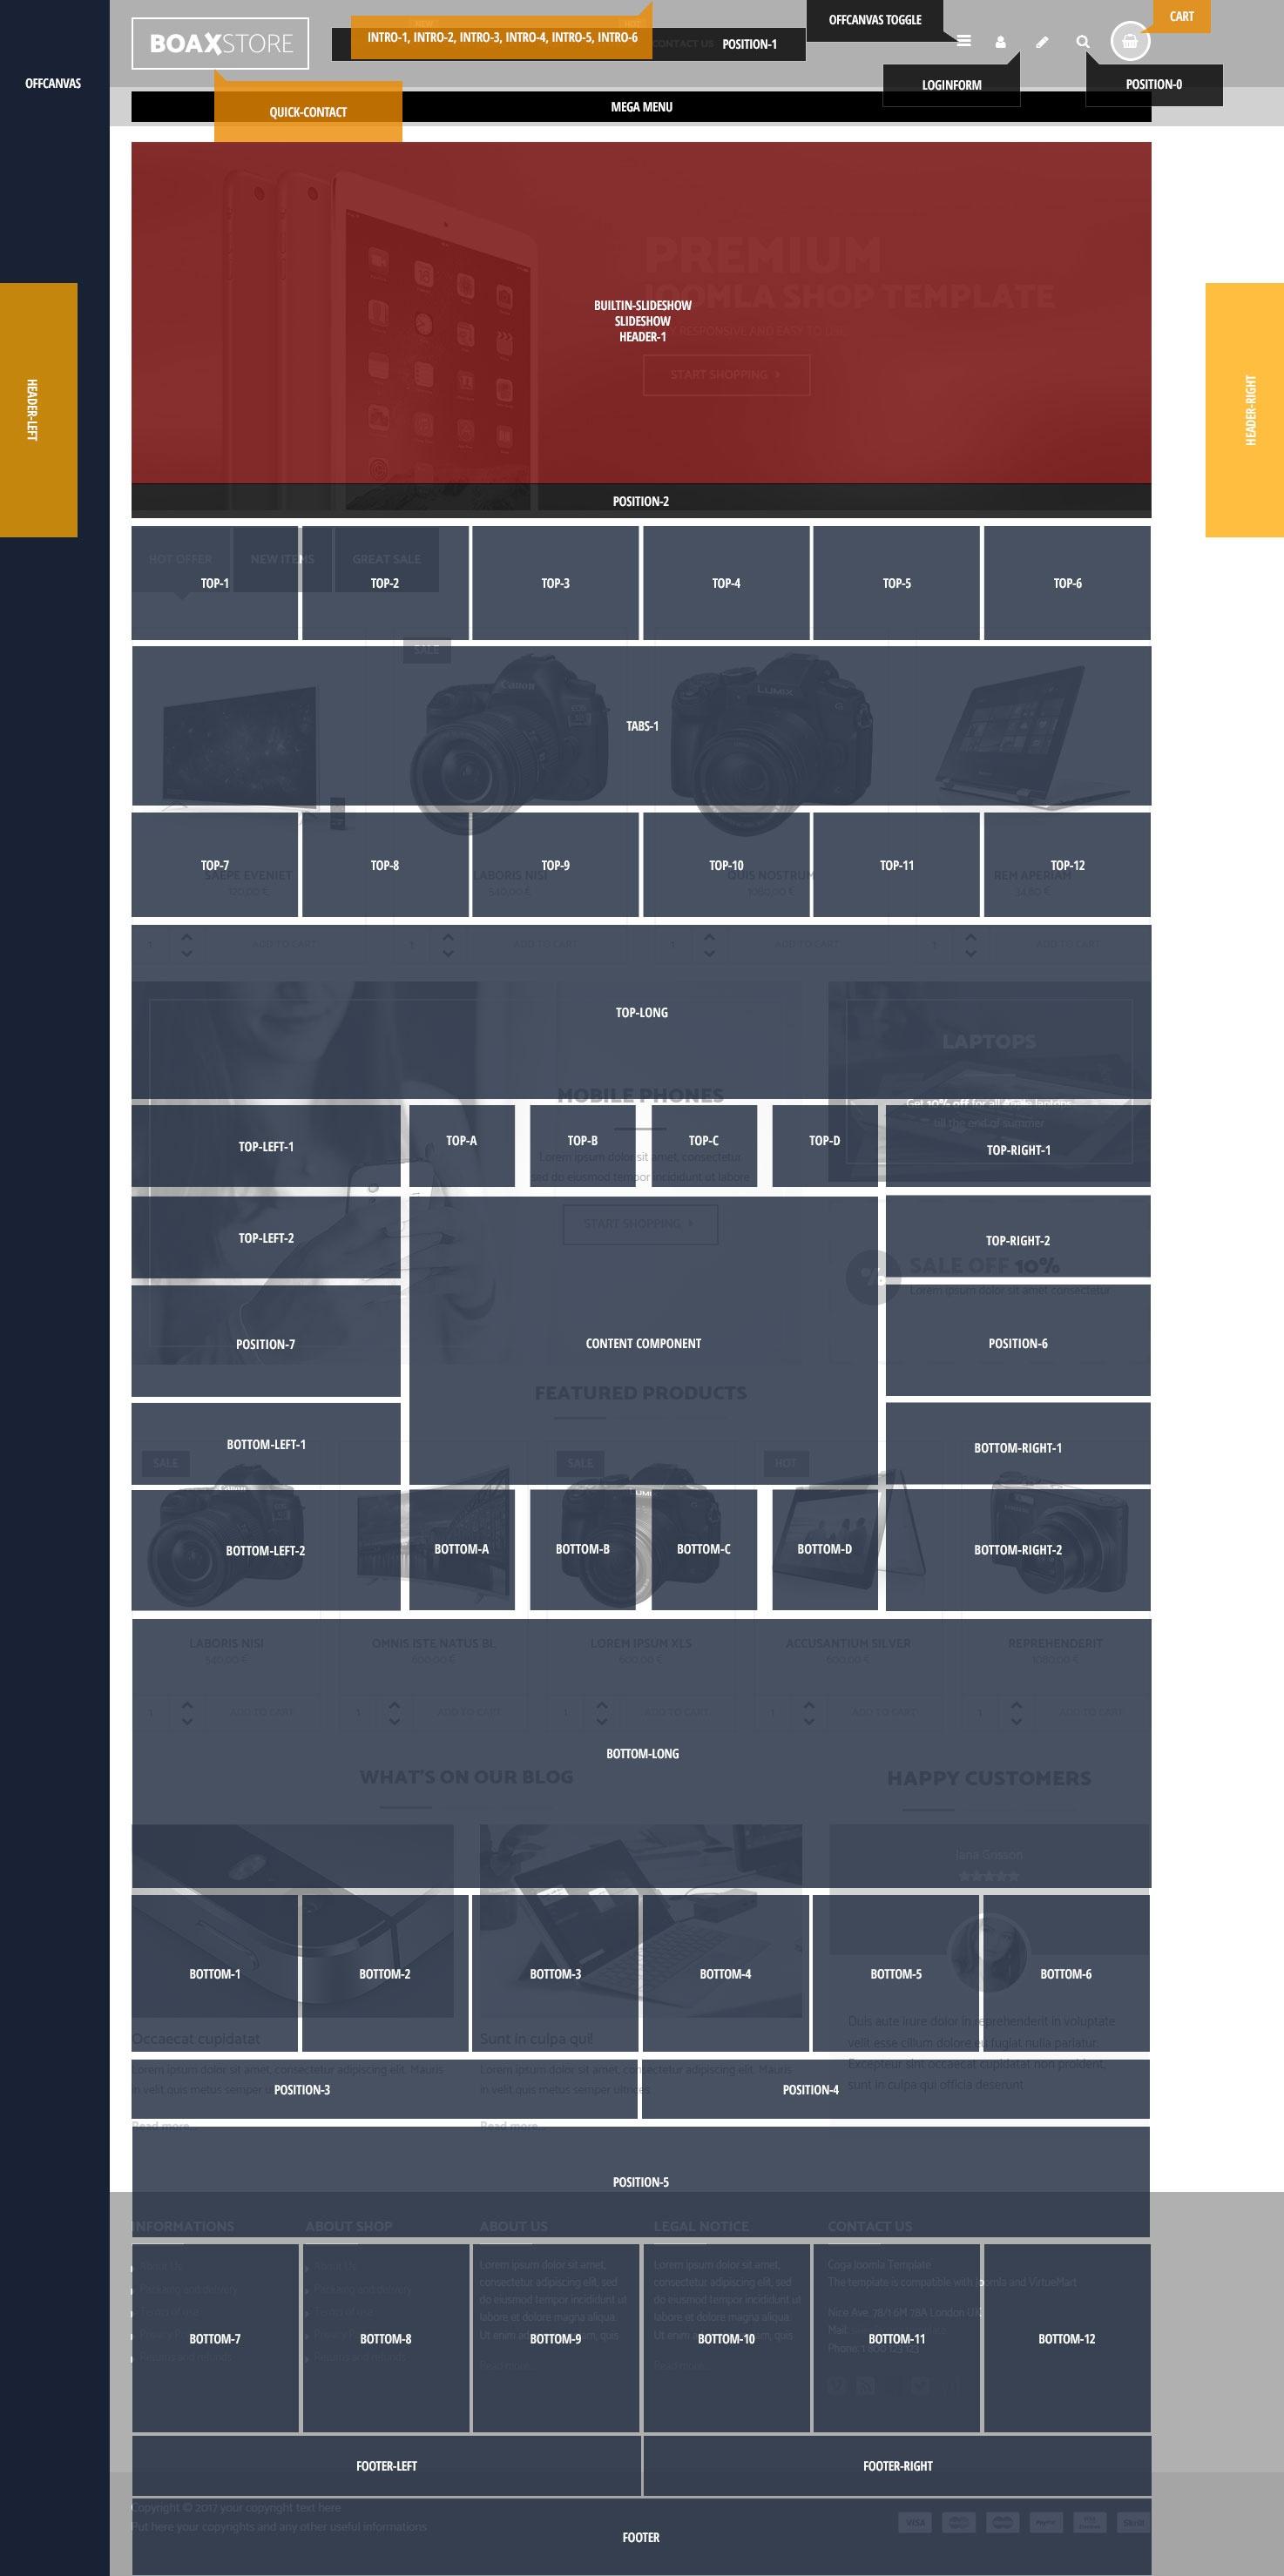
Template Module Positions
The template supports the following module positions
Login form button and register button located at the top of the template use the loginform module position
Drop Down Panel visible on our demo comming with 6 flexible modules positions:
intro-1, intro-2, intro-3, intro-4, intro-5, intro-6.Virtuemart shopping cart module uses the cart module position
The small menu which appears at the top of the template uses the quick-menu module position
Top menu uses the position-1 module position
Joomla or the Virtuemart Search uses the position-0 module position
The slideshow which appears at the top of the template uses the builtin-slideshow module
Pop up left and right boxes uses header-left and header-right module positions.
Breadcrumbs uses the position-2 module position
Top-1, Top-2, Top-3, Top-4, Top-5, Top-6, Top-7 ,Top-8, Top-9, Top-10, Top-11, Top-12 module positions located at the top of the template use custom module positions where you can add your own text or images inside the module positions
Top-left-1, Top-left-2, bottom-left-1 and bottom-left-2 modules appear on the left hand side of the template
Position-7 module position is used to display web site navigation menu or the Virtuemart module navigation menu in the left hand column of the template
Top-long module position which appears in the centre of the template can used for the news flash module or for a custom module
Top-A, Top-B, Top-C, Top-D module positions located at the top / centre of the template use custom module positions
Right module position can be used to publish other modules of your choice to the right module position
top-right-1, top-right-2, bottom-right-1, bottom-right-2 modules appear in the right hand side of the template
Bottom-A, Bottom-B, Bottom-C, Bottom-D module positions located at the bottom of the template use custom module positions
Bottom-long module position appears at the bottom of the template
Bottom-1, Bottom-2, Bottom-3, Bottom-4, Bottom-5, Bottom-6 module positions located at the bottom of the design use custom module positions plus you can publish the latest news or popular news to the module positions to the modules
If you need to put more horizontally aligned modules on the bottom area (over the footer) use:
Bottom-7, Bottom-8, Bottom-9, Bottom-10, Bottom-11, Bottom-12Footer-right module is used to display your website copyright text using a custom module position
Footer-left module is also used to display a menu module
How Do I Access The Template Settings
To access the template settings please complete the following.
Log into your Joomla administrator area
Select the Extensions menu and Template Manager menu
Select the Styles tab
Open the template you have installed by clicking on the template link from the list of templates
You will now see the template settings as show in the screen shot below
For more information about how to use each setting included in the template control panel PLEASE HOVER OVER THE TEXT NEXT TO EACH SETTING
You can also find out more information how to use the template settings by logging into the http://www.virtuemarttemplates.net site and visiting the knowledgebase
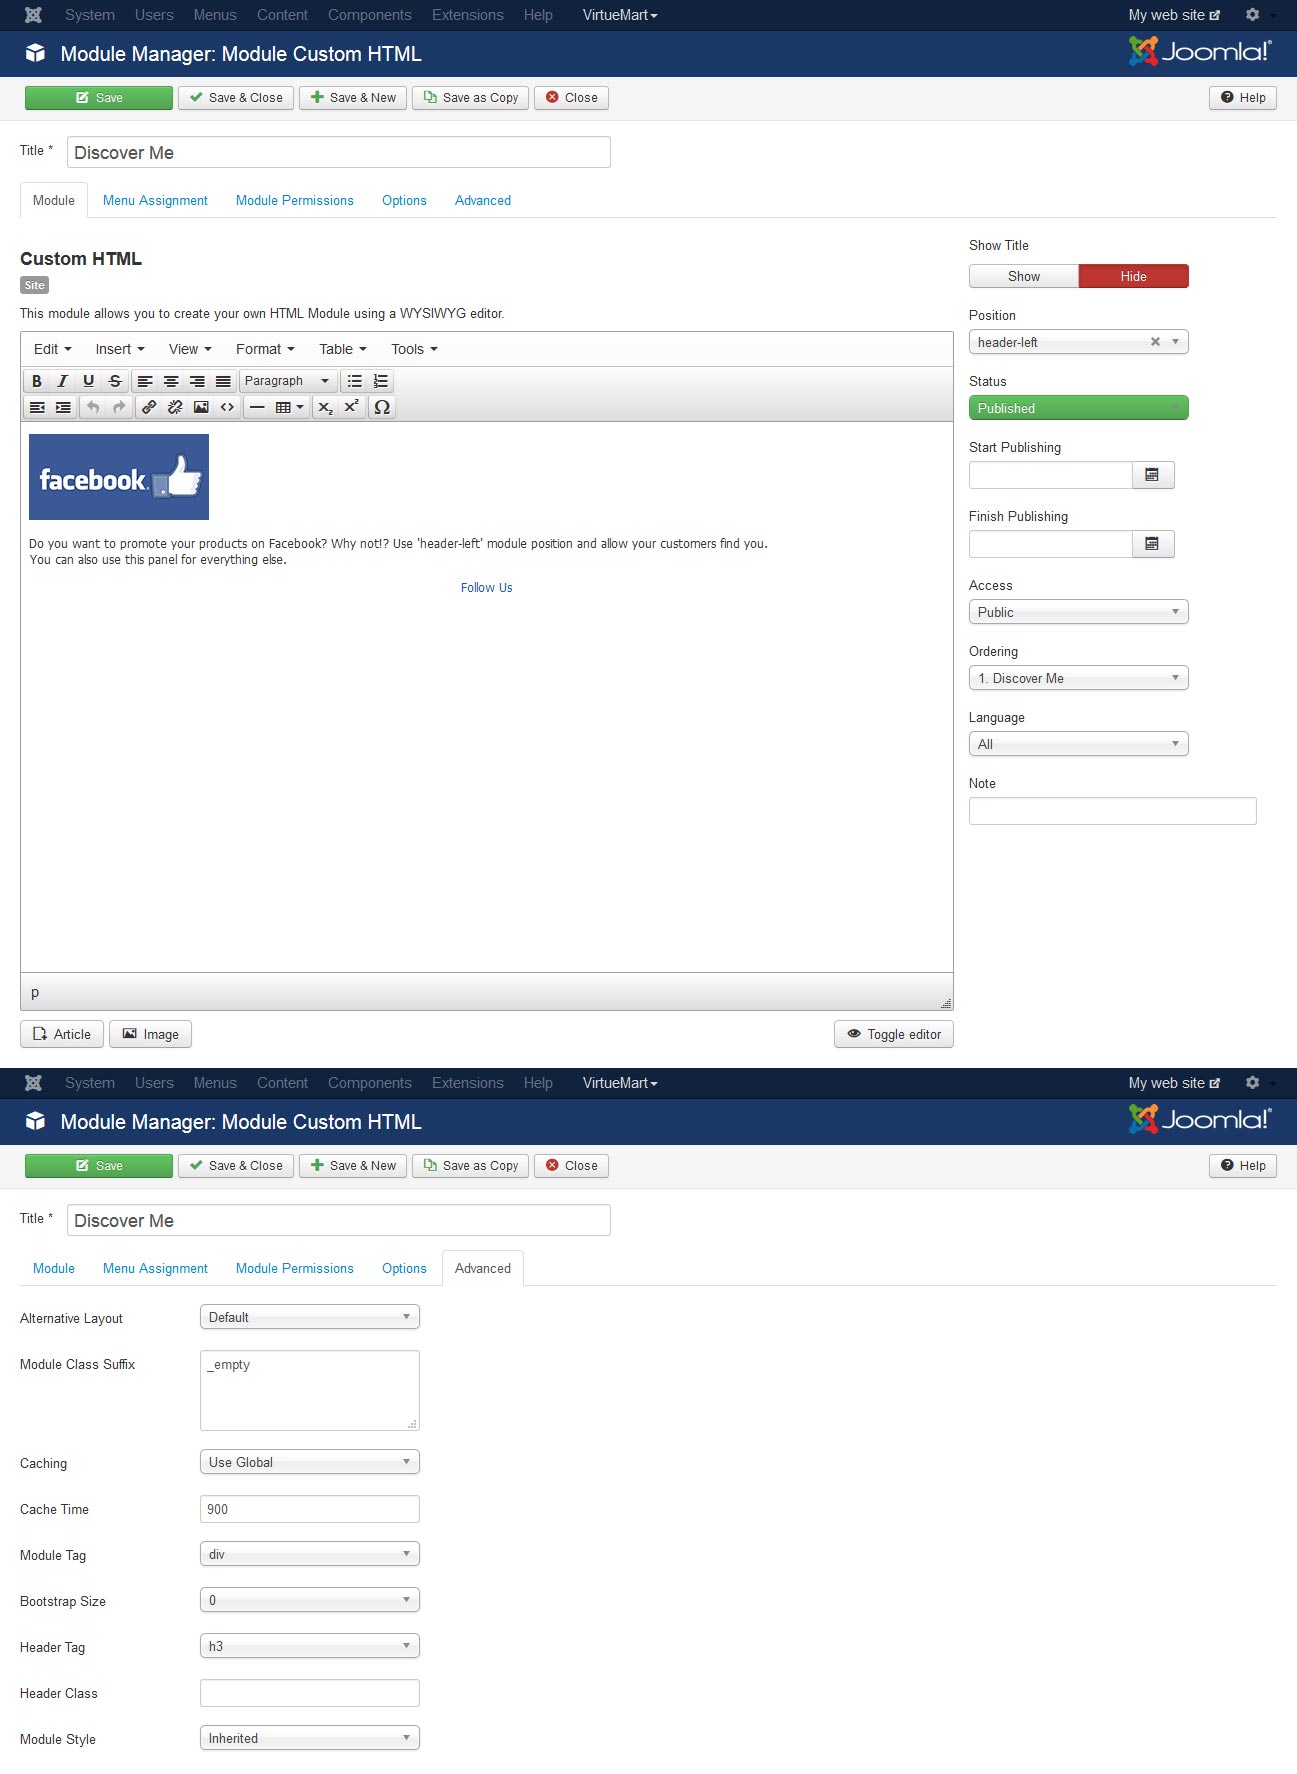
How Do I Create The Custom Modules
To create a custom module position complete the following steps
From the Joomla administrator select the Content Menu and Site Module menu.
Select the New button
Select the Custom HTML option
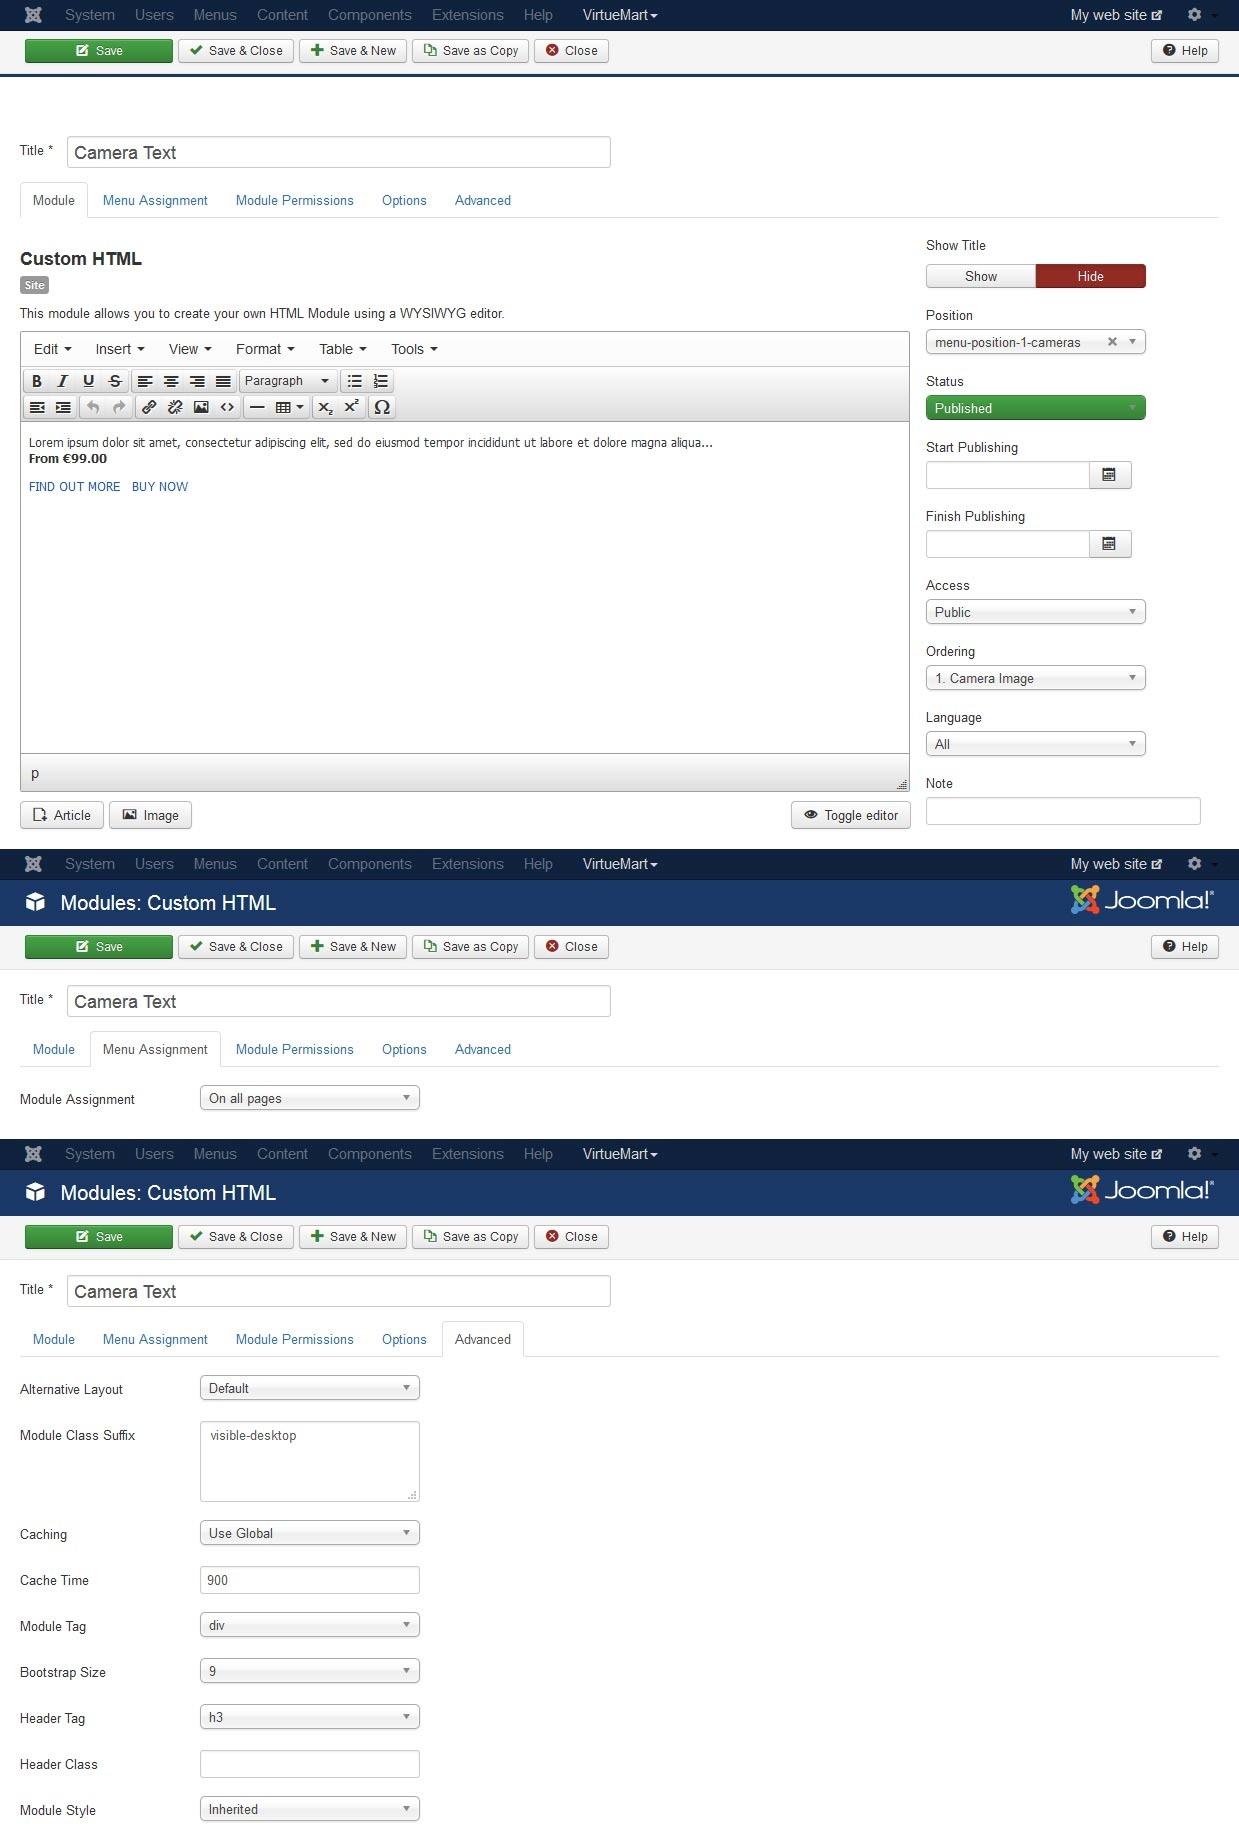
Now setup the module as show in the screen shots below.
When you have setup the custom module select the Save & Close button to save and publish the module to your Joomla site.
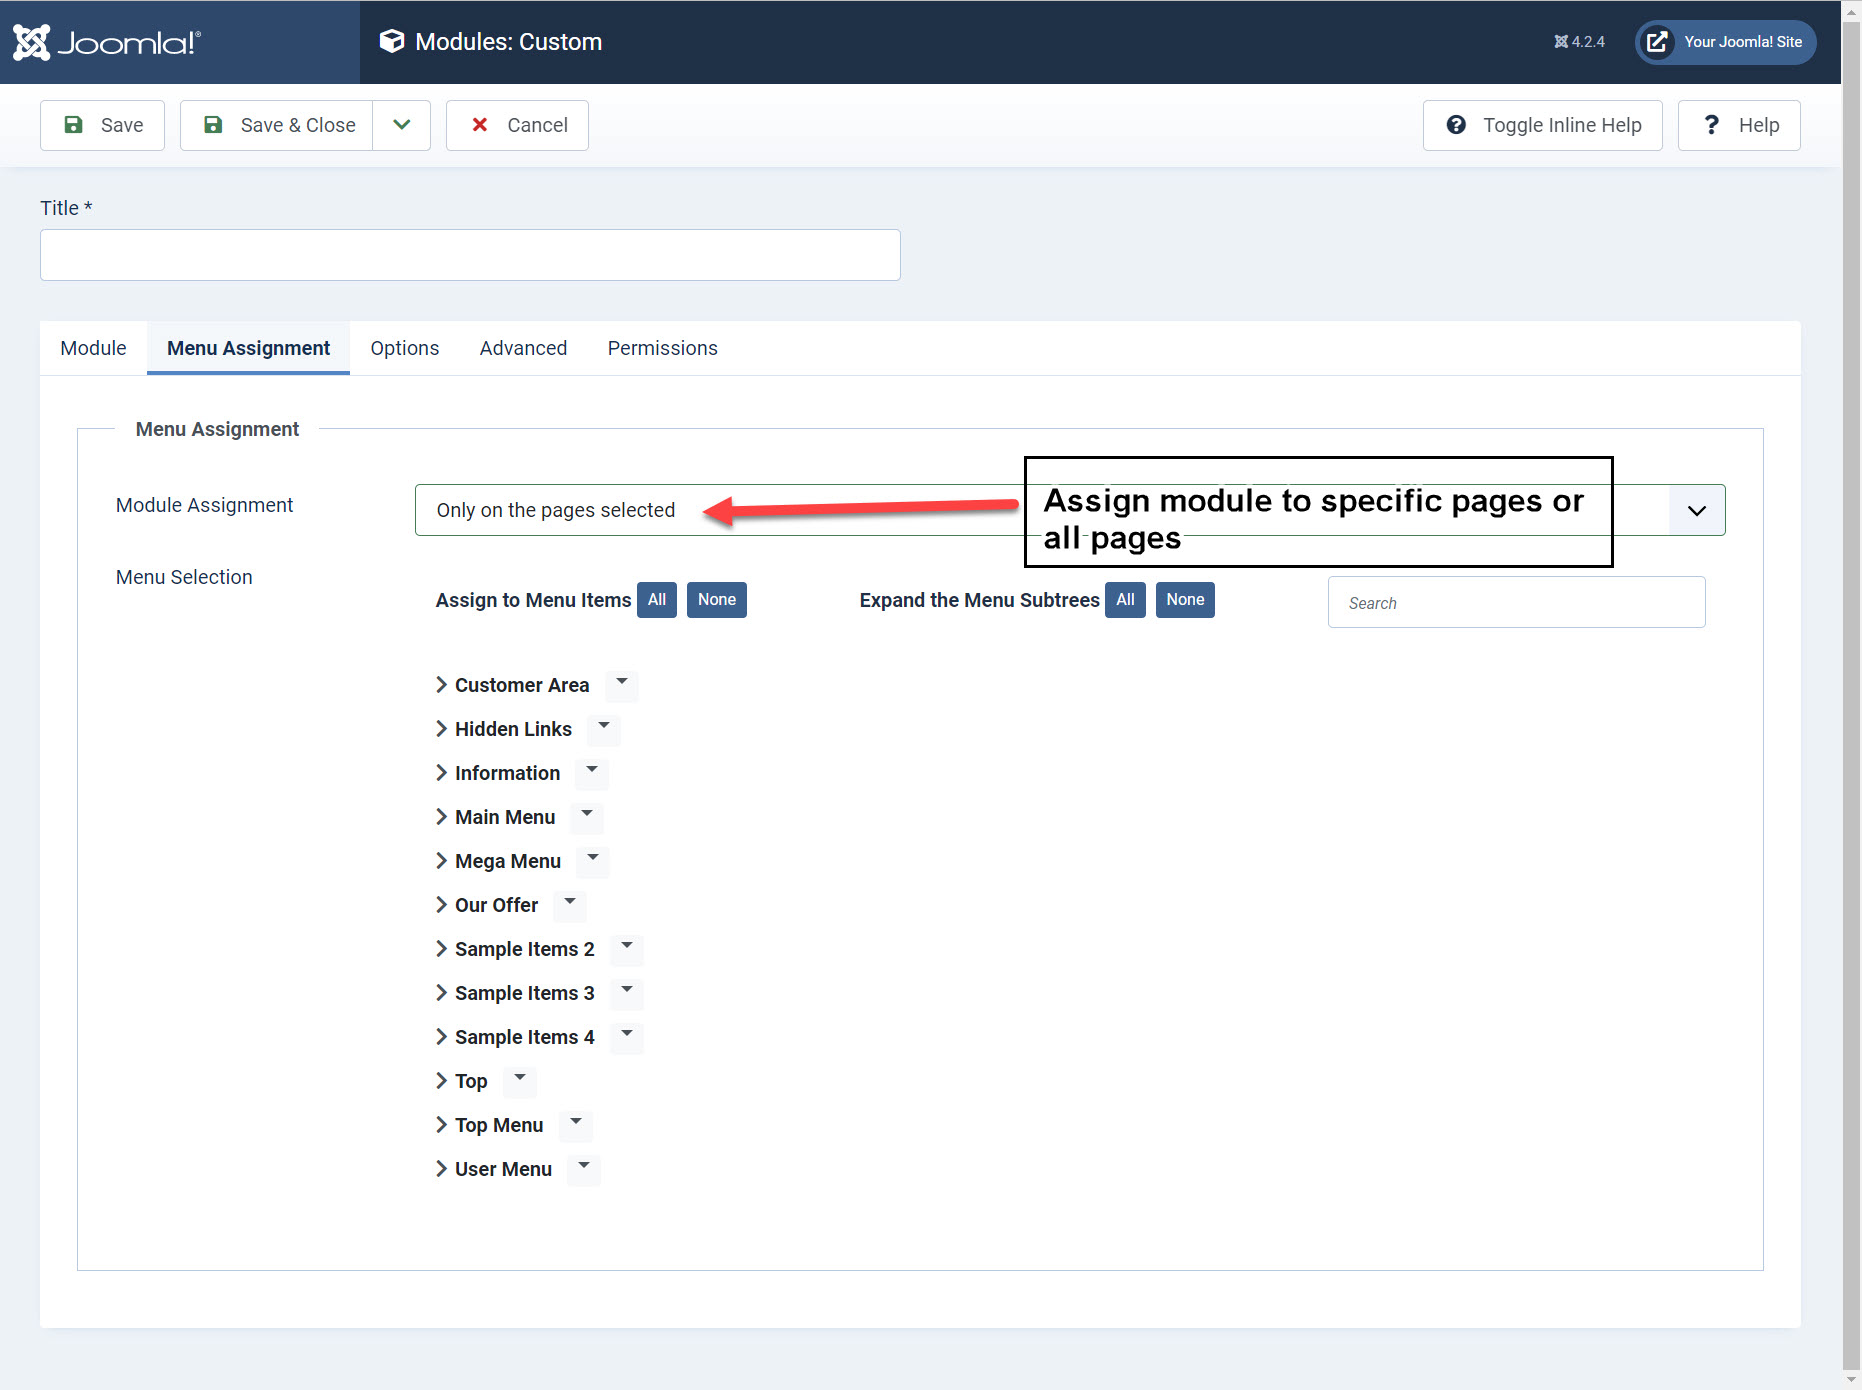
If you want the module position to appear on ALL pages you need to assign the module positions to ALL the menu items
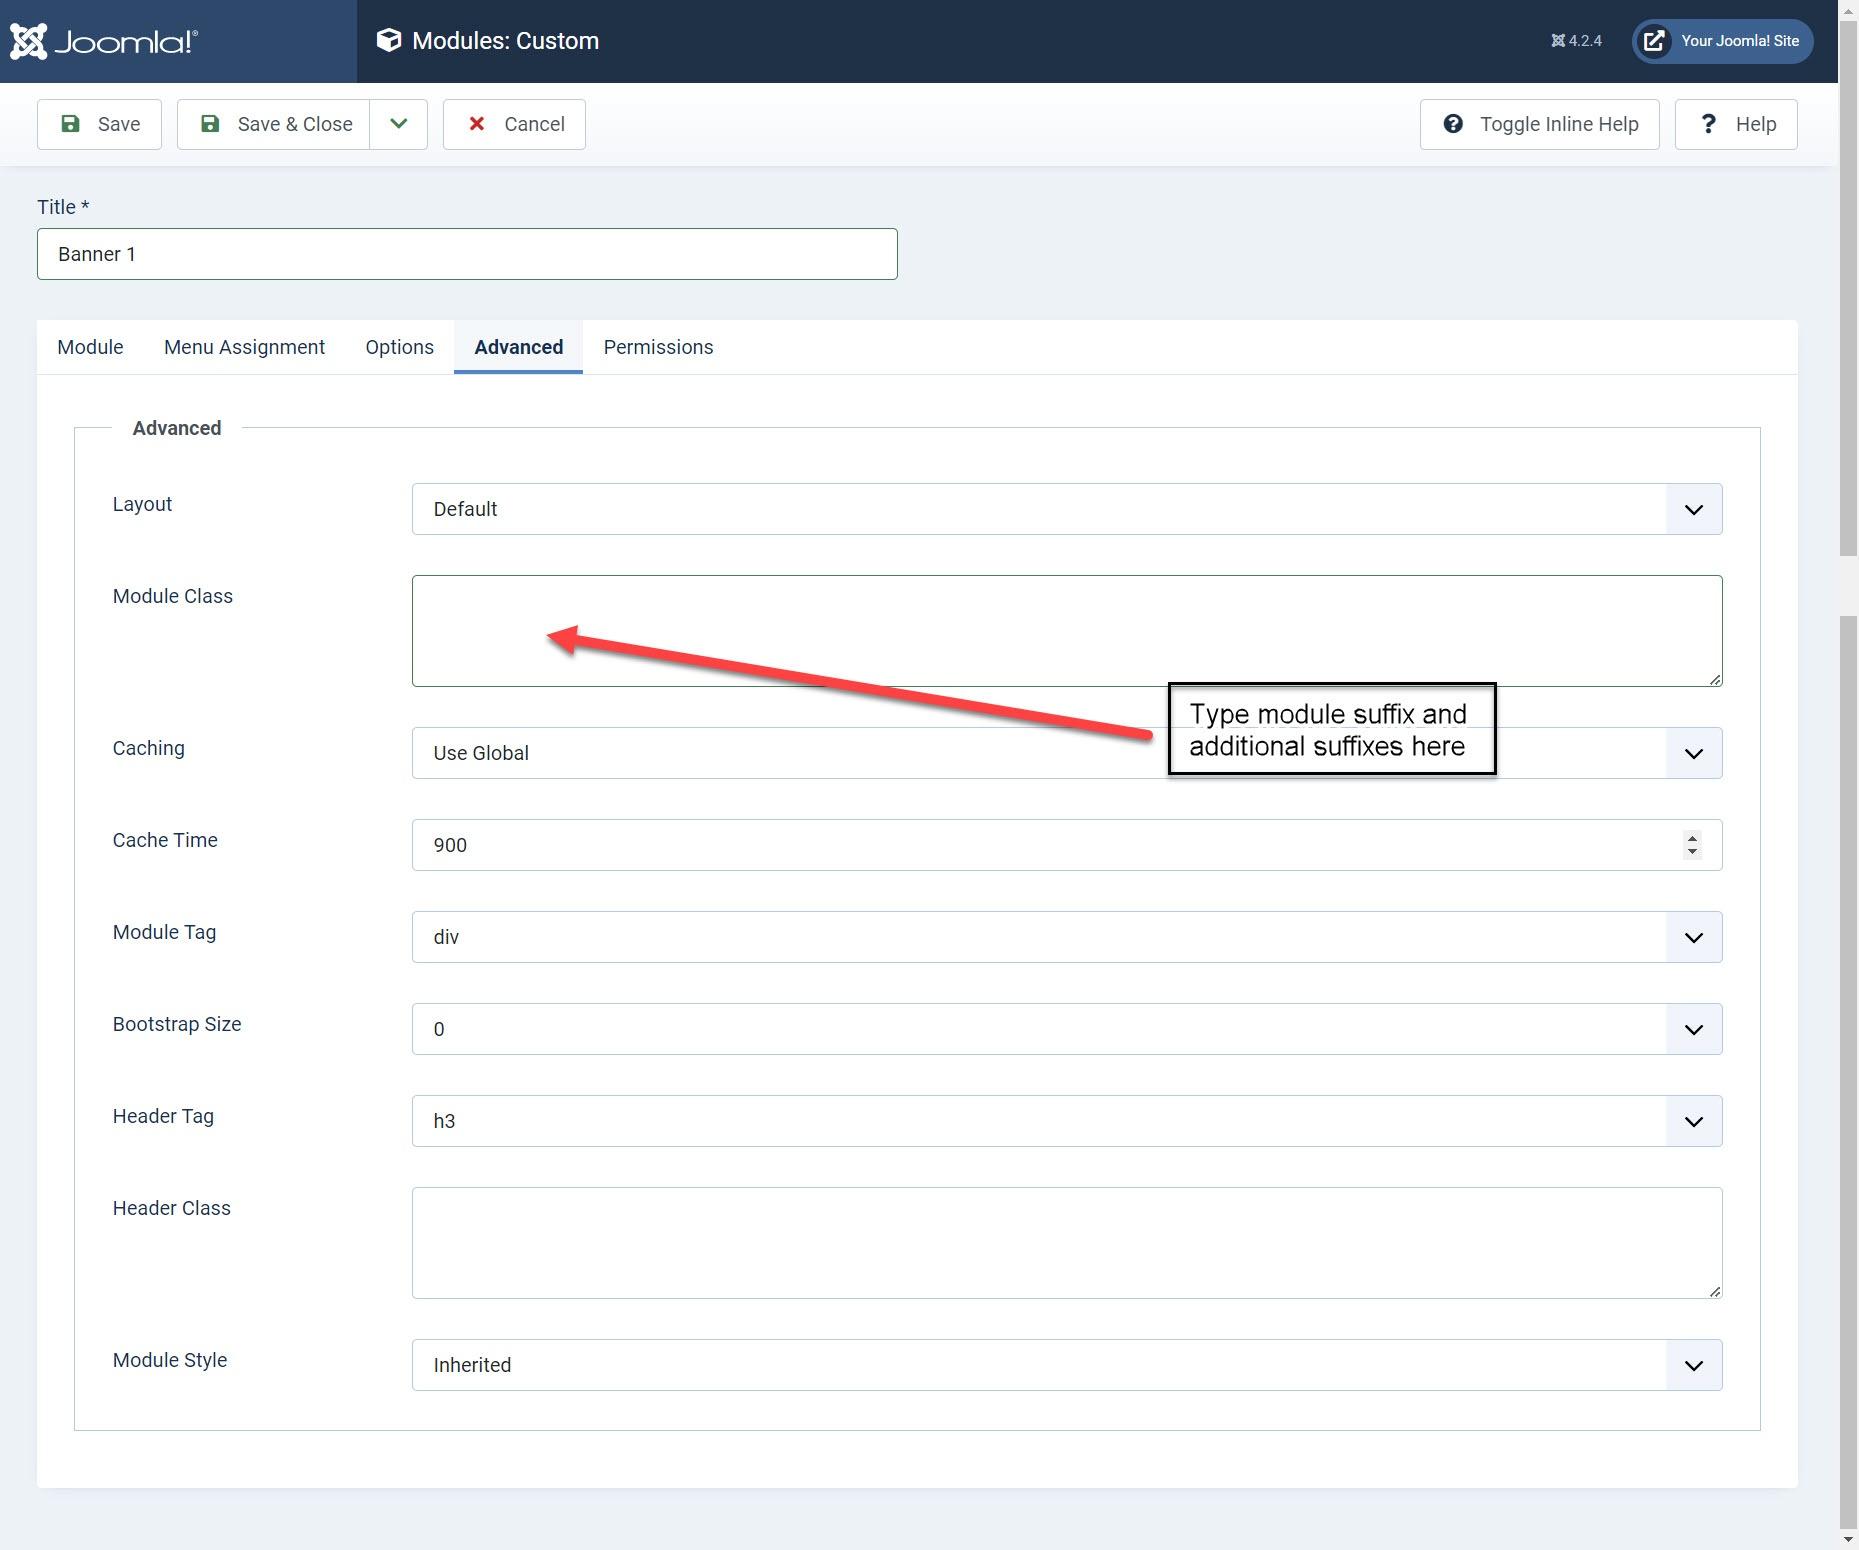
The template provides following module class suffixes you can use for the custom modules:
- _style1
- _style2
- _style3
- _style4
- _style5
- _style6
- _style7
- _style8
- _style9
Additionaly for modules with suffix _style3, _style4, _style5 and _style6 you can use an additional color suffixes: color1, color2 and color3. Make sure you put an empty space before additional suffix, for example:
_style3 color3
To add an animation for module so, it would appear during scrolling your website use one of following additional suffixes: moveup, movedown, moveleft or moveright. Make sure you put an empty space before additional suffix, for example:
_style3 moveleft
_style3 color1 moveup
With modules where you used _style3 or _style5 module class suffix you can also use 2 more additional suffixes:
shadow - to add a shadow to module
radius - to add rounded corners to the module
Examples:
_style3 color2 radius
_style5 color1 shadow
The template allows you to use parallax background for custom modules. To add a parallax background to the module select an image on Options tab of the module, use _style7 module suffix and change style module to parallax in Module Style field. To align the text vertically you can use one of following additional suffixes: text-top, text-middle or text-bottom, for example: _style7 text-bottom - this settings will set the text on bottom of the module.
A module with _style8 module class suffix allows you to put a text and an image on background. To set up a module with image on background please create new Custom module in Extensions -> Modules and on Options tab select an image you want to use on background. On Advanced tab type _style8 in Module Class Suffix field and on Module tab type your text.


How Do I Set Up Front Page Tabs
Tabs Module Position automatically puts your modules into the tabs. To set tabs on your front page publish your modules to tabs-1 module position. Module title will be used as a tab label.
If you used any additional module class suffix for custom module published to the tabs-1 module position the tabs will use its label and background color.
How Do I Add The Read More Button To The Custom Module
To add the read more button which appears in the custom module position complete the following
Open up the custom module position you have created
Scroll down to the WYSIWYG editor at the bottom of the module position
Select the tools menu and source code menu in the WYSIWYG editor to open the HTML window
Under the text you have entered into the custom module position copy and paste this text into the HTML window
<p><a class="button" href="#">Read More</a></p>
Change the # to the web site address for the article you want to point the read more button to.
Save the changes
Read more button will now appear in the custom module position you have created
The templates provides second type of styling for buttons. To use 2nd style for button use one of following additioanl classes: light black, light white, for example:
<p><a class="button light black" href="#">Read More</a></p>

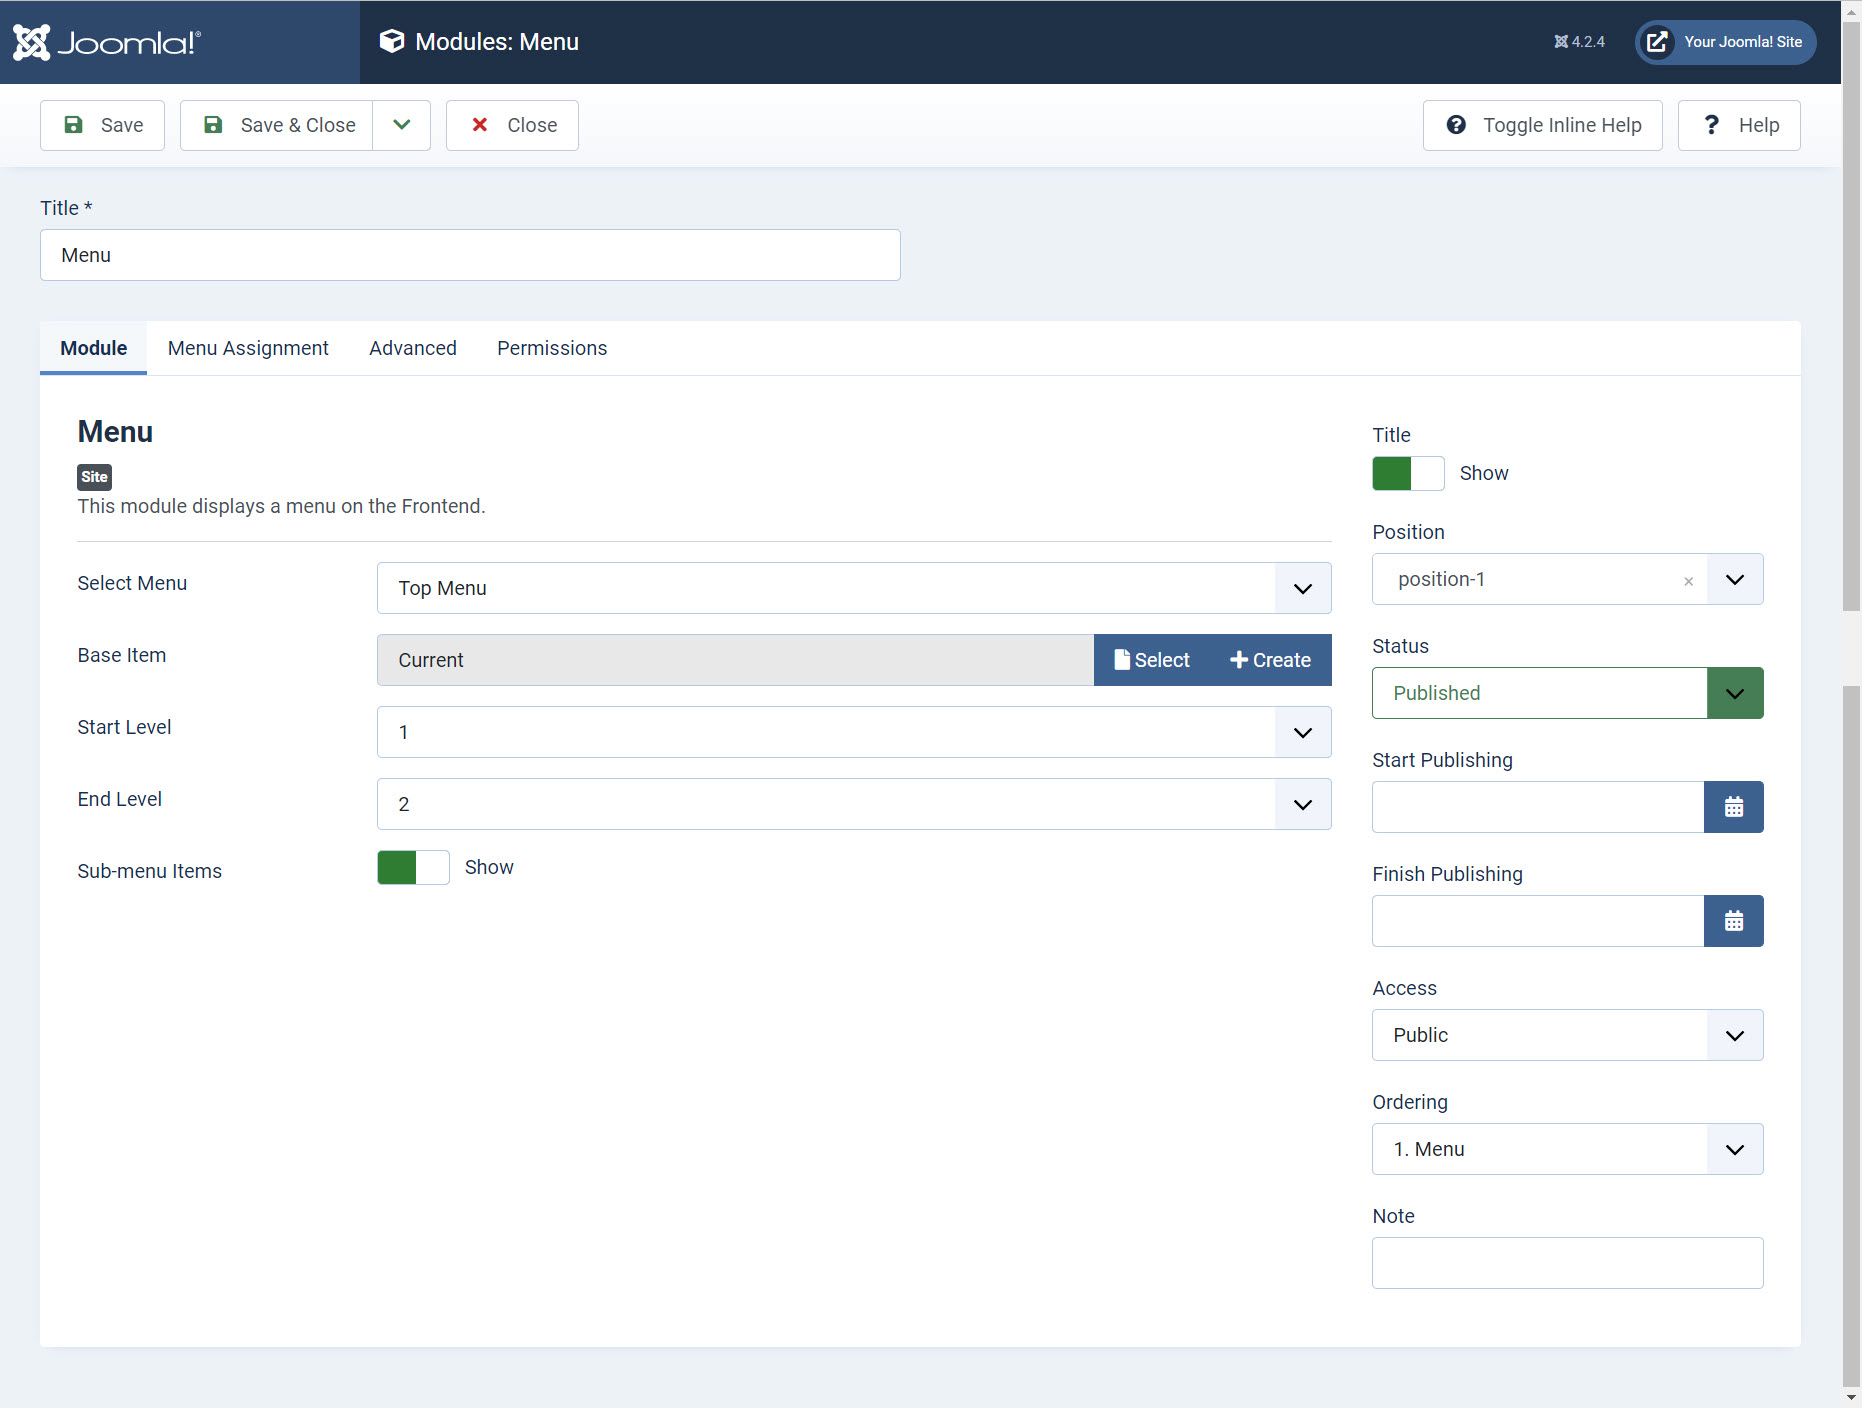
Top Menu Module Settings
To change the top menu module menu style please complete the following.
From the Joomla Administrator area select the Systems menu and modules Site Module
Now select the top menu module which needs to use the position-1 module position.
In the Menu Tag ID field enter nav
In the Menu Class Suffix field enter -nav
To enable the drop down menu for the top menu position set the "Always show sub-menu items" to YES
Click on the save button.


How Do I Set Up Ribbon On Top Menu Item
Nice eye-catching ribbon can be easy added to your menu item.
- Open Menus -> Your Top Menu and select menu item you want to add a ribbon to
- Find Note field and type a lable for your ribbon
- Click Save & Close.

How Do I Set Up The Built-in Mega Menu
To set up the built-in mega menu please follow these steps:
First of all prepare a new menu which will be used for mega menu. Make sure you add only a first level menu items (without sub-items) to your new menu.
To add new menu please go to Menus -> Manage -> Add New Menu. For the demo purposes we called our menu 'Mega Menu'.
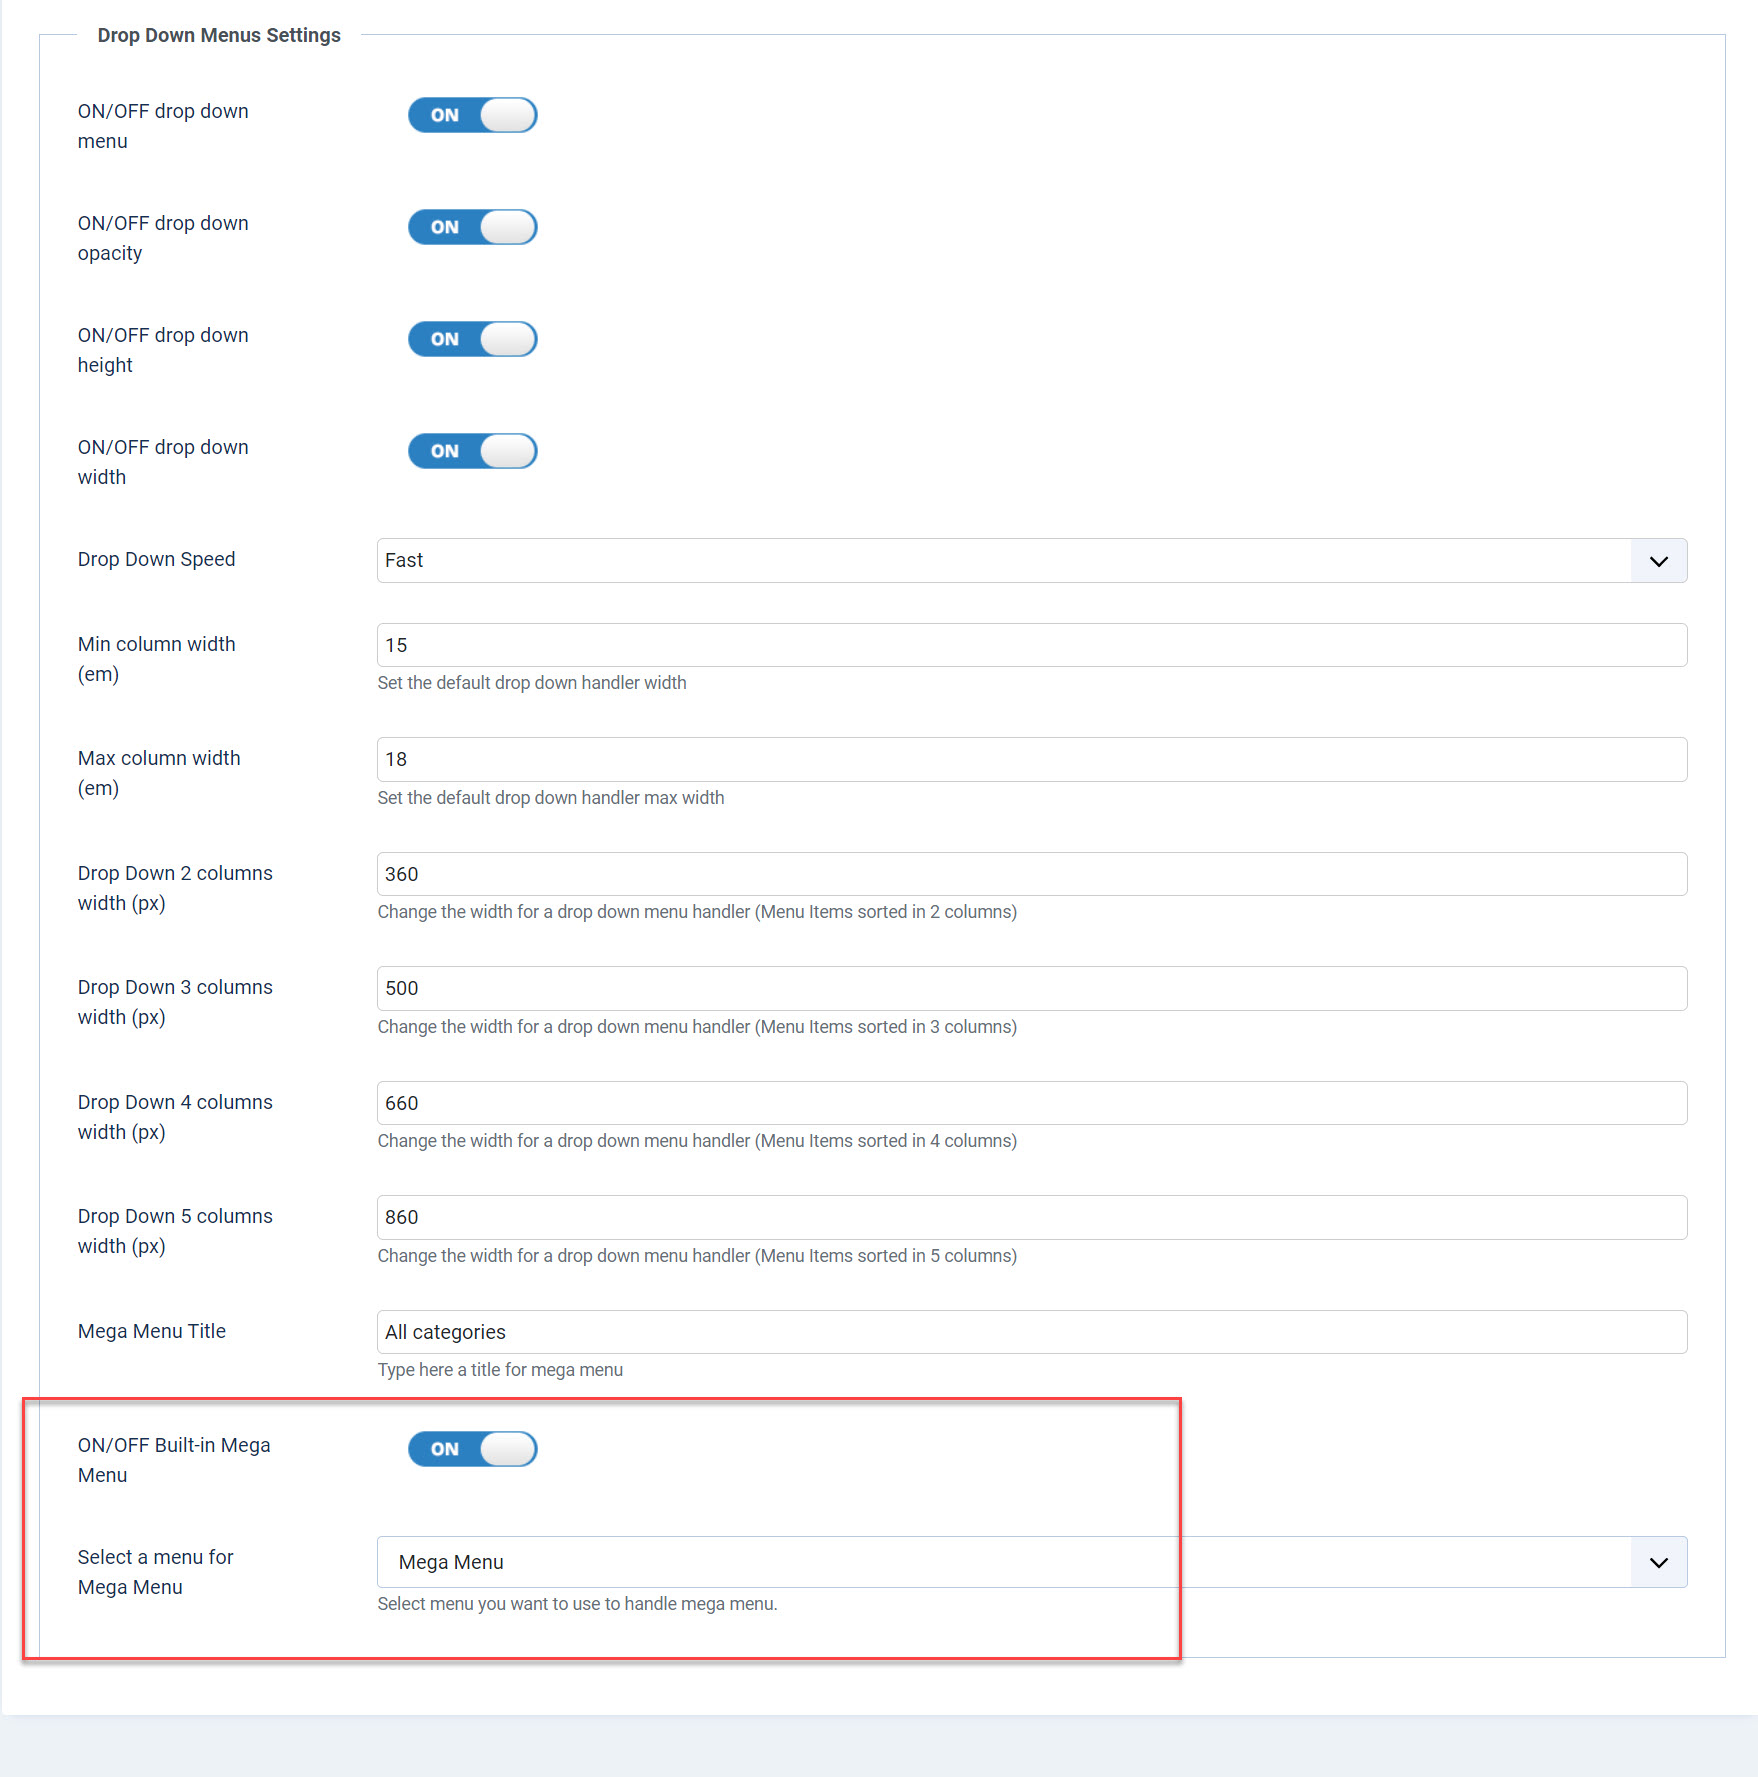
Now you need to turn on the mega menu and select a menu which will be used for mega menu purposes. To do this please go to Extensions -> Templates and click the template name to open the template settings. Now select Drop Down Menu Settings tab and set up mega menu settings as following:

Your mega menu is now ready to use. Now you can add a sub-items and any module you want to use. To add a sub-items menu please go to Menus -> Manage -> Add New Menu and create new menu - called for example Smart Phones Items.
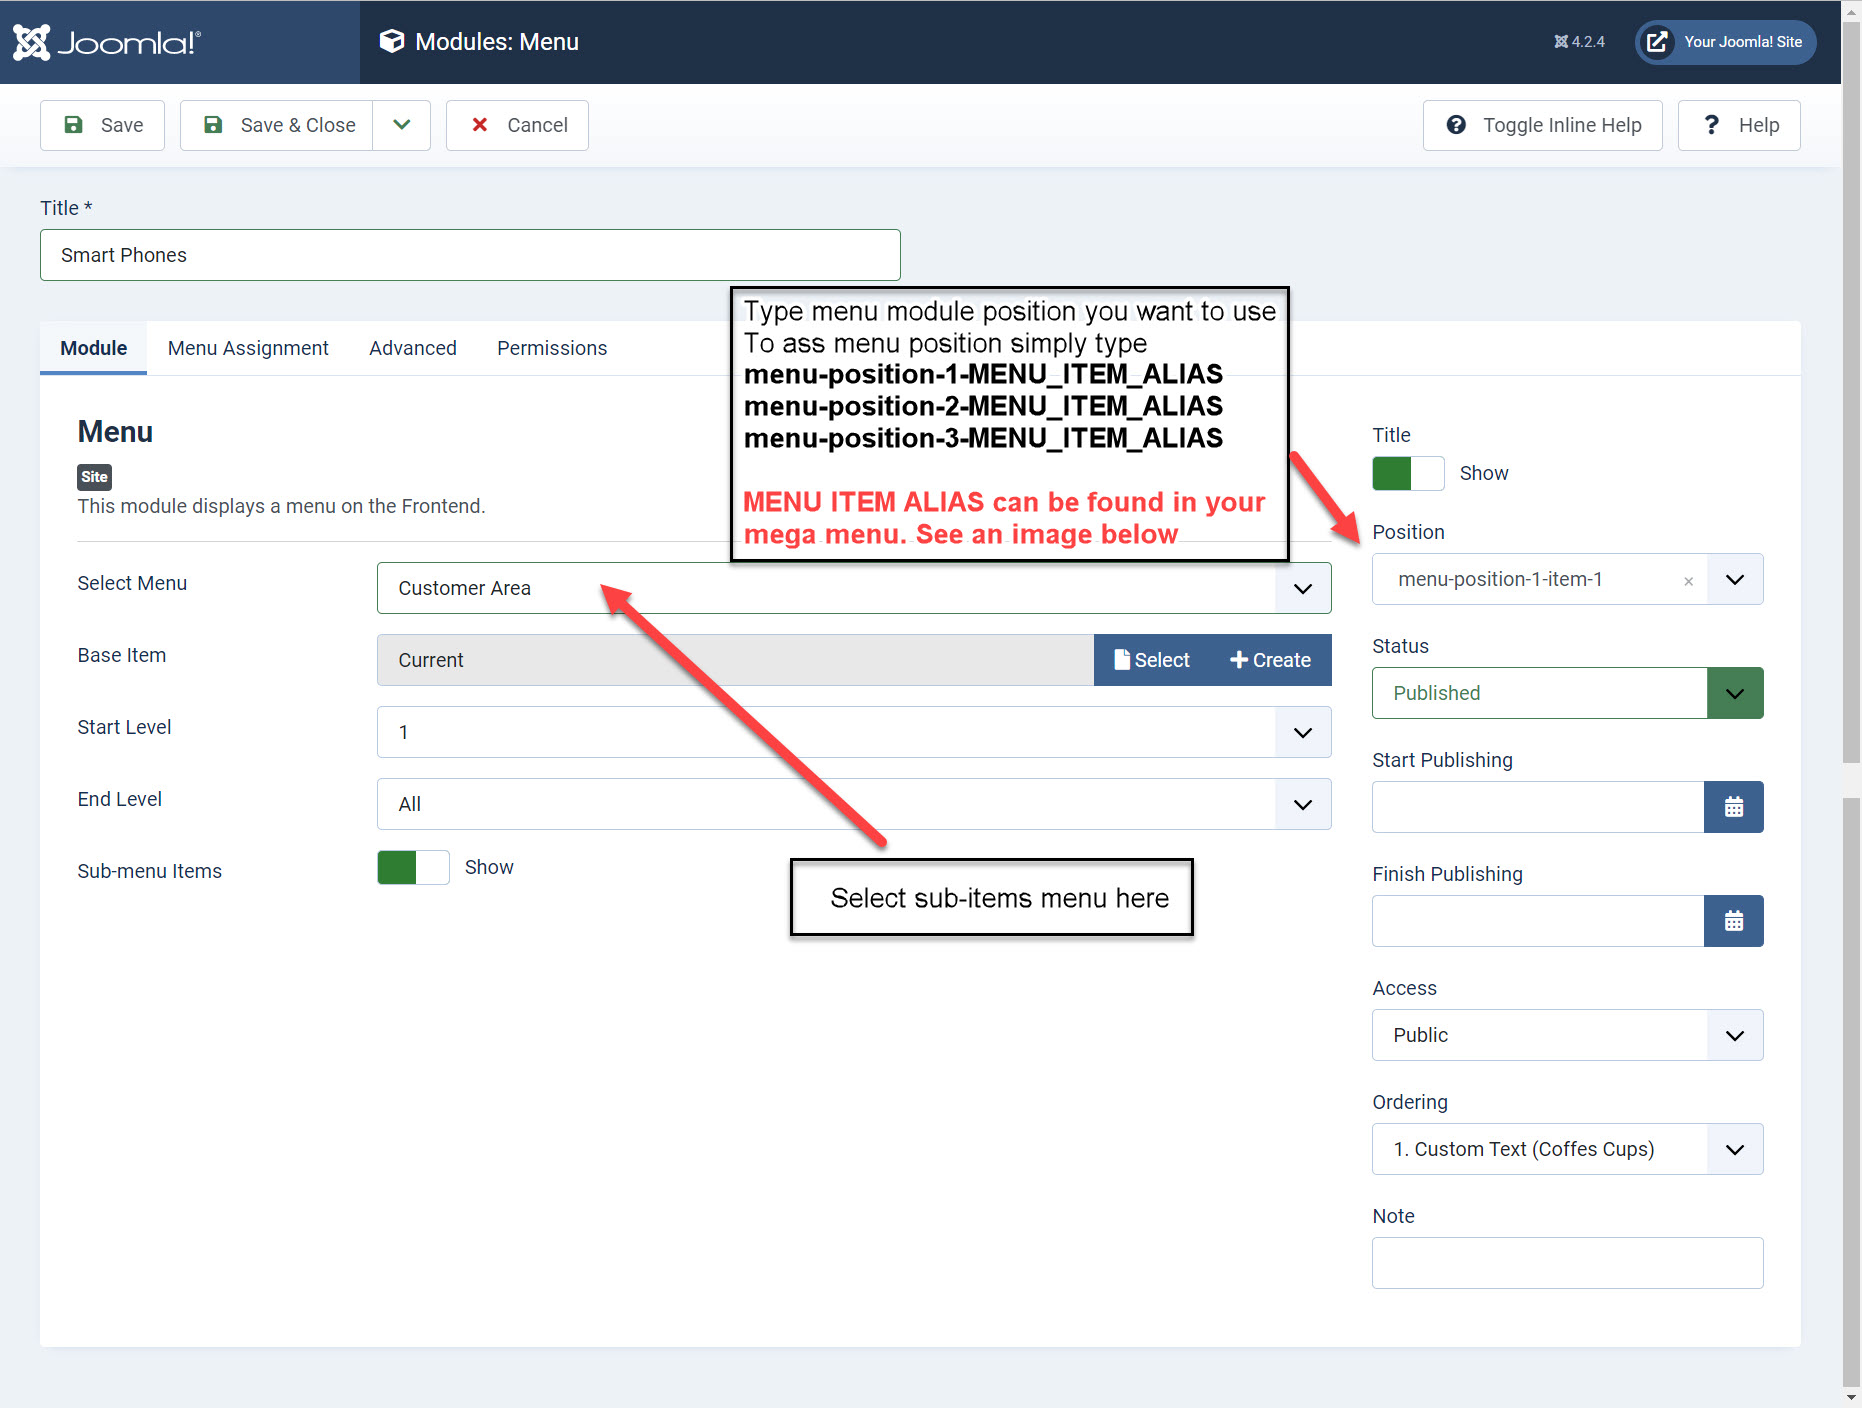
Now, to add you sub-items menu to mega menu please go to Extensions -> Modules and add new Menu module. Provide following settings:


Where can I find MENU ITEM ALIAS
Menu Item alias has been created automatically when you added menu items to your Mega Menu menu in Menus -> Manage.

You can add up to 12 modules into one module position. There is available 3 modules position which can be used with menu items as following:
menu-position-1-MENU_ITEM_ALIAS
menu-position-2-MENU_ITEM_ALIAS
menu-position-3-MENU_ITEM_ALIAS
So, to could use modules positions under Watches menu item as on our demo simply add watches alias to could publish modules:
menu-position-1-watches
menu-position-2-watches
menu-position-3-watches
IMPORTANT! - please note the modules positions are not available on the list of predefined modules position in module settings. You need to type module position name in Position field as following:

- Set up sub-items handler width
Each menu item sub-items handler can use specific width. To set up the width please simply do following:
1. Go to Menus -> Mega Menu created before
2. Open menu item settings, open Link Type tab and type a width in 'Link Class Style'

- Add more modules to mega menu
You can add any type of module to the mega menu. For the demo purposes we added some custom HTML modules. Please see the settings for Custom HTML module published under 'Coffee Cups' menu item


How do I set up an off-canvas area
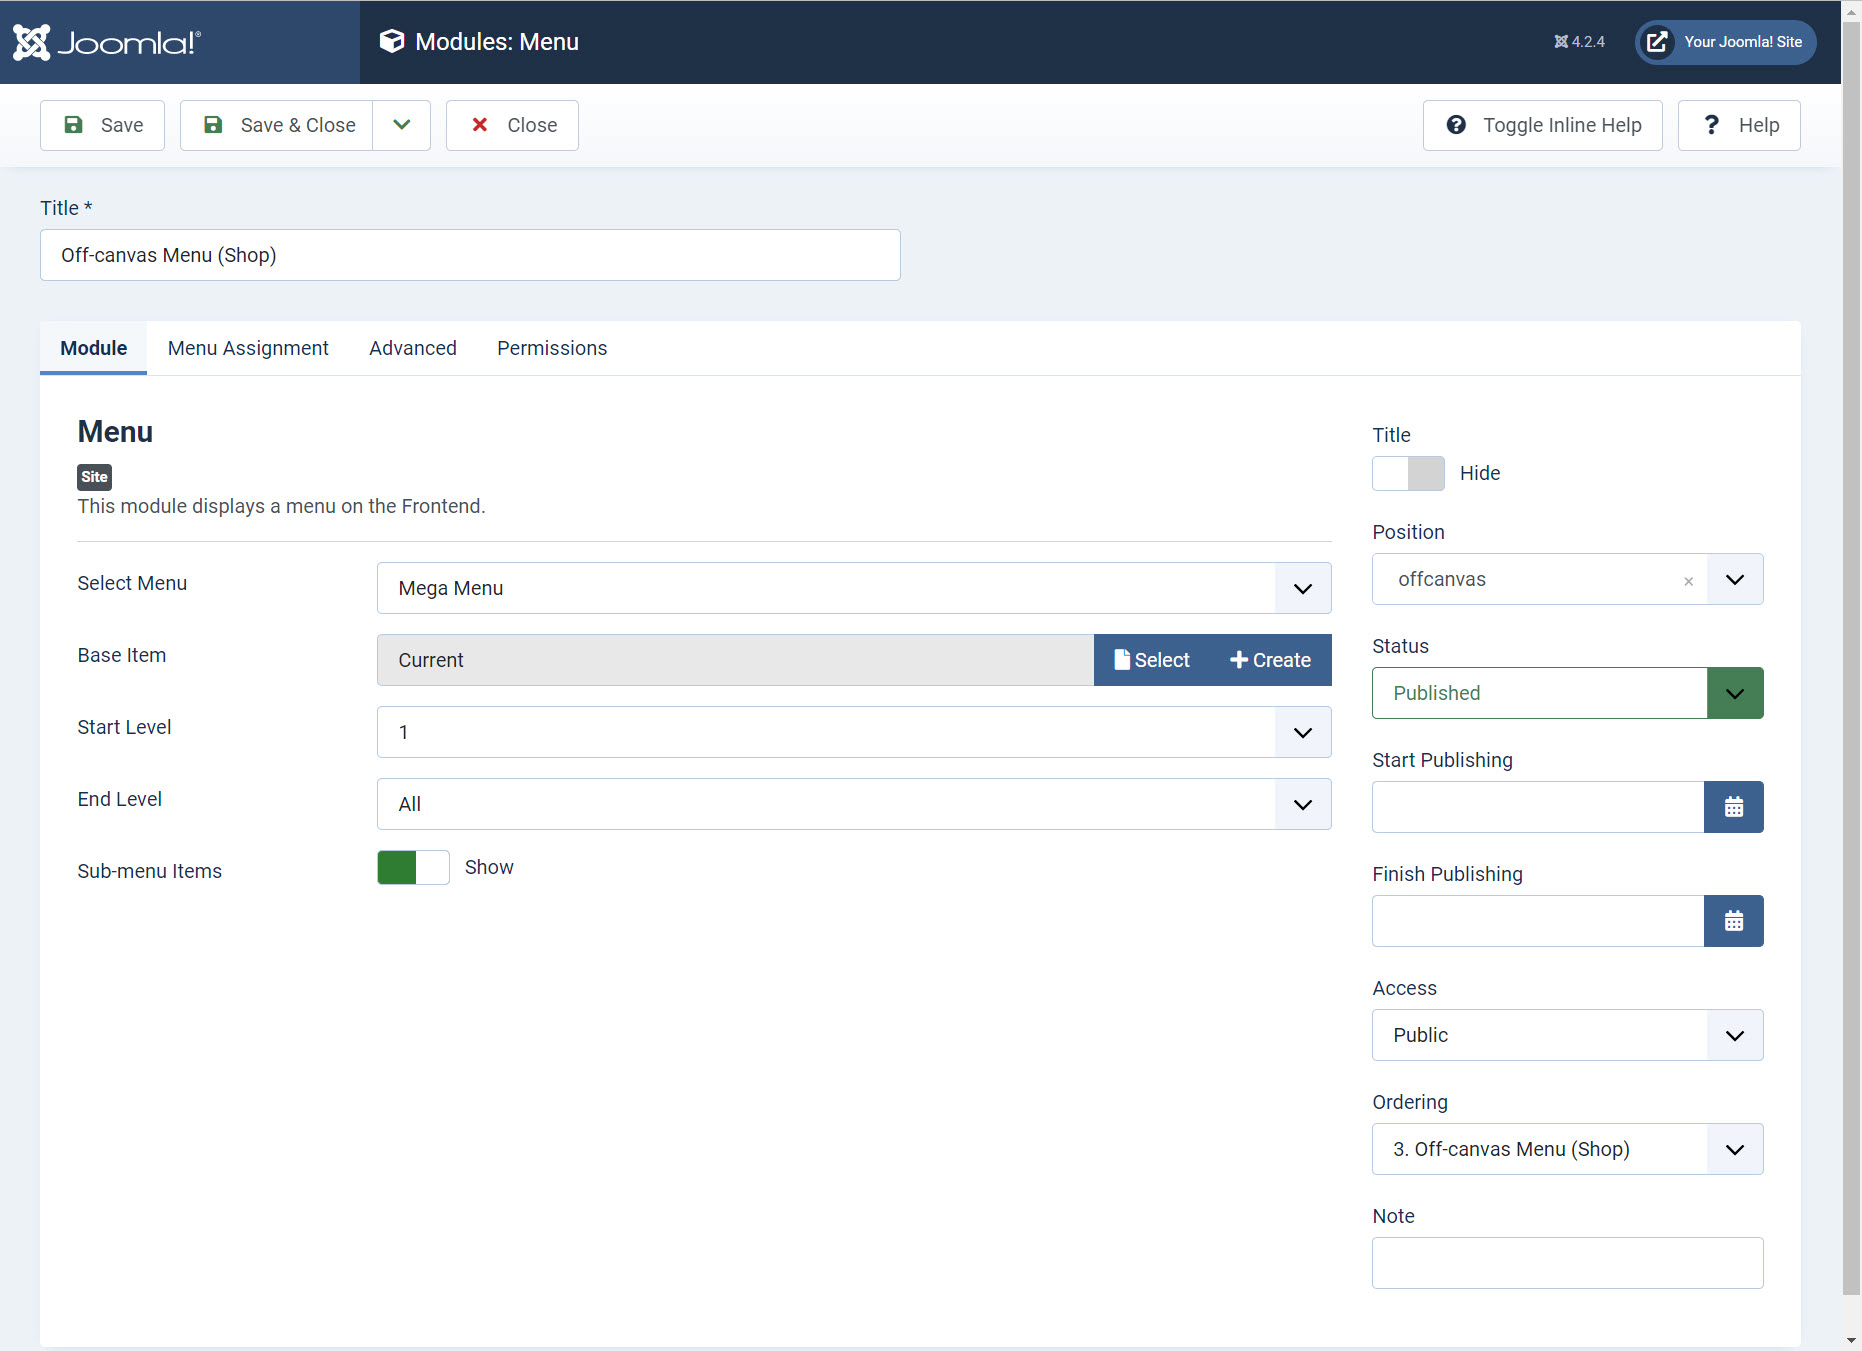
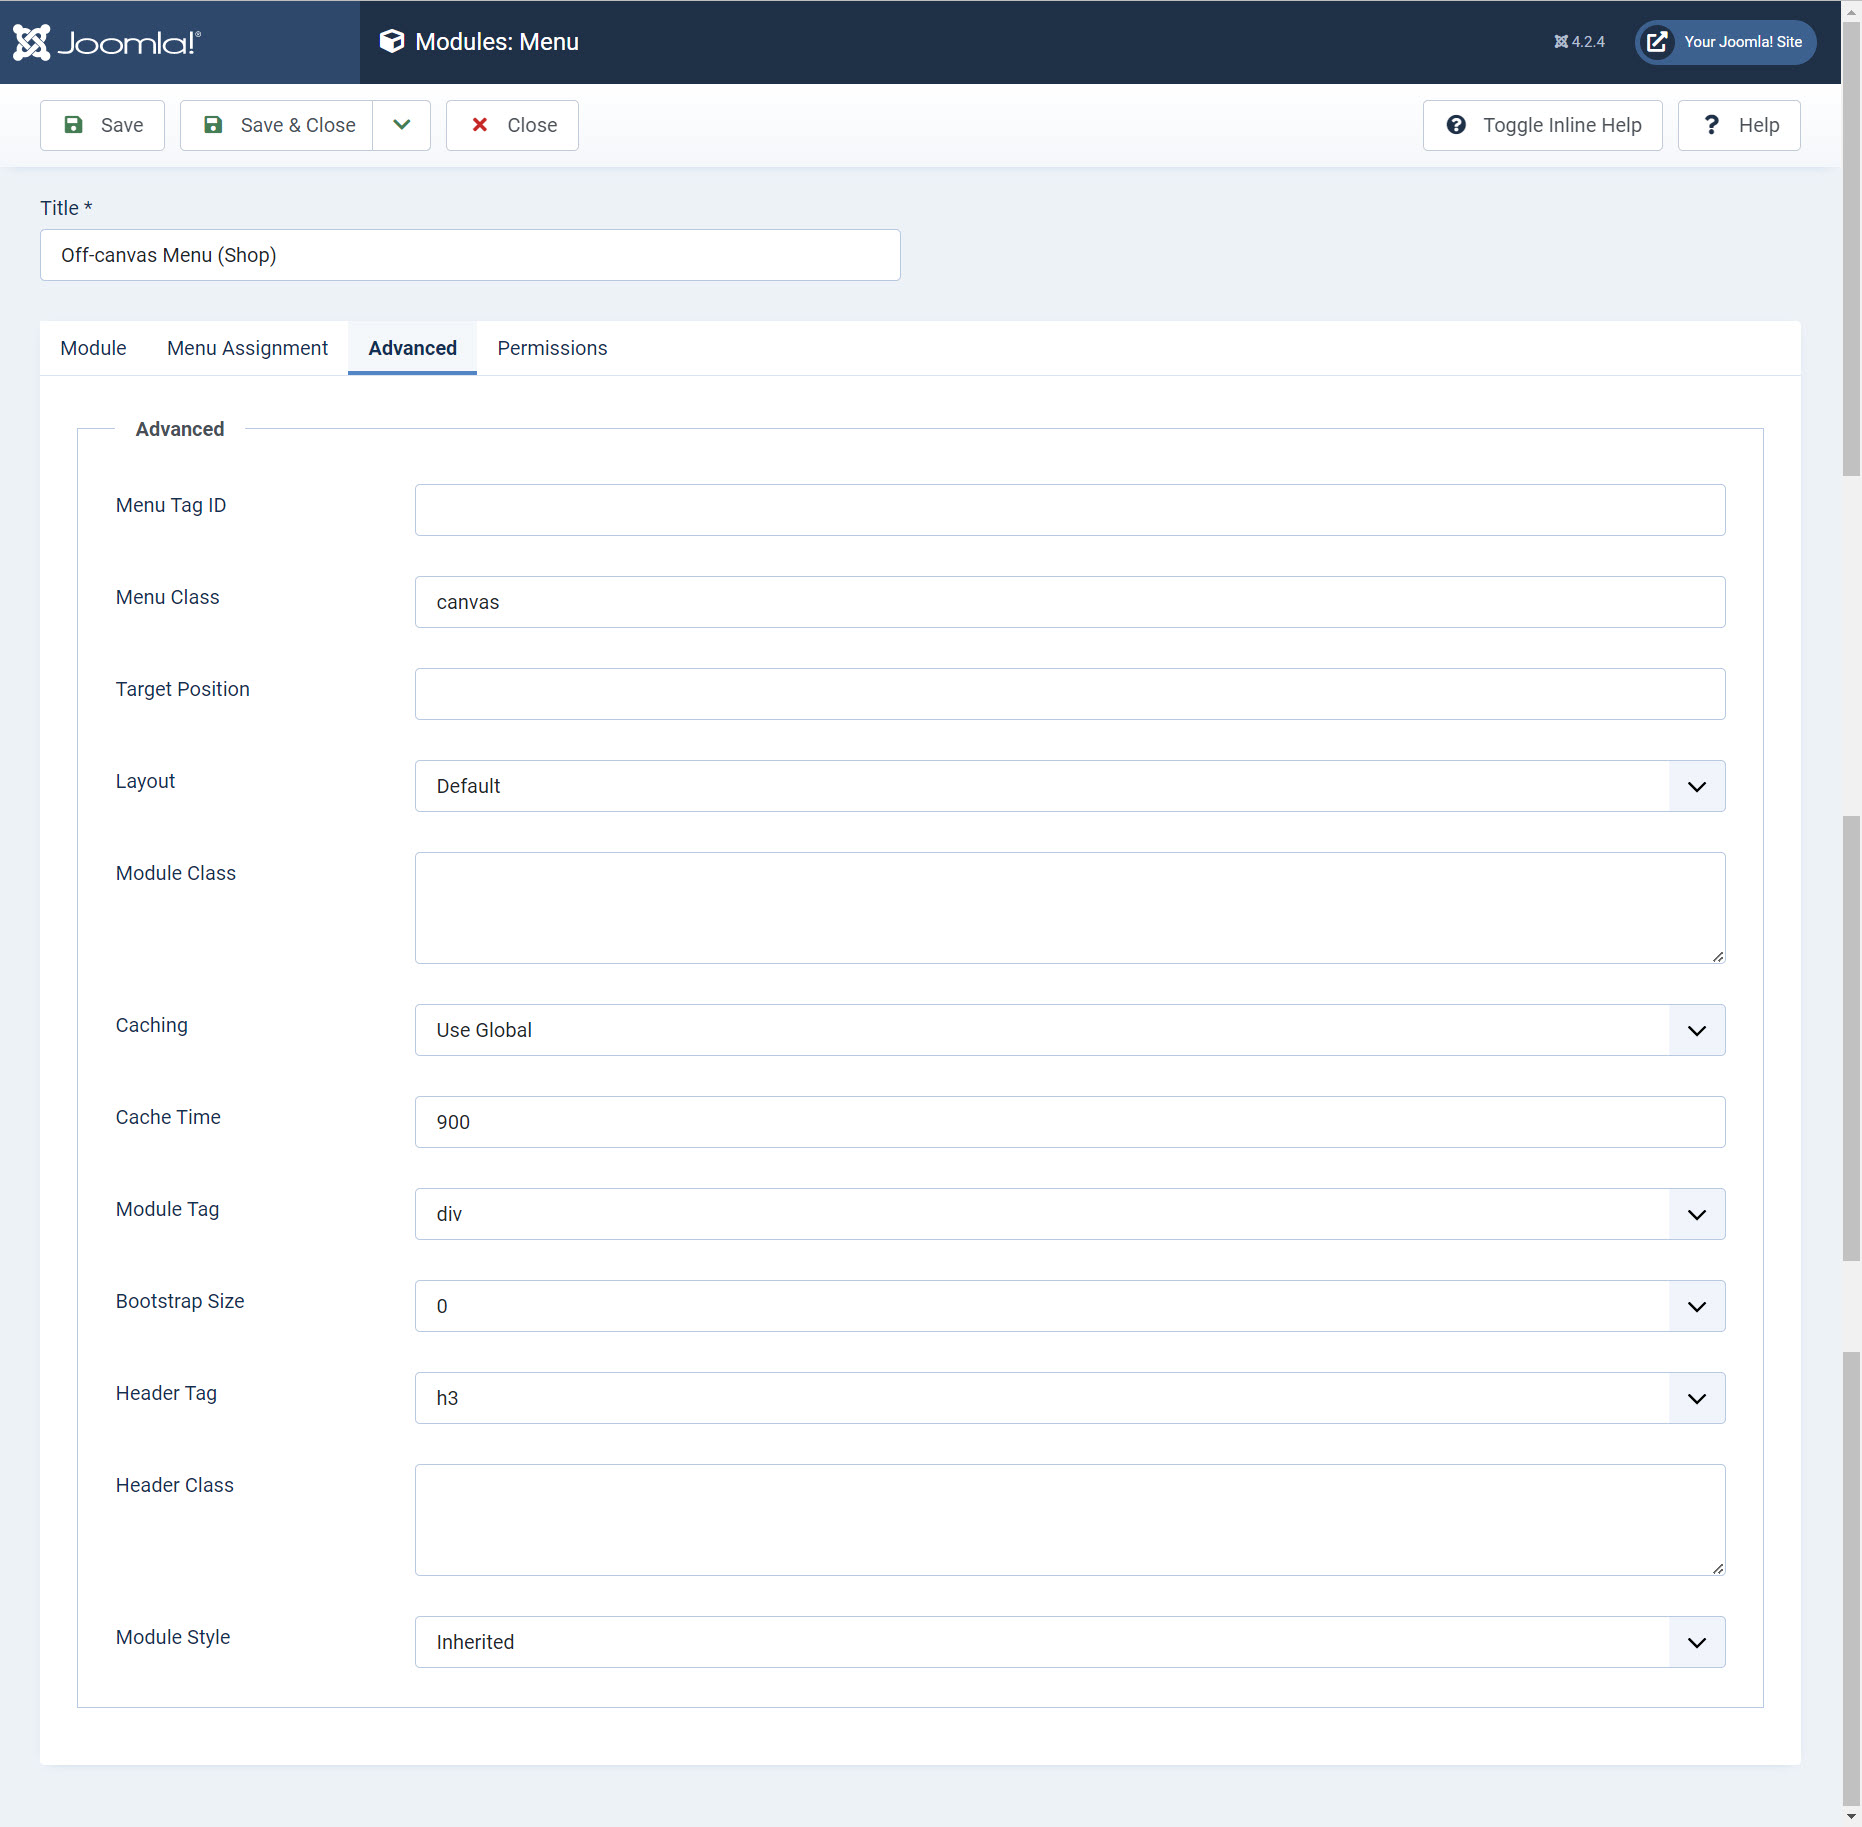
The template comming with a built-in off-canvas feature. To set up an off-canvas feature please publish a menu module to offcanvas module position.
Provide following settings in your of-canvas menu module:

How can I hide/show modules on different devices
The template provides a classes which can be used in module settings in Module Class Suffix field to hide/show module on mobile devices, laptops or desktops. To could manage it please simply use following classes in Module Class Suffix field:
visible-phone
hidden-phone
visible-tablet
hidden-tablet
visible-desktop
hidden-desktop
IMPORTANT! - Make sure you type a space before the class name in Module Class Suffix.
Double images animation for products module
To display an animation of two product images on products module or products slider module do following:
- Go to VirtueMart -> Products
- Open your product and select Images tab
- Add additional image/images to your produt
Note: Only a second additional image will be used in an animation
How do I turn on Jump To Top button
The template supports a jump to top button which will help your visitors quick back to the top of the page when you are using more content or products per page.
To turn on Jump To Top button at your website please do following:
- Log in to Joomla and select Extensions -> Templates -> Style (Extensions -> Templates [Joomla 4])
- Click the template name to open the template settings.
- Select Theme Settings tab and set ON for 'Turn ON/OFF Jump to up button' option
- Click Save/Save&Close
How Do I Setup The Slide Show
The template includes a built-in slideshow where you can display images in the slideshow you have uploaded to the web site.
To setup the slideshow you need to complete the following three steps
Create images which will appear in the slideshow
Create a custom module position for each slide show image
Open the template control panel to change the slide show settings
Create Images For the Slideshow
The first step is to create new images which will appear in the slide show.
Create a new .JPG image. For an additional image (visible as pop up on right hand side on our demo) simply create PNG image called file-name.ext.png. For example if you have fist image named slide-1.jpg then second image need to be named slide-1.jpg.png
If you want to add four images to the slide show then you will need to create four new images
Save the images to your computer
Create A Custom Module Position For Each New Slideshow Image
The Second step is to create a new custom module position for each image which will appear in the slideshow.
From the Joomla administrator area select the Extensions Menu and Module Manager menu.
Select the New button
Select the Custom HTML option
In the module title enter the name for the new slide. The title will NOT be displayed in the slideshow
Assign and publish the module to the builtin-slideshow module position
In the WYSIWYG editor enter the heading and text which will appear as a caption over the slideshow image
Create a read more button to link to an article in your Joomla site (see instructions below)
In the options tab choose the SELECT button to upload and select the slide image you have created for the slideshow
- If you want to use 2nd image just upload it to /images directory in your Joomla root. Don't select it in the background image field - image will be used automatically.
Save the changes to publish the image to the builtin-slideshow module position
NOTE!
To could move the slide caption to the right hand side go to Advanced tab in your slide module and in Module Class Suffix type ' move-right'. Make sure you put an empty space before move-right suffix.
The captions positions settings can be found in the template settings area in BUILT-IN SLIDESHOW SETTINGS tab.


How Do I Add More Images To The Slide Show
You can add as many images to the slideshow as like but for each image you add to the slideshow you must create a new custom module position by following the instructions noted above for each new slide you add to the slideshow.
The slideshow image ordering can be changed by changing the module order for the custom modules you have created and published to the builtin-slideshow module position.

Slideshow Settings
The 3rd step is enable the slideshow in the template control settings.
To enable the slideshow in the template control panel complete the following.
Log into your Joomla administrator area
Select the Extensions menu and Template Manager menu
Select the Styles tab
Open the template you have installed by clicking on the template link from the list of templates
Select the built-in slideshow settings tab
Next to the slide the button to ON
Save the changes by clicking on the Save & Close button
You can also change the slideshow show effects and many more options included in the built-in slowshow settings tab.
For more information about how to use the slideshow settings PLEASE HOVER OVER THE TEXT NEXT TO EACH SLIDESHOW SETTING
How Do I Setup The Login & Registration Buttons
To setup the login and registration buttons which appear at the top of the template complete the following
Log into your Joomla! administrator area
Select the Extensions menu and Module manager menu
Open the Joomla login module
Assign the login module to the loginform module
Save the changes to the module position
How Do I Setup The Our Partner & Brands
To setup the Virtuemart Manufacturers module (our partner and brands) located at the bottom of the template see the screen shot below.
Please note you need to upload the manufacturers images via the Vistuemart administrator area first before setting up the module.

How Do I Setup The Contact Us Module
To setup the module complete the following steps
From the Joomla administrator select the Extensions Menu and Module Manager menu.
Select the New button
Select the Custom HTML option
Now setup the module as show in the screen shots below.

How Do I Setup The Footer Menu
To setup the footer menu you need to log into your Joomla website administrator area and select the menus option and then add new menu
When you have created the new menu for the footer menu please use the settings included in the screen shot show below.

How Do I Add The Footer Copyright Text To The Template
To add and copyright footer text included at the bottom of the template you need to create a custom module position as assign the module to the footer module
From the Joomla administrator select the Extensions Menu and Module Manager menu.
Select the New button
Select the Custom HTML option
Now setup the module as per the screen shot.

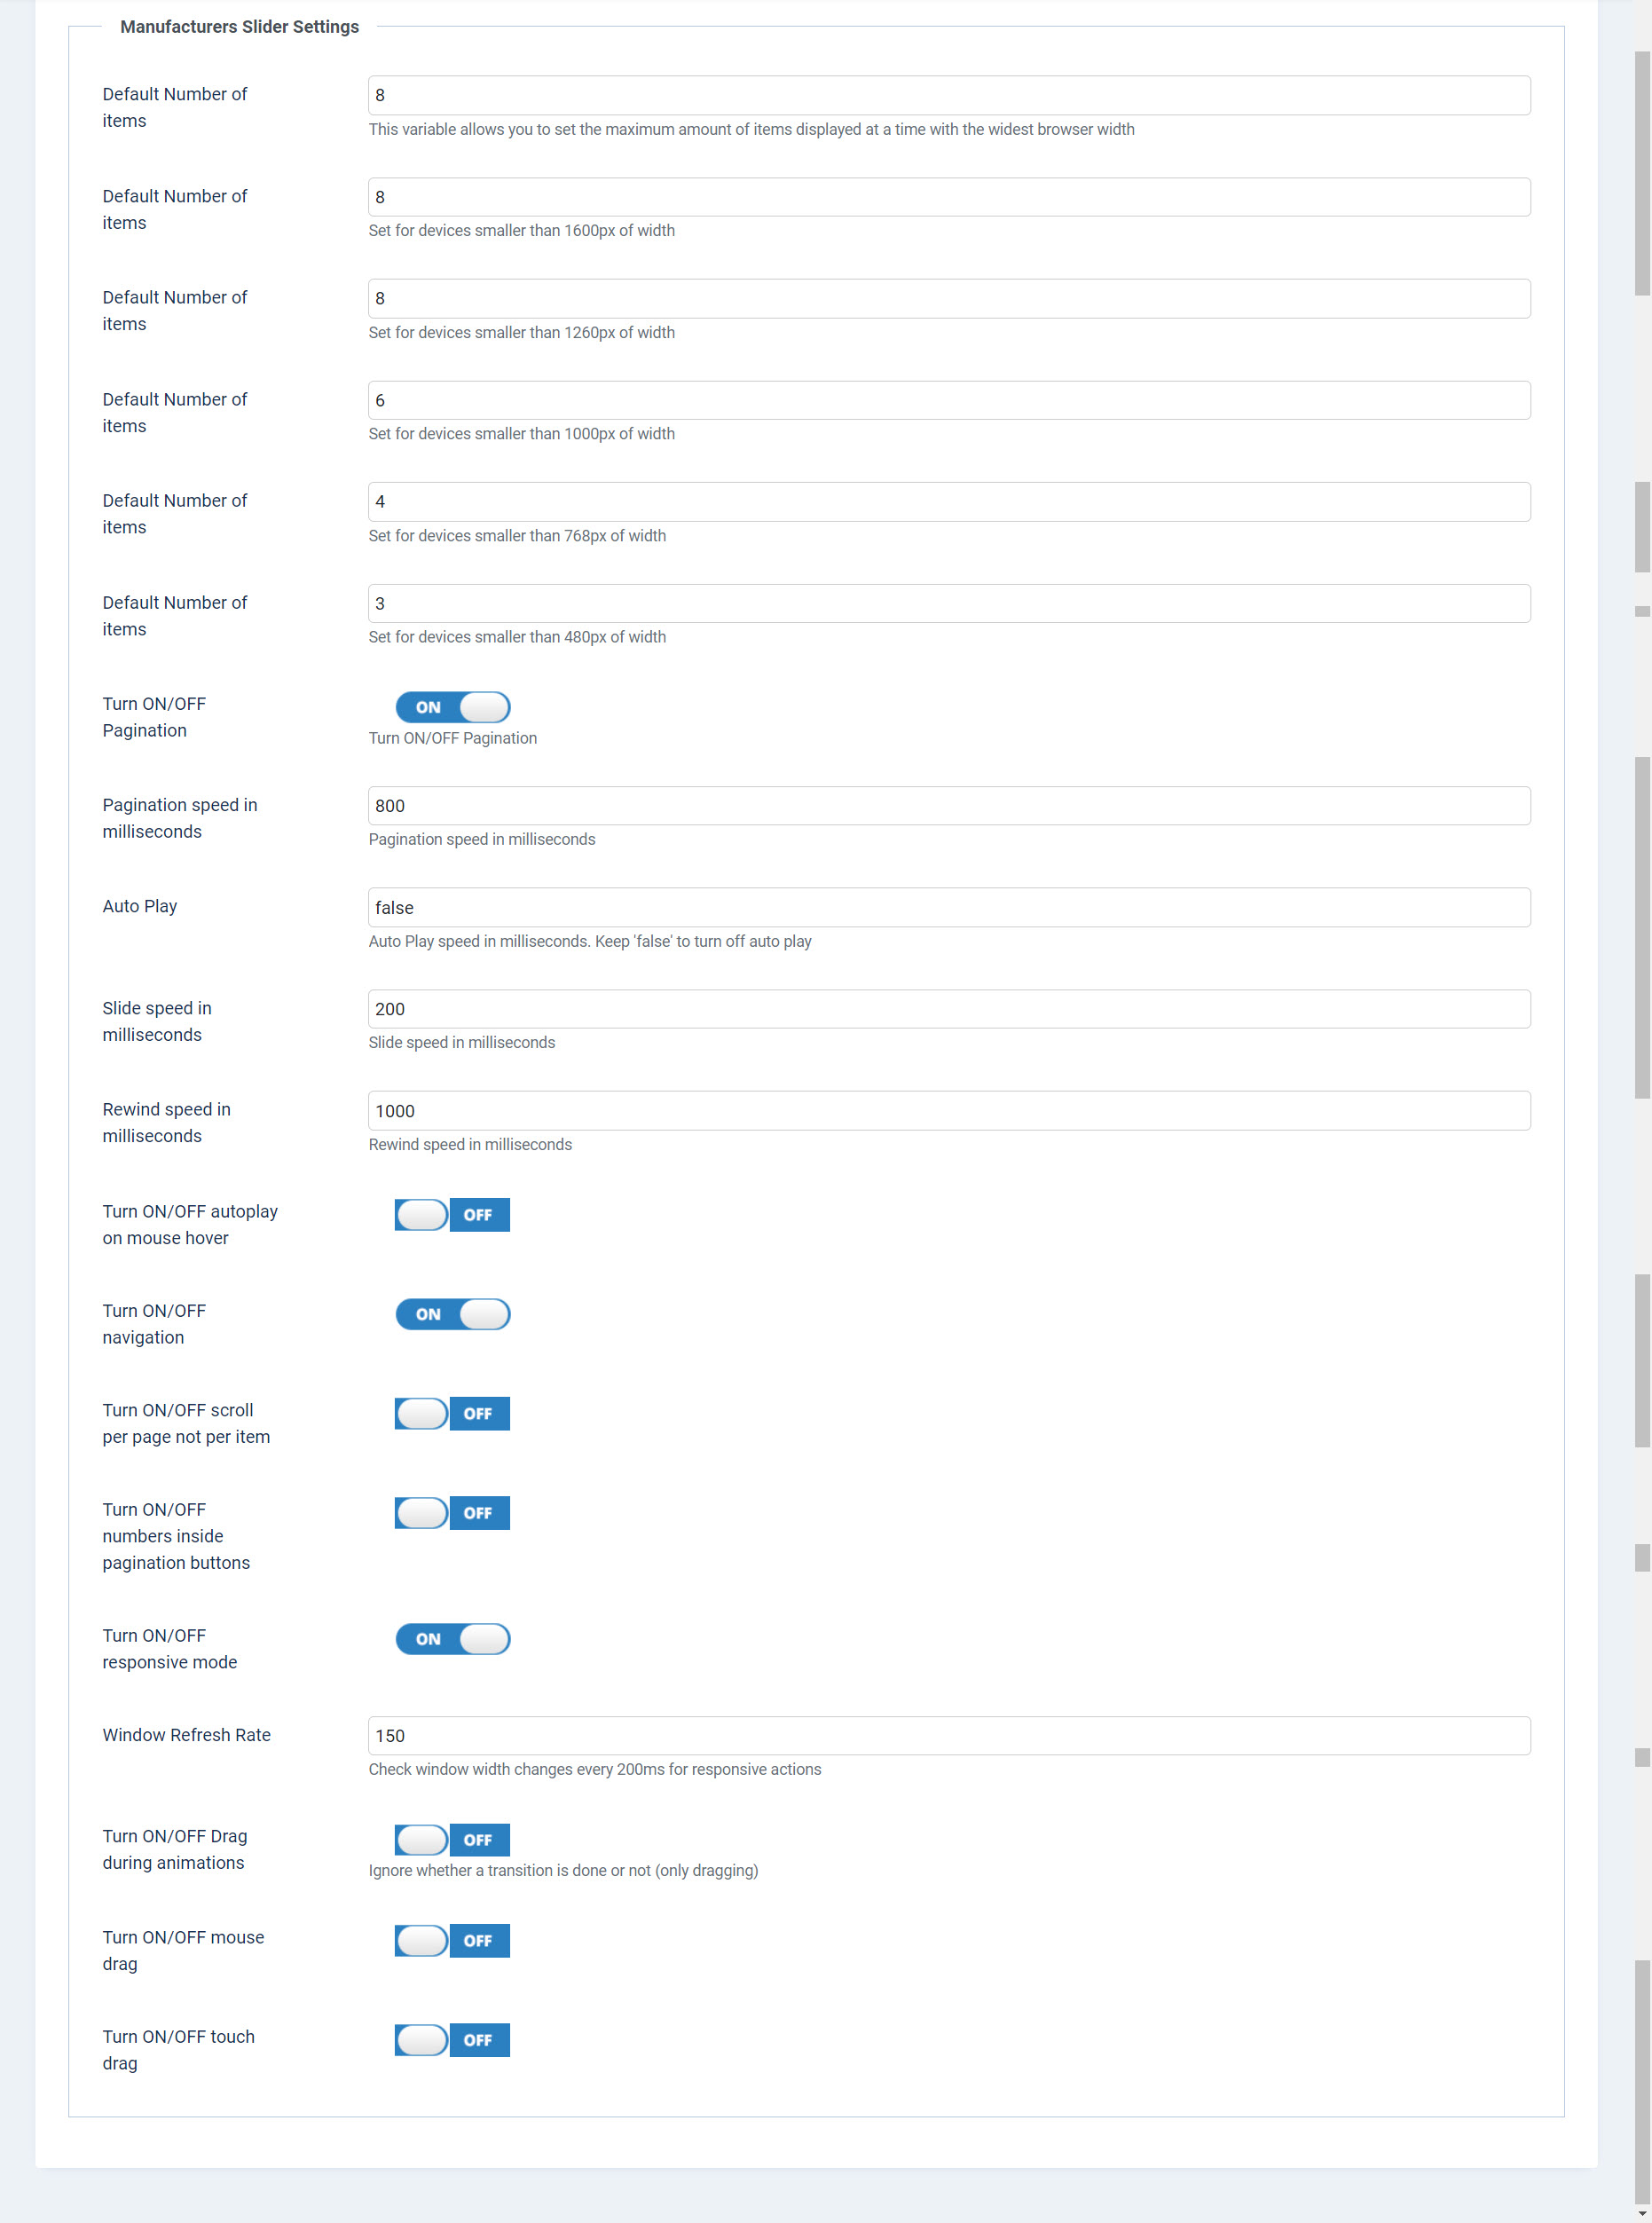
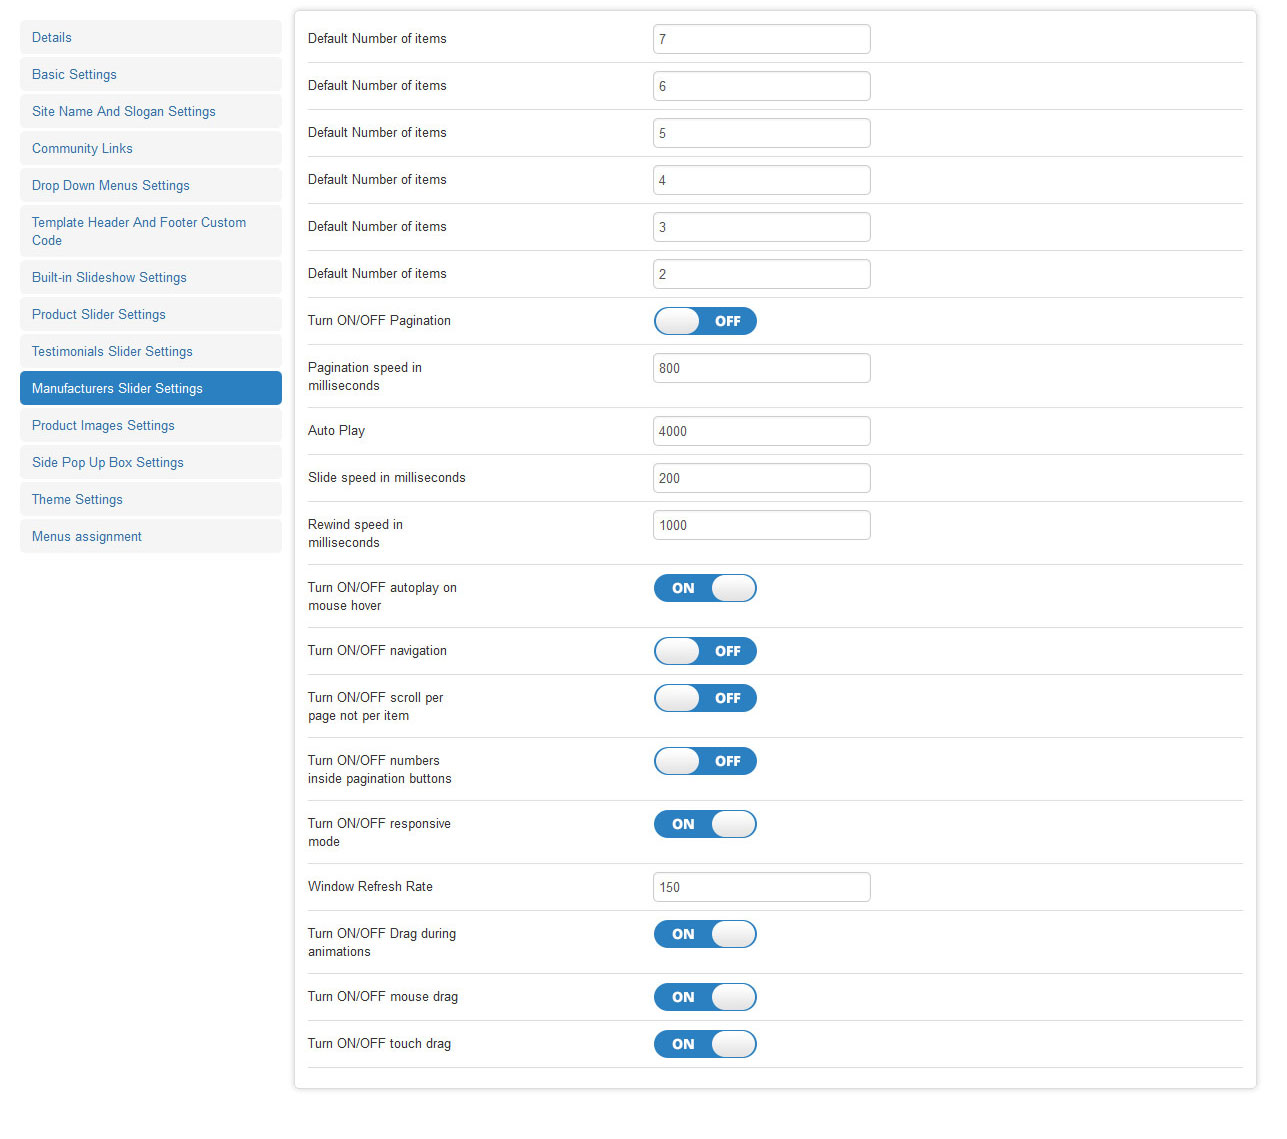
How Do I Set Up Products/Manufacturers Slider Module
To add a product/manufacturer module to your online store please follow these steps:
Go to Extensions -> Template Manager
Select the template name and open Product Slider Settings or Manufacturers Slider Settings
Set up sliders script to fit it to your needs


Now go to Extensions -> Module Manager and click New button on top menu to create new VirtueMart Products Module or VirtueMart Manufacturers Module
Provide the modules settings as following:


How Do I Set Up Products/Manufacturers Slider Module Centered
The template allows you to use 2 styles for sliding modules. One where the module title is on right hand side and slideshow navigation on right and the 2nd where all is nice centered
To make the modules centered follow these steps
- Open your product, manufacturer module and select Advanced tab
- In Module Class Suffix field add ' centered' suffix (make sure it is the last on the list if you have more suffixes)

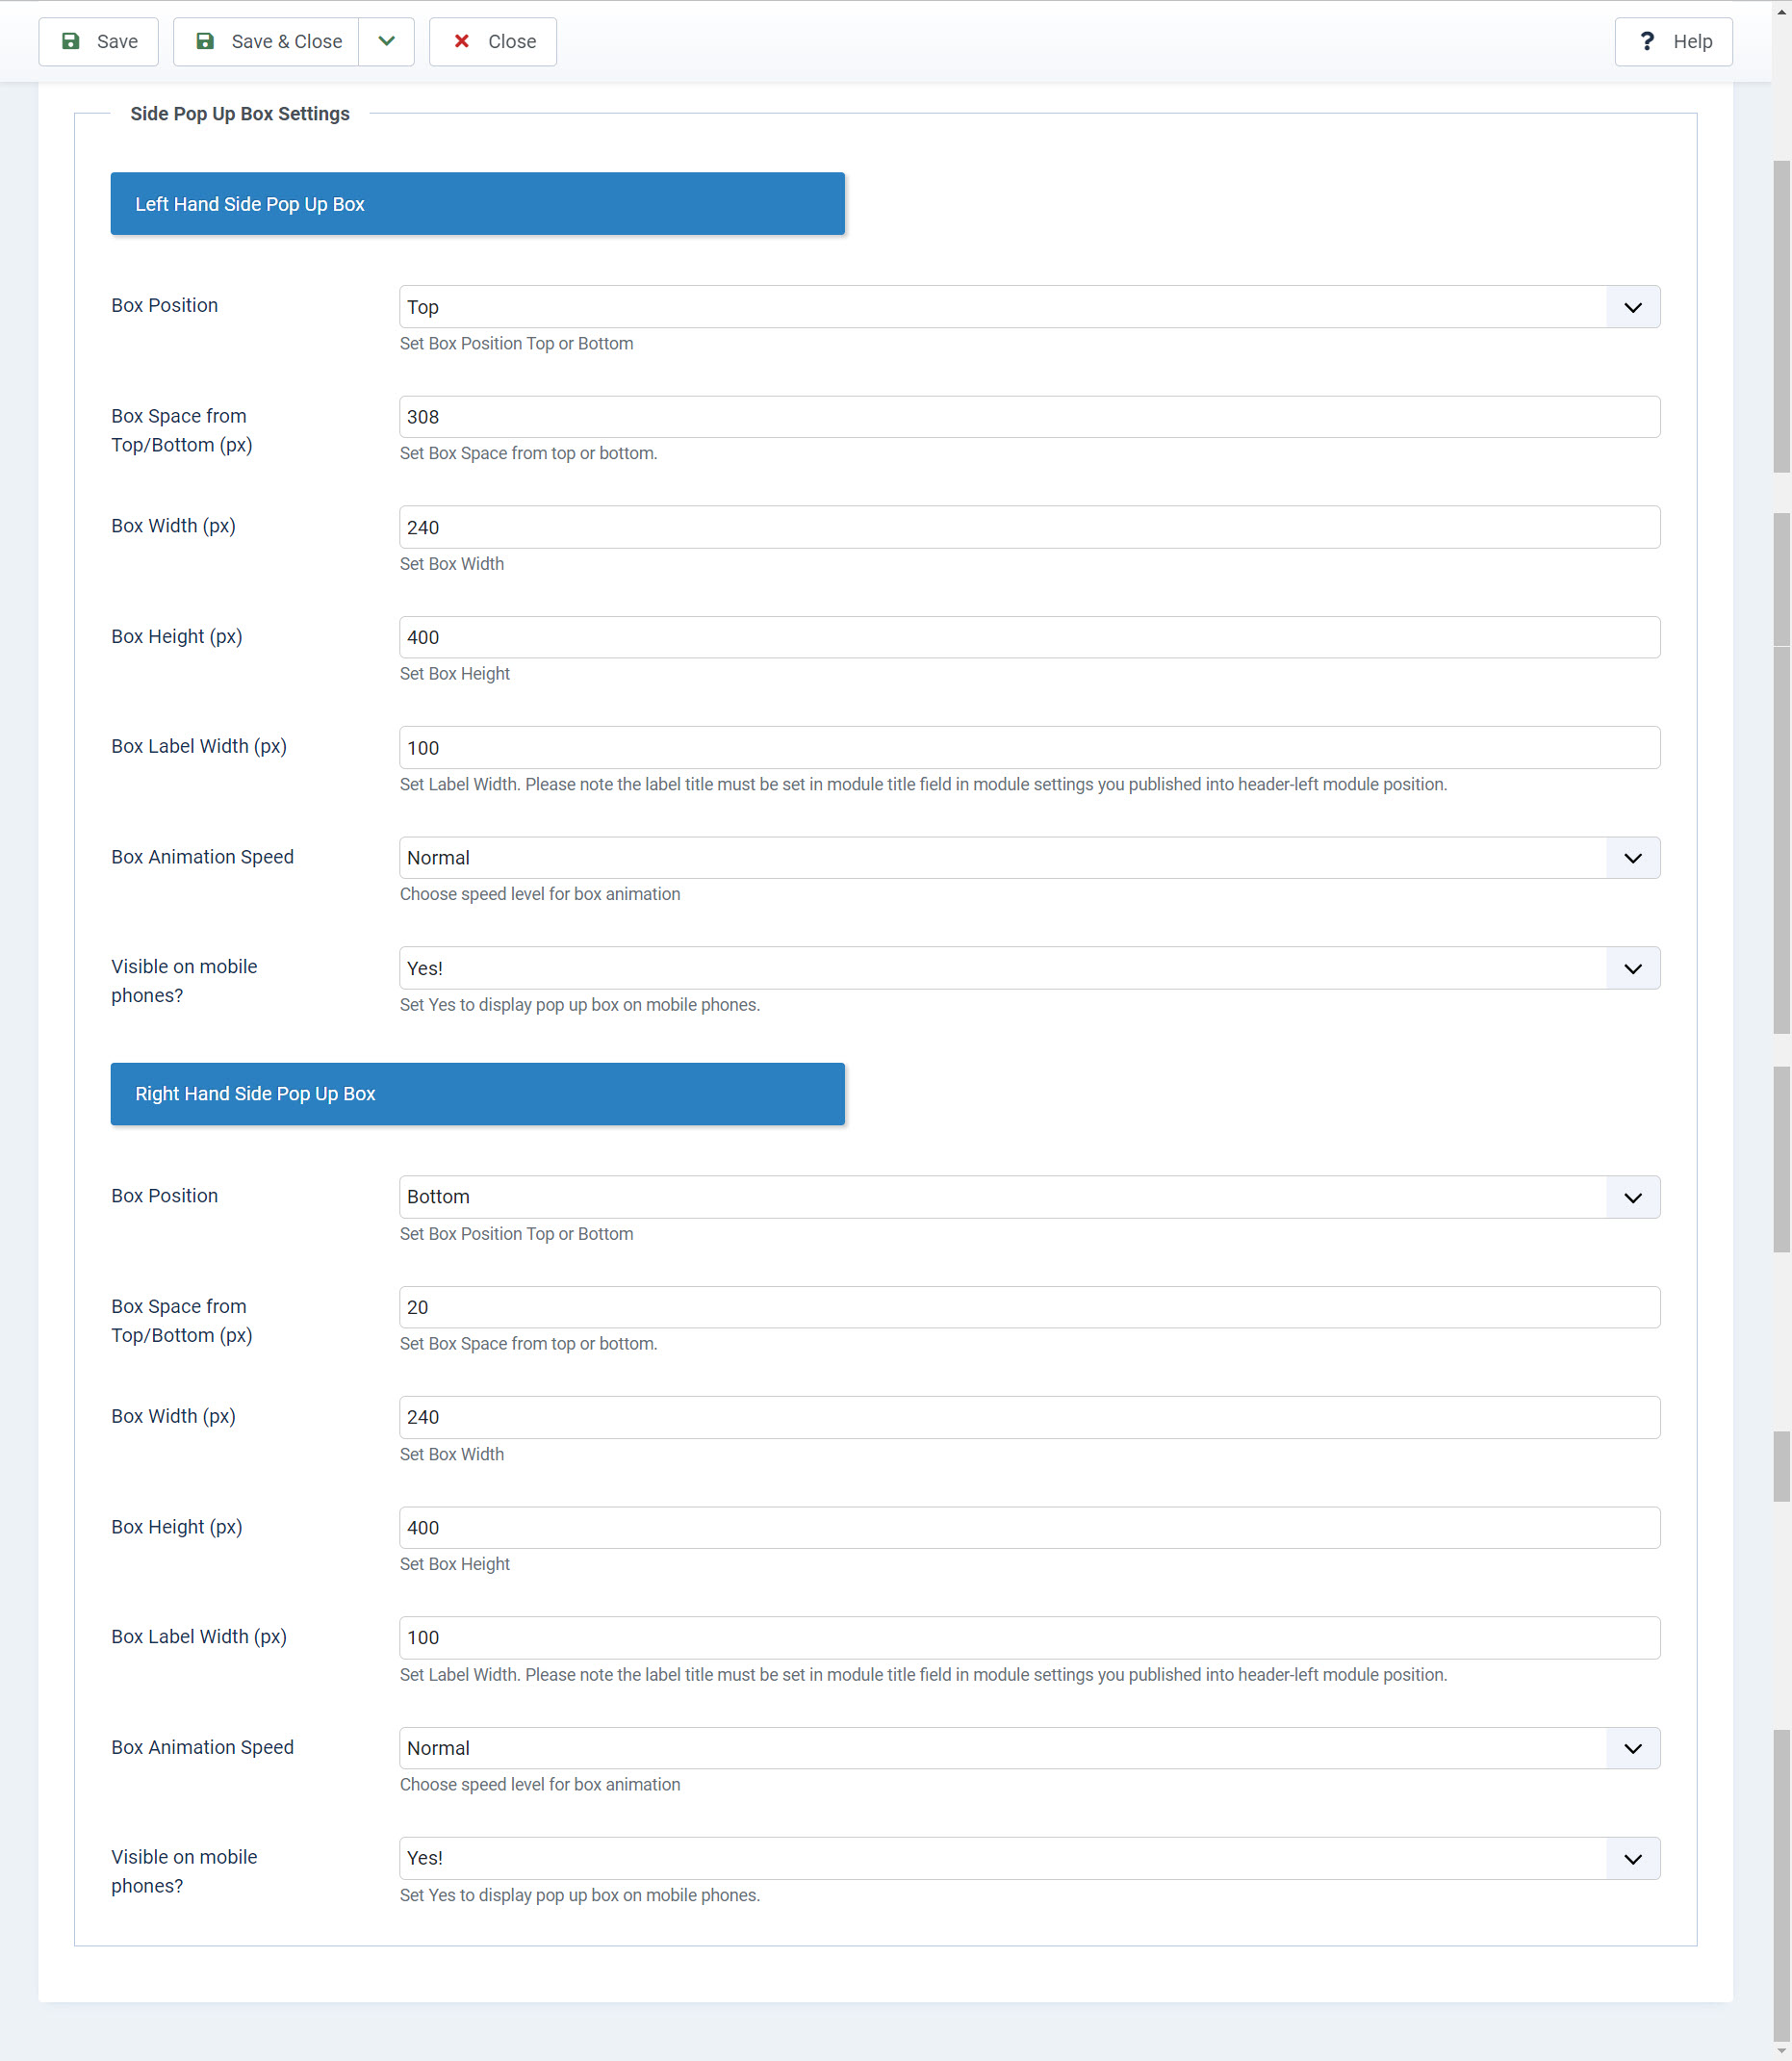
How Do I Set Up Pop Up Boxes
Pop Up Side boxes using header-left or header-right modules positions. Labels of pop up boxes open buttons are using a title of first modules published to header-left or header-right modules positions.
To set up pop up boxes please follow these steps:
Go to Extensions -> Template Manager
Select the template name and open Side Pop Up Box Settings and set up pop up script to fit it to your needs:

Now go to Extensions -> Module Manager and click New button on top menu to create new custom HTML modules
- Provide the module settings as following:


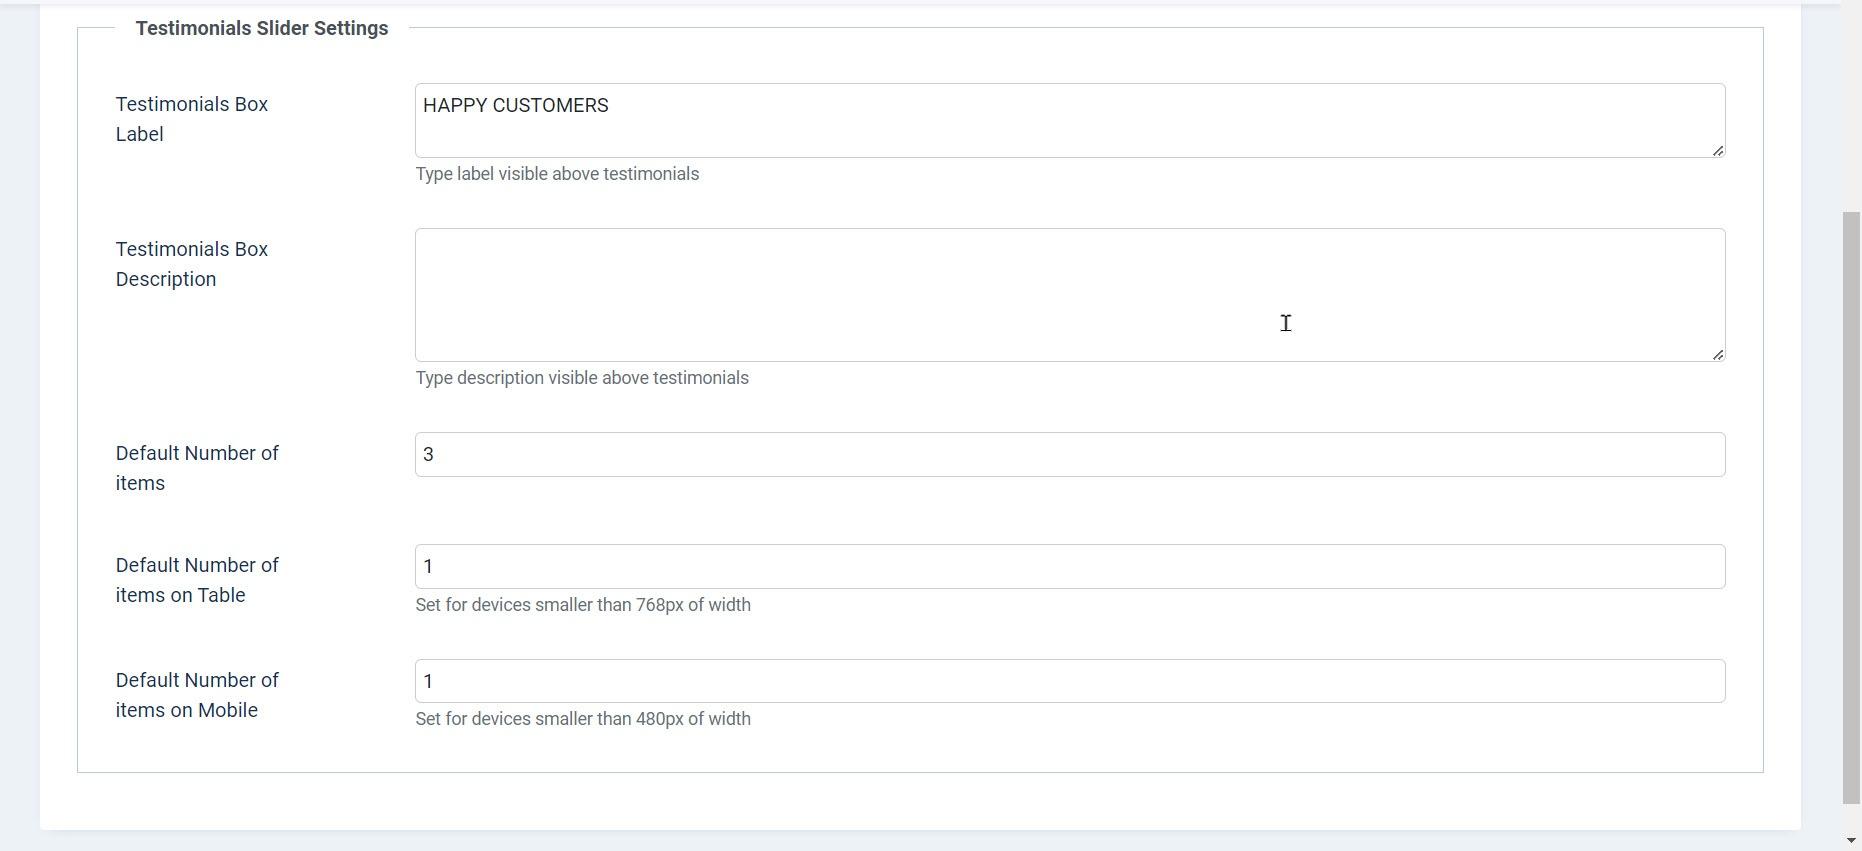
How Do I Set Up The Testimonials Box
The Testimonials Box works very similar to the Built-in Slideshow. Each item is in fact a custom HTML module which you can easy create and add to the testimonial slider in Extensions -> Module Manager. Custom HTML module must to be published to position-3 module position. Before you start to add a testimonials items make sure you have configured a testimonials box in the template settings area on TESTIMONIALS SLIDER SETTINGS tab.

How Do I Add An Items To The Testimonials Box
To add an item to your testimonial tab please follow these instructions:
- On Joomla Top Menu select Extensions -> Module Manager
- Select New button on top toolbar and provide a settings for testimonials item as following:


How Do I Set Up The Theme settings
The template comming with advanced settings for your website layout where you can set up a layout for each section of your website, add an image or parallax background image. The theme settings also allows you to select a type of AJAX VirtueMart Cart module where you can select a pop up window or pop up side panel.
To get an access to the theme settings log in to your Joomla Administrator Panel and select Extensions -> Templates and click the template name. Open THEME SETTINGS tab:


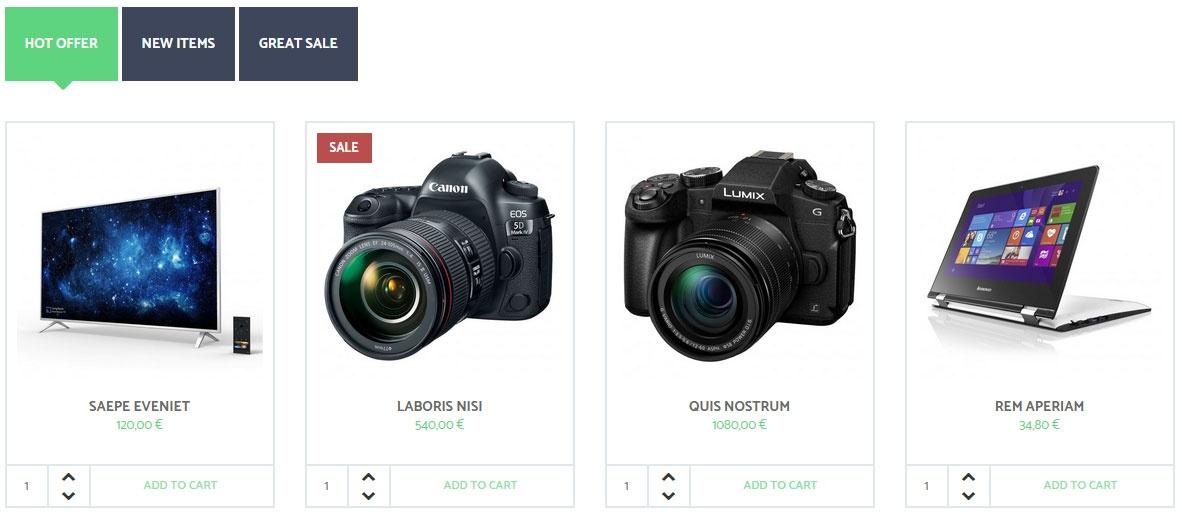
How Do I Set Up The Product Ribbons
THe template allows you to use a HOT, SALE and NEW ribbons for selected products. To could use the ribbons for your products please do following:
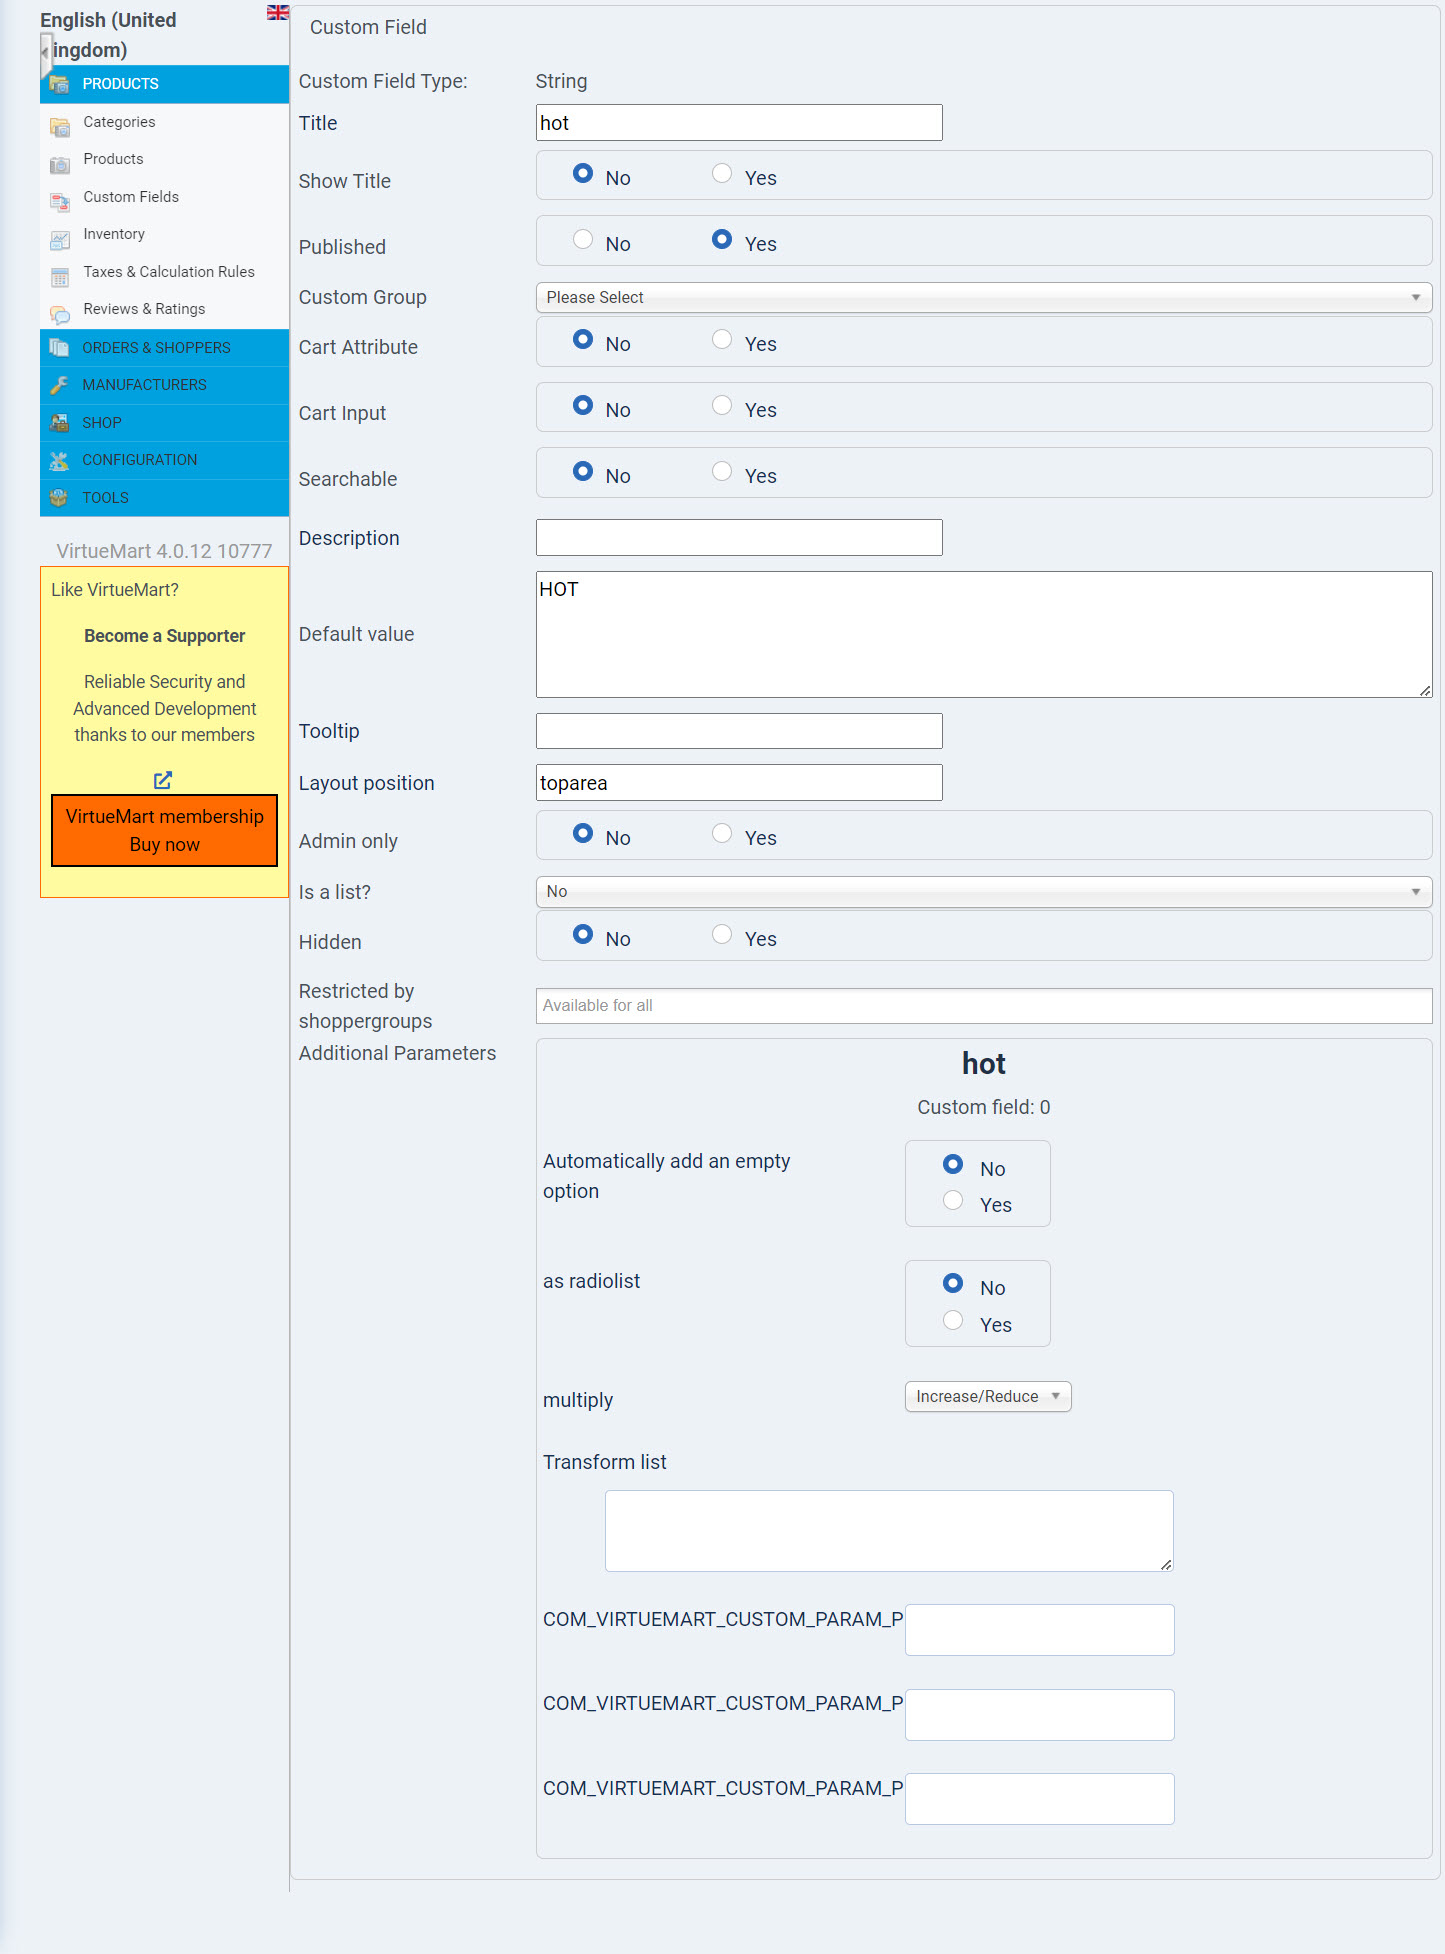
- Go to Components -> VirtueMart and on left menu select Products -> Custom Fields
- Click New button and select String for Custom Field Type
- Provide the rest of the settings as follow (see below images)


- Click Save
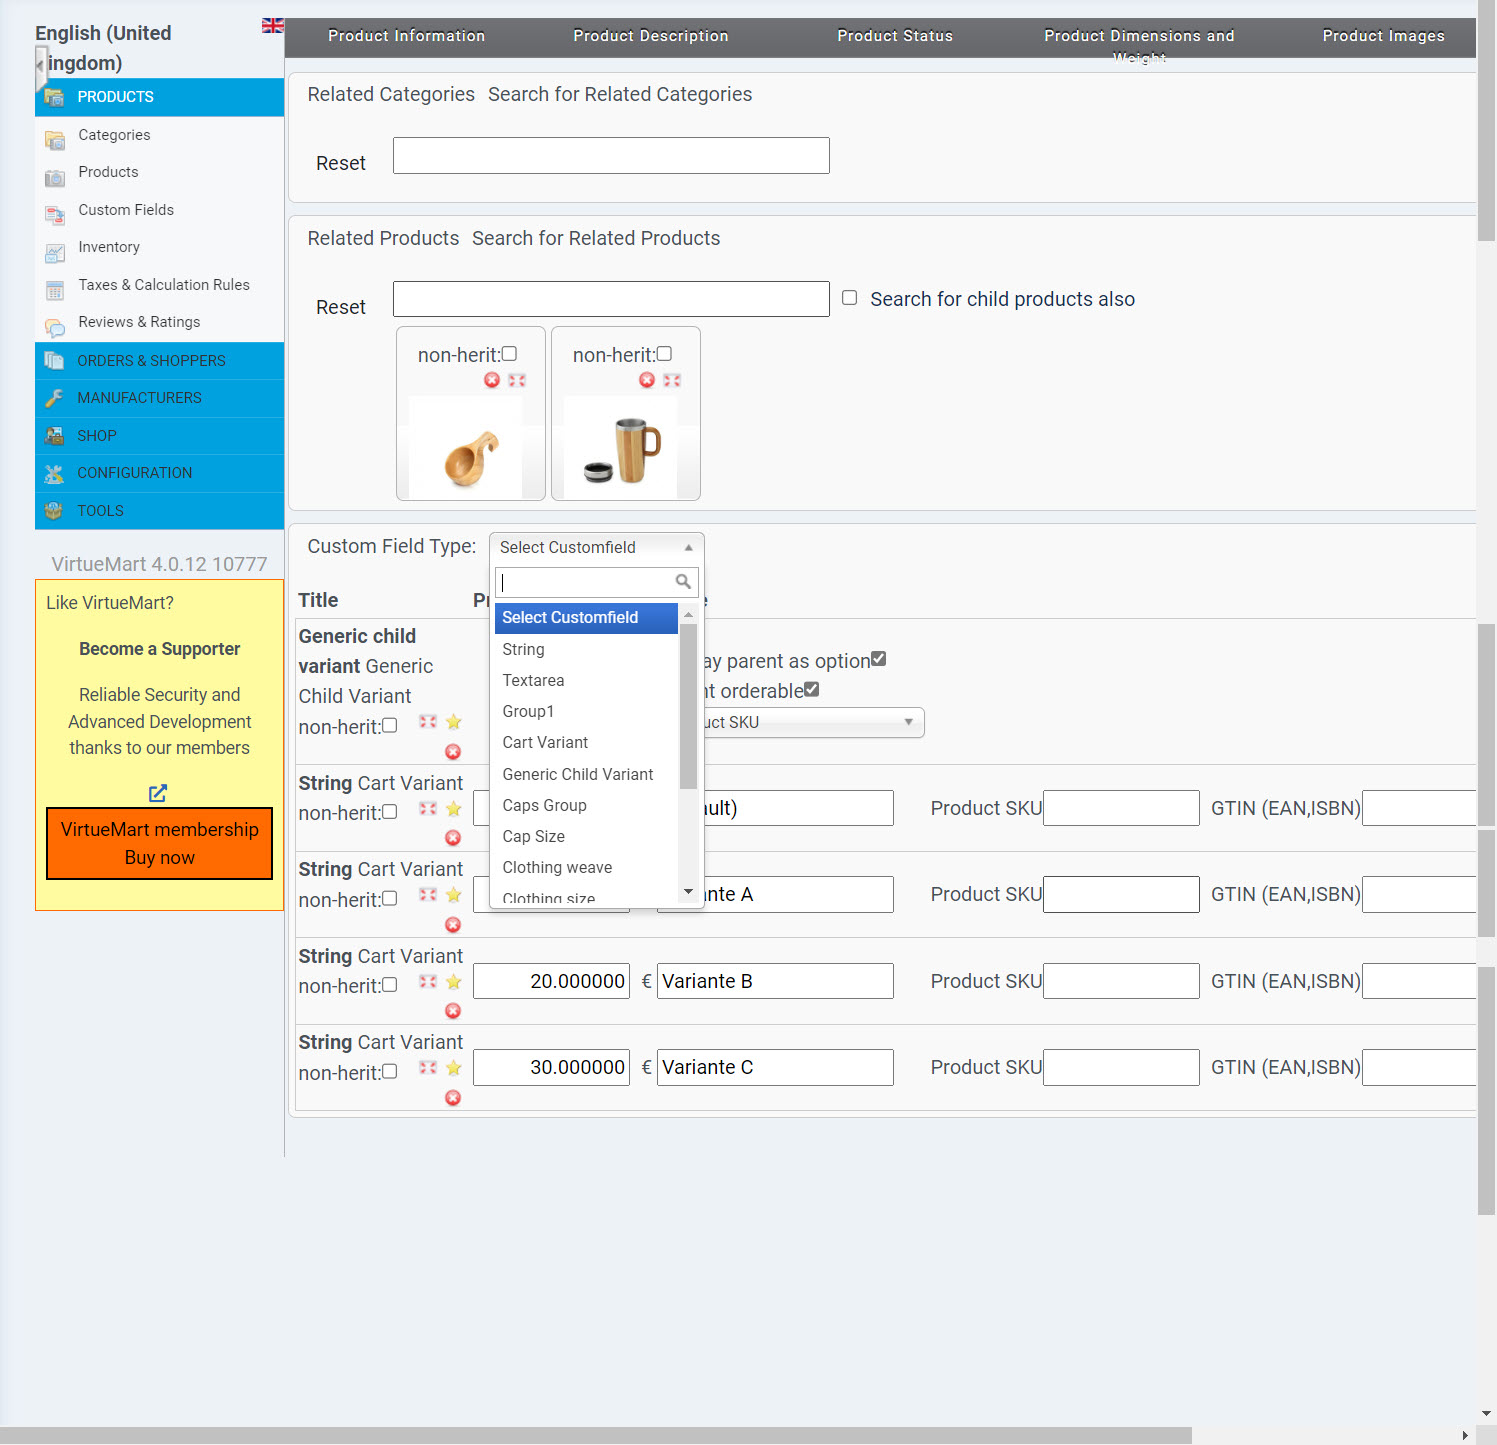
- To add ribbon to product please open Products -> Products and open a product you want to add a ribbon(s) to
- Select Custom fields tab and select ribbons field on the list as following:

- Click Save