The following installation guide will provide you with instructions to install and setup the Light Cart Virtuemart template for the latest version of Joomla 5.x and Virtuemart for Joomla 5.x
- Template Usage
- Template Support
- Joomla & Virtuemart Installation
- Template Package Contents
- Installing The Joomla Template
- How Do I Set The Template As The Default Joomla Template
- How Do I Setup The Virtuemart Template
- Template Module Positions
- How Do I Create A Custom Module Position For Joomla
- How Do I Add The Read More Button To The Custom Module
- Top Menu Module Settings
- Virtuemart Product Category Menu
- How Do I Setup Featured Products Slider Module
- How Do I Setup The Slide Show
- Create Images For the Slideshow
- Create A Custom Module Position For Each New Slideshow Image
- How Do I Add More Images To The Slide Show
- Slideshow Settings
- How Do I Access The Template Settings
- How Do I Update The Template Settings
- How Do I Setup The Login & Registration Buttons
- How Do I Setup The Our Partner & Brands
- How Do I Setup The Latest News & Articles Most Read
- How Do I Setup The Our Services & About Us Menu
- How Do I Setup The Footer Menu
- How Do I Add The Footer Copyright Text To The Template
Template Usage
Before using or installing this template please read the https://www.virtuemarttemplates.net/terms-of-service.html which you have agreed to before downloading the template at the www.virtuemarttemplates.net.
Template Support
Please note we only provide support for using and setting up the Virtuemart template you have downloaded at the website
If you need support for the template please using one of the following options
- We recommend you install the template quick start package which will give you an exact copy of the template you can see running at the http://demoj4.virtuemarttemplates.net/lightcart/ site. The template quick start package is also great understand how we have setup Joomla, virtuemart and the template..
- Log into the website and visit the members knowledge base which includes lots of useful information and step by step guides to help you use and setup the template
- Log into the website and open a support ticket at the website and our support team will be happy to help you with any questions you may have about using or setting up the template
If you need support for Joomla or Virtuemart please visit one of the following websites
- Joomla documentation website http://docs.joomla.org
- Joomla forum http://forum.joomla.org
- Joomla tutorials http://www.joomlatutorials.com
- Virtuemart documentation website http://docs.virtuemart.net
- Virtuemart tutorials http://docs.virtuemart.net/tutorials.html
- Virtuemart forum http://forum.virtuemart.net
Joomla & Virtuemart Installation
Before installing this template you need to
- Download and install the latest version of Joomla 5.x from the http://www.joomla.org website
- Download and install the latest version of Virtuemart from the http://www.virtuemart.net website
Template Package Contents
This template package includes the following.
-
Template zip file for latest version of Joomla 5.x and Virtuemart which can be installed automatically via your Joomla administrator area.
-
Adobe Photoshop file.
-
Template Install instructions
Installing The Joomla Template
To install the Joomla template complete the following
- Log into the Joomla administrator area of your website
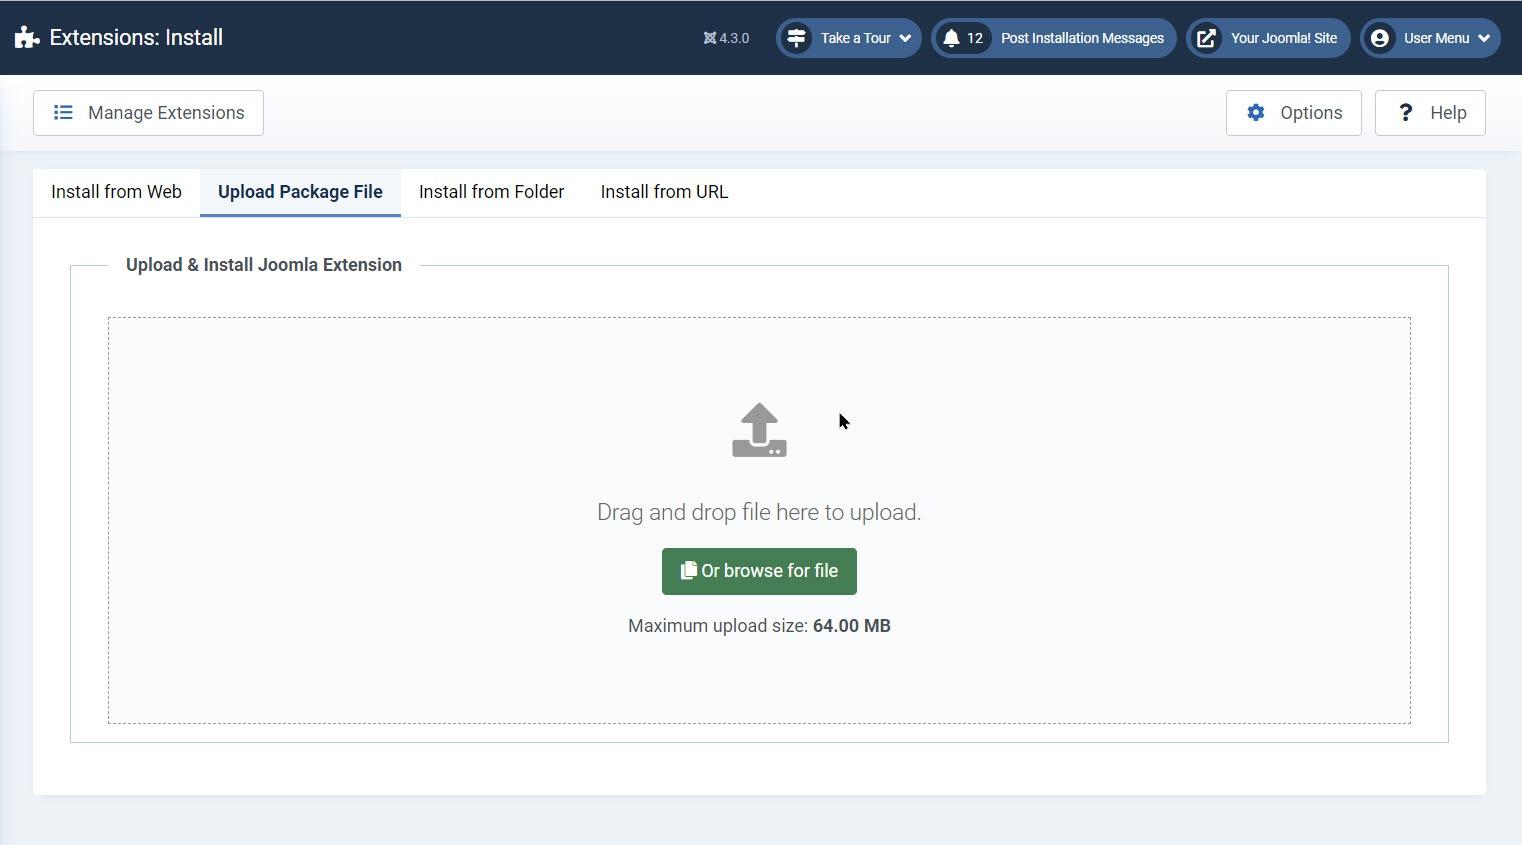
- Select the System menu and Install Extensions
- Select the Browse button and choose the template zip file located in the Joomla 5.x directory included in the zip file you have downloaded from the website to your computer
- Select the Upload & Install button
How Do I Set The Template As The Default Joomla Template
- From your Joomla administrator area select the System menu and Site Template Style
- Select the check box next to the Joomla template you have installed
- Select the button Default

How Do I Setup The Virtuemart Template
To setup the virtuemart template complete the following
- Log into your Joomla administrator
- Select the components menu and Virtuemart
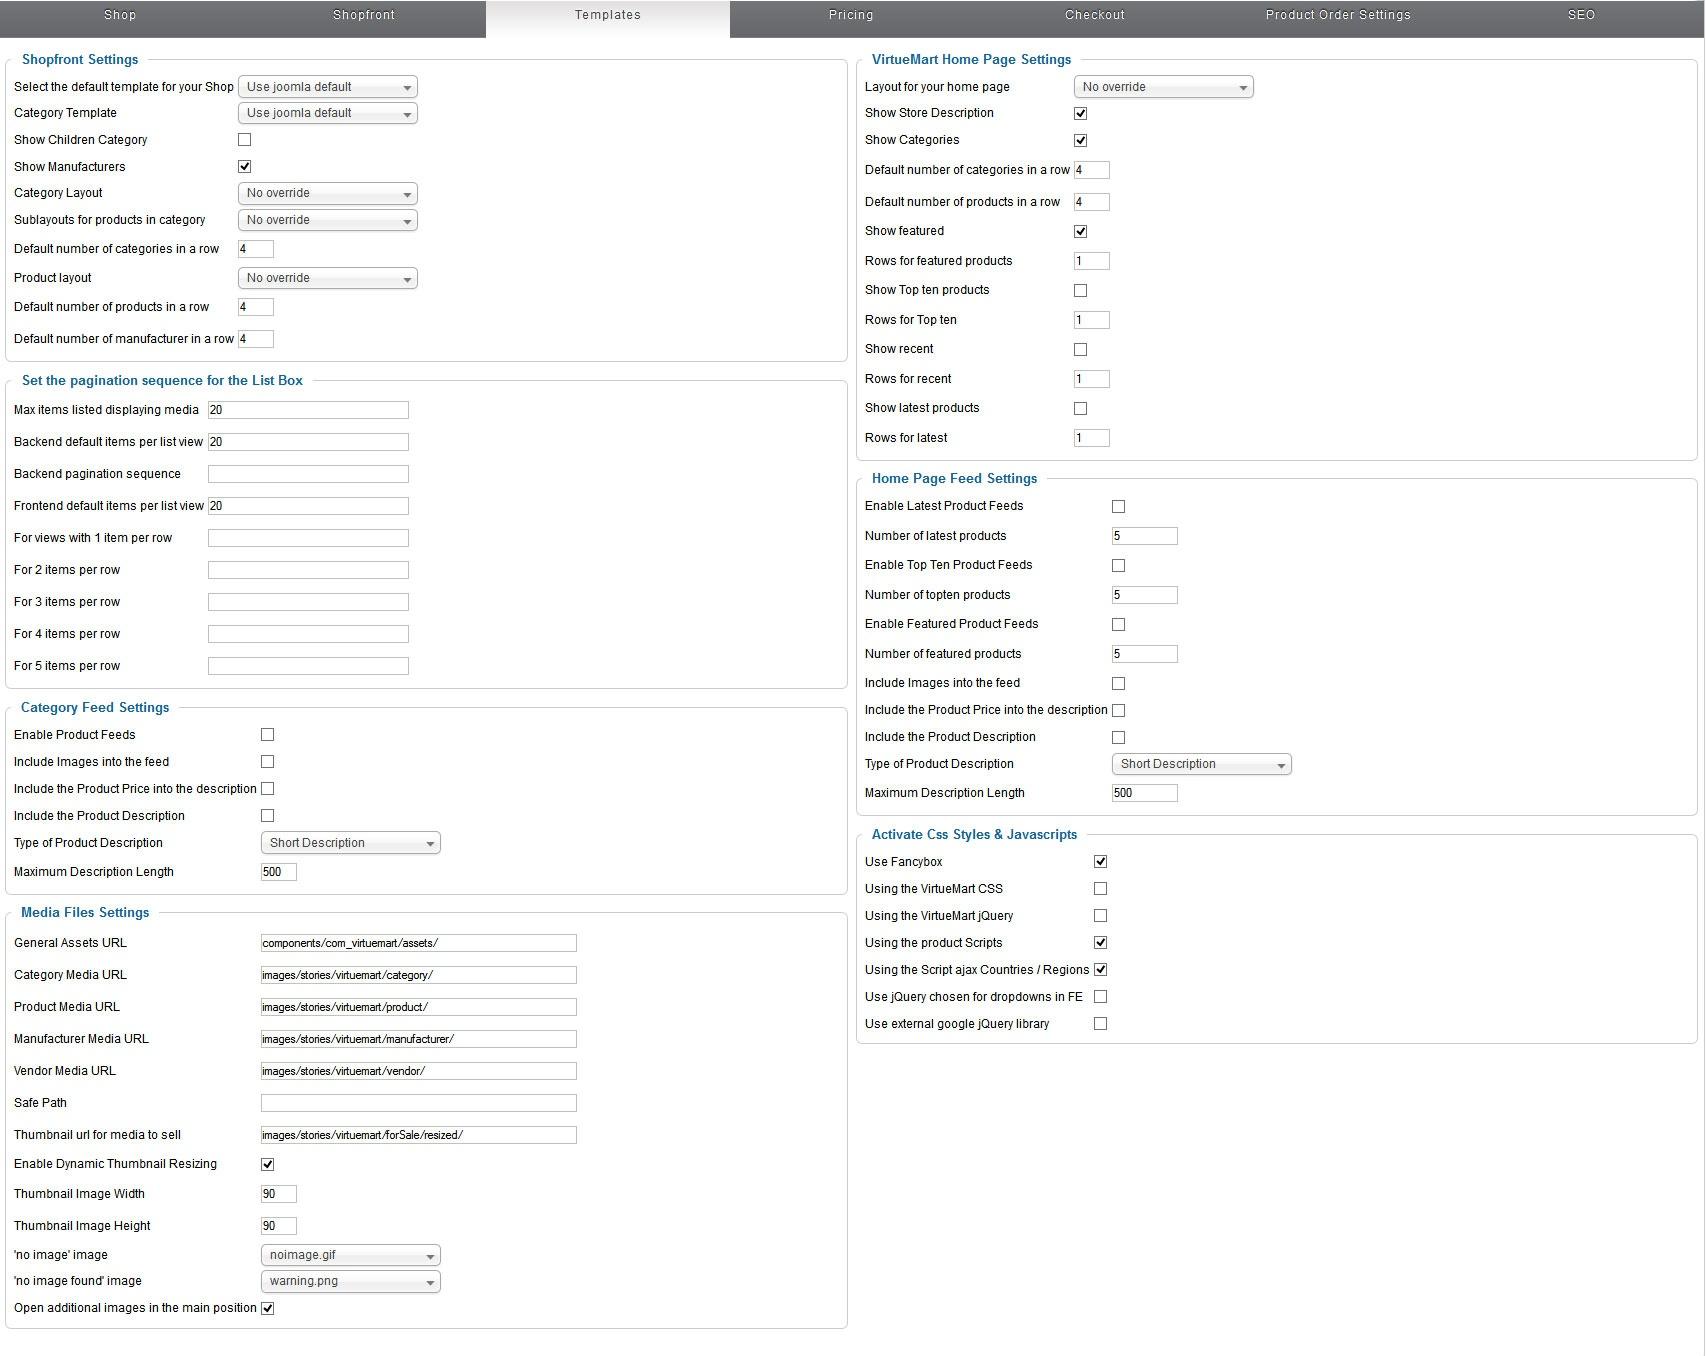
- Select Virtuemart configuration tab and the configuration menu
- Select the Templates tab
- Setup the virtuemart template as show in the screen shot below
Template Module Positions
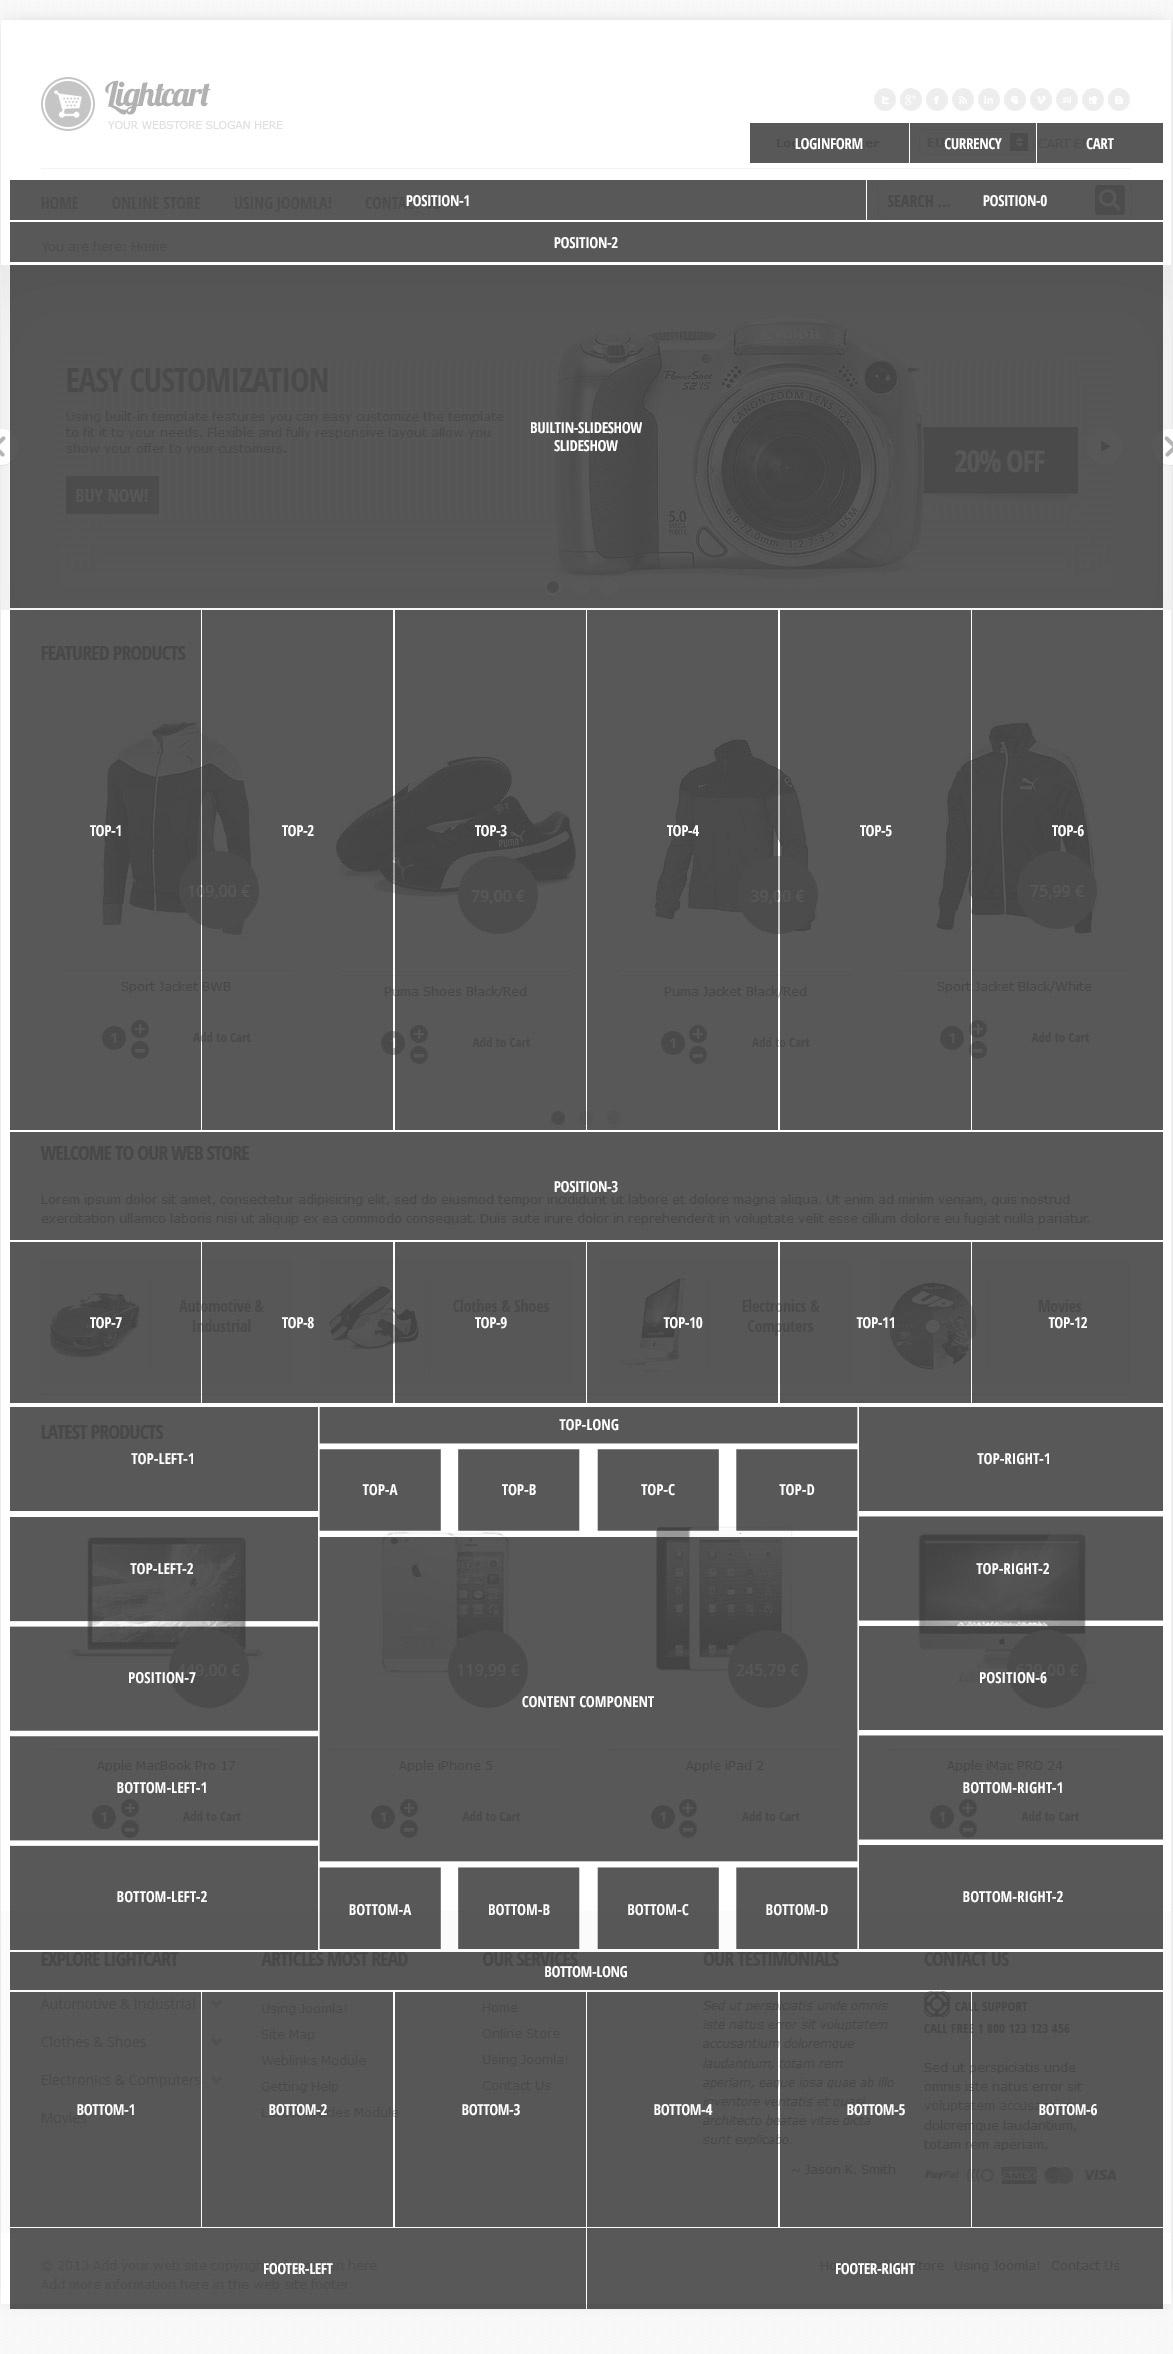
The template supports the following module positions
- Login form button and register button located at the top of the template use the loginform module position
- Virtuemart shopping cart module uses the cart module position
- Virtuemart currency select module uses the currency module position
- Top menu uses the position-1 module position
- Search uses the position-0 module position
- The slideshow which appears at the top of the template uses the builtin-slideshow module
- Breadcrumbs uses the position-2 module position
- Top-1, Top-2, Top-3, Top-4, Top-5, Top-6, Top-7 ,Top-8, Top-9, Top-10, Top-11, Top-12 module positions located at the top of the template use custom module positions where you can add your own text or images inside the module positions
- Top-left-1, Top-left-2, bottom-left-1 and bottom-left-2 modules appear on the left hand side of the template
- Position-7 module position is used to display web site navigation menu or the Virtuemart module navigation menu in the left hand column of the template
- Top-long module position which appears in the centre of the template can used for the news flash module or for a custom module
- Top-A, Top-B, Top-C, Top-D module positions located at the top / centre of the template use custom module positions
- Right module position can be used to publish other modules of your choice to the right module position
- top-right-1, top-right-2, bottom-right-1, bottom-right-2 modules appear in the right hand side of the template
- Bottom-A, Bottom-B, Bottom-C, Bottom-D module positions located at the bottom of the template use custom module positions
- Bottom-long module position appears at the bottom of the template
- Bottom-1, Bottom-2, Bottom-3, Bottom-4, Bottom-5, Bottom-6 module positions located at the bottom of the design use custom module positions plus you can publish the latest news or popular news to the module positions to the modules
- Footer-right module is used to display your website copyright text using a custom module position
- Footer-left module is also used to display a menu module
How Do I Create A Custom Module Position For Joomla
The custom module positions can be used to display text or images in the top, bottom, left or right hand areas of the template.
You need to following the instructions noted below for each new custom module you publish to the web site.
To create a custom module position complete the following steps
-
From the Joomla administrator select the Module menu.
-
Select the New button
-
Select the Custom HTML option
-
Now setup the module as show in the screen shots below.
-
When you have setup the custom module select the Save & Close button to save and publish the module to your Joomla site.
-
You can use any of the custom module positions located at the top, bottom of the template or the left or right of the template noted above
-
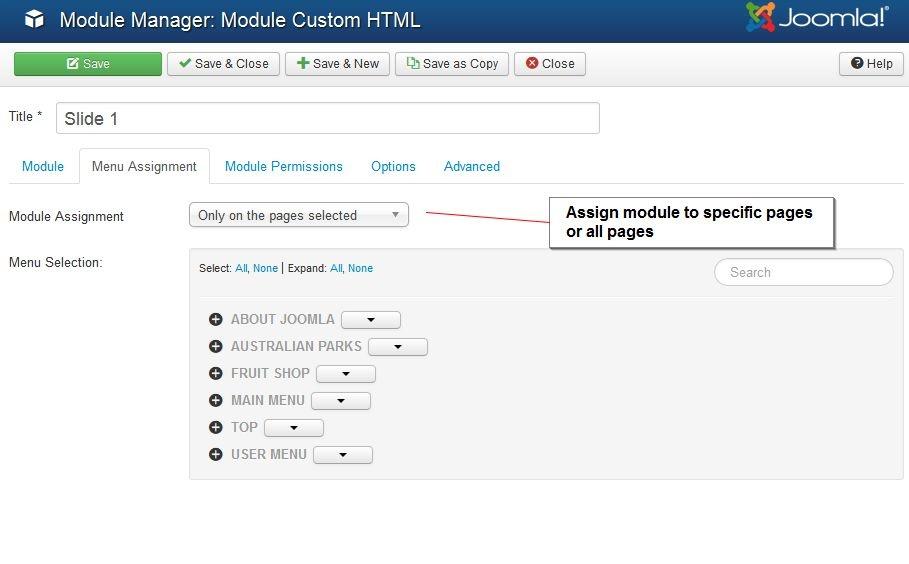
If you want the module position to appear on ALL pages you need to assign the module positions to ALL the menu items


How Do I Add The Read More Button To The Custom Module
To add the read more button which appears in the custom module position complete the following
-
Open up the custom module position you have created
-
Scroll down to the WYSIWYG editor at the bottom of the module position
-
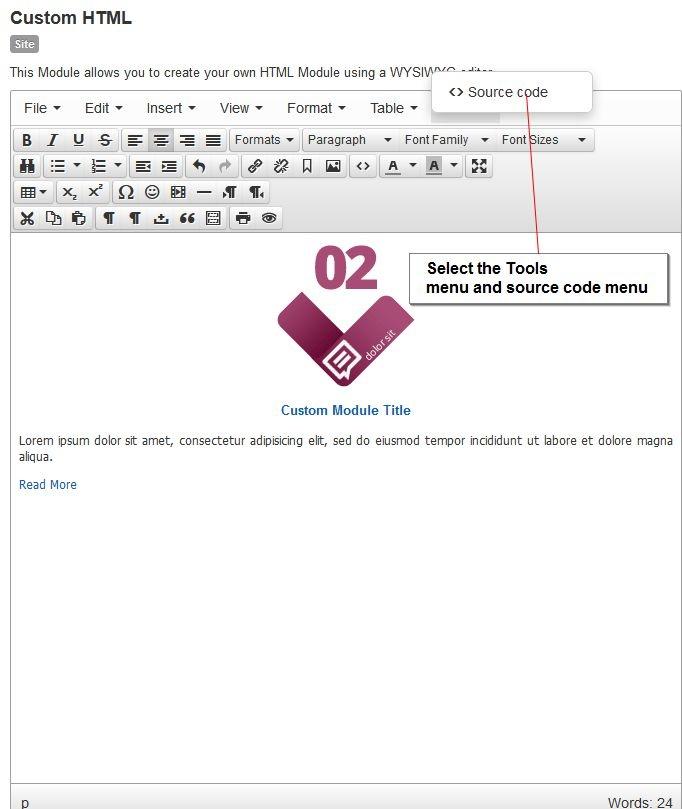
Select the tools menu and source code menu in the WYSIWYG editor to open the HTML window
-
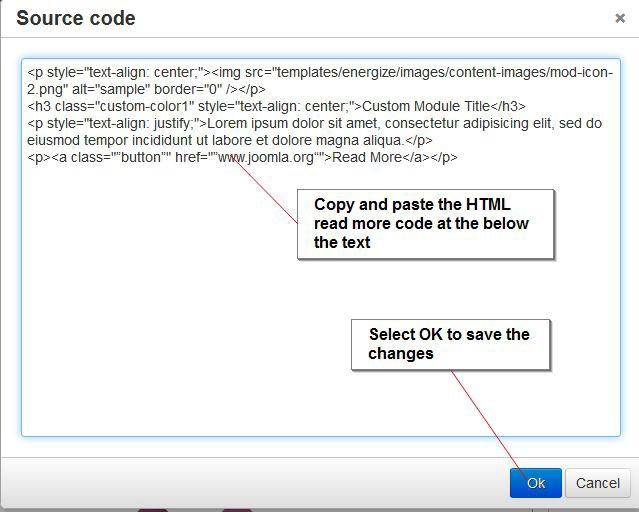
Under the text you have entered into the custom module position copy and paste this text into the HTML window
-
<p><a class="button" href="#">Read More</a></p>
-
Change the # to the web site address for the article you want to point the read more button to.
-
Save the changes
-
Read more button will now appear in the custom module position you have created
Top Menu Module Settings
To change the top menu module menu style please complete the following.
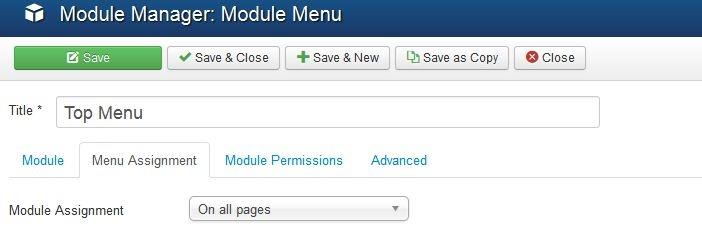
- From the Joomla Administrator area select the modules menu
- Now select the top menu module which needs to use the position-1 module position.
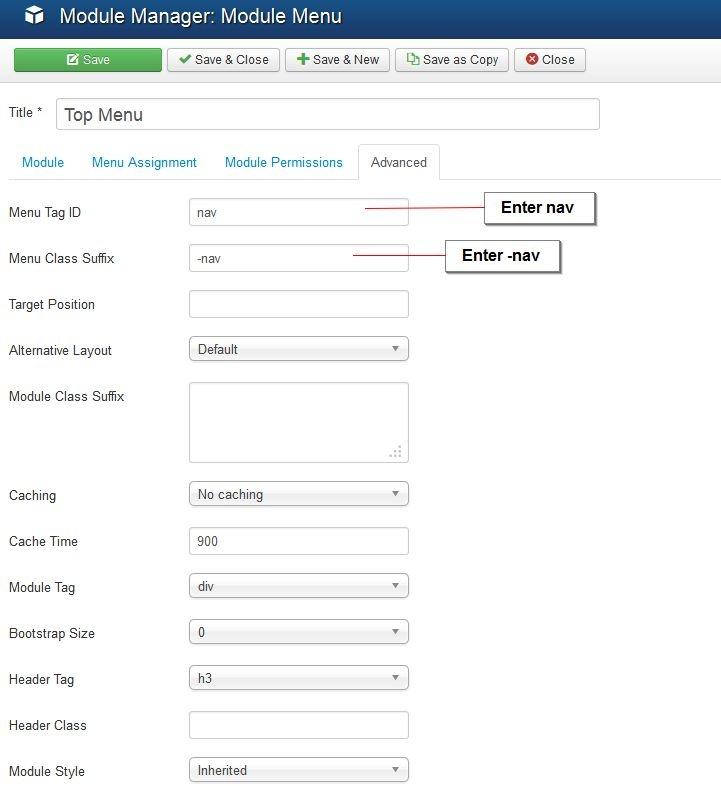
- In the Menu Tag ID field enter nav
- In the Menu Class Suffix field enter -nav
- To enable the drop down menu for the top menu position set the "Always show sub-menu items" to YES
- Click on the save button.

Virtuemart Product Category Menu
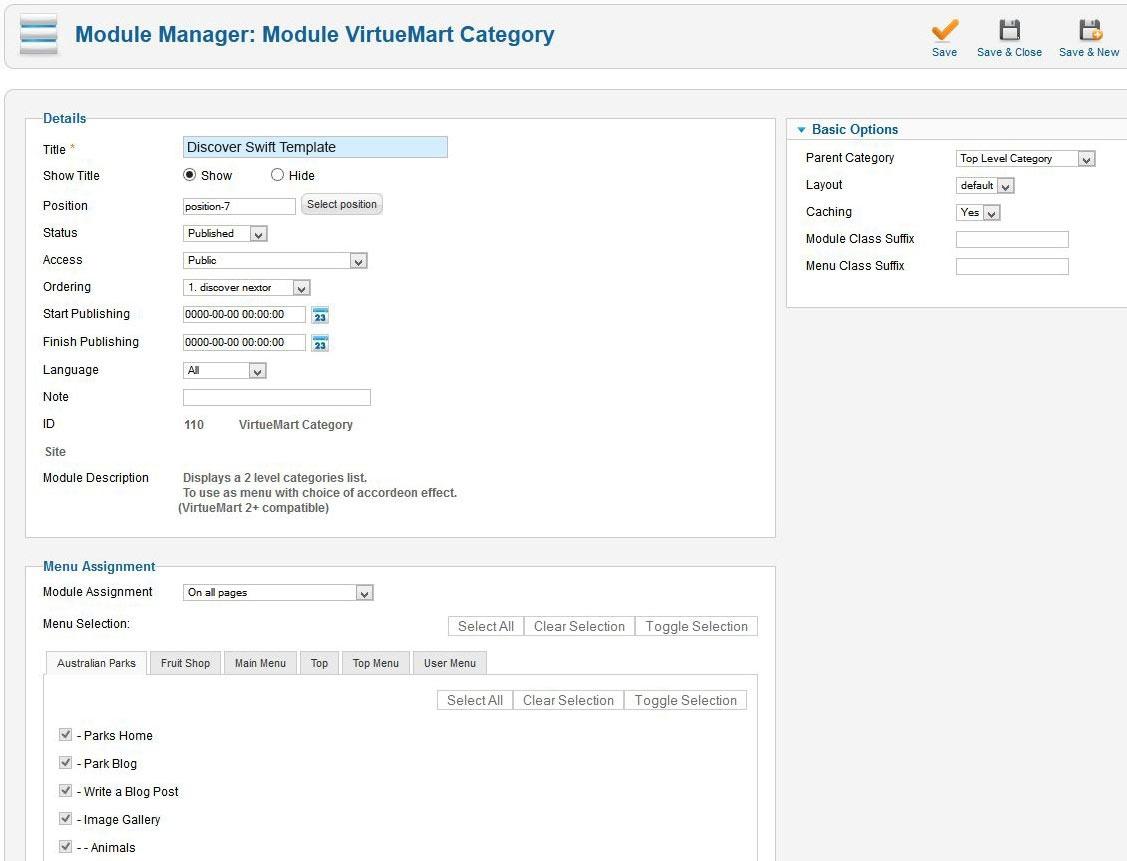
To setup the Virtuemart product category complete the following
-
From the Joomla Administrator area select the Modules Manager
-
Open the VirtueMart Category module and setup the module as shown in the screen shot below
How Do I Setup Featured Products Slider Module
- From the Joomla administrator select the Extensions Menu and Module Manager menu.
- Select the New button
- Select the VirtueMart Products option and provide following settings
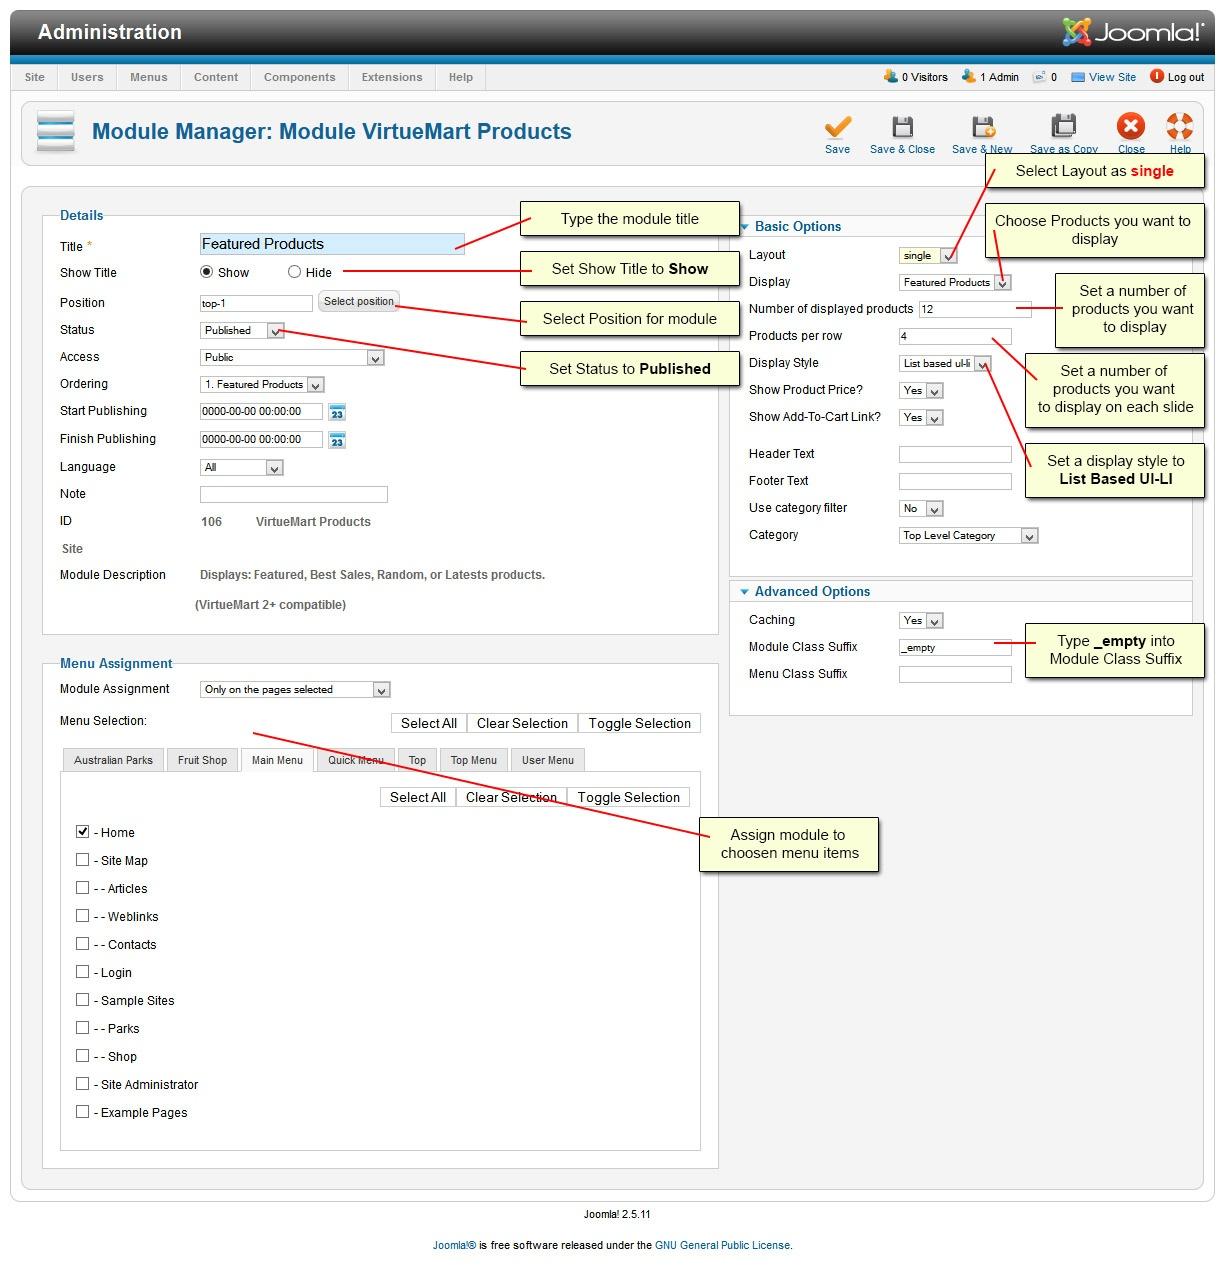
- To change the settings of product slider on top menu select Extensions -> Template Manager and choose template. Open Product Slider Settings tab

How Do I Setup The Slide Show
The template includes a built-in slideshow where you can display images in the slideshow you have uploaded to the web site.
To setup the slideshow you need to complete the following three steps
- Create images which will appear in the slideshow
- Create a custom module position for each slide show image
- Open the template control panel to change the slide show settings
Create Images For the Slideshow
The first step is to create new images which will appear in the slide show.
- Create a new .JPG image
- If you want to add four images to the slide show then you will need to create four new images
- Save the images to your computer
Create A Custom Module Position For Each New Slideshow Image
The Second step is to create a new custom module position for each image which will appear in the slideshow.
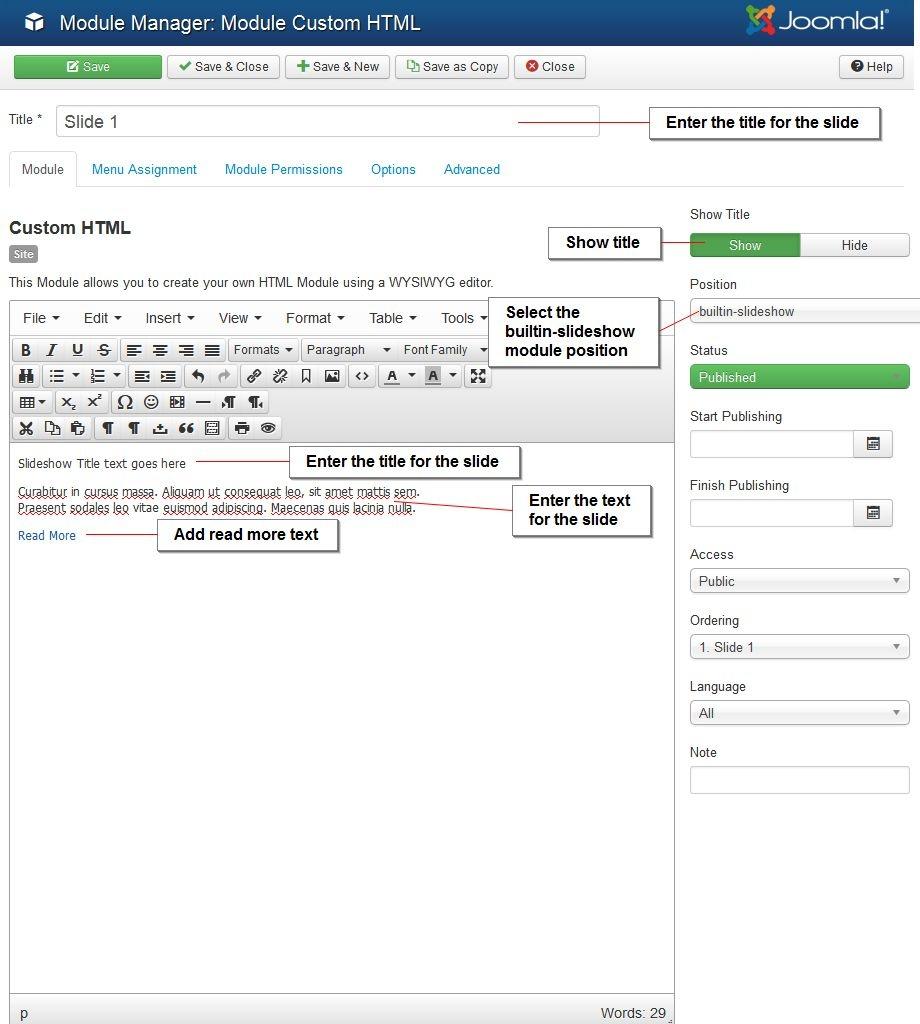
- From the Joomla administrator area select the Module Manager menu.
- Select the New button
- Select the Custom HTML option
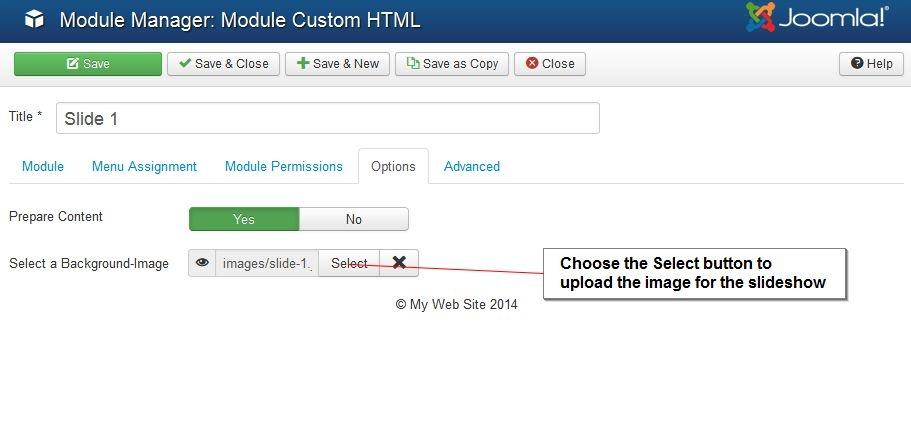
- In the module title enter the name for the new slide. The title will NOT be displayed in the slideshow
- Assign and publish the module to the builtin-slideshow module position
- In the WYSIWYG editor enter the heading and text which will appear as a caption over the slideshow image
- Create a read more button to link to an article in your Joomla site (see instructions below)
- In the options tab choose the SELECT button to upload and select the slide image you have created for the slideshow
- Save the changes to publish the image to the builtin-slideshow module position
How Do I Add More Images To The Slide Show
You can add as many images to the slideshow as like but for each image you add to the slideshow you must create a new custom module position by following the instructions noted above for each new slide you add to the slideshow.
The slideshow image ordering can be changed by changing the module order for the custom modules you have created and published to the builtin-slideshow module position.

Slideshow Settings
The 3rd step is enable the slideshow in the template control settings.
To enable the slideshow in the template control panel complete the following.
- Log into your Joomla administrator area
- Select the System menu and Site Template Style
- Open the template you have installed by clicking on the template link from the list of templates
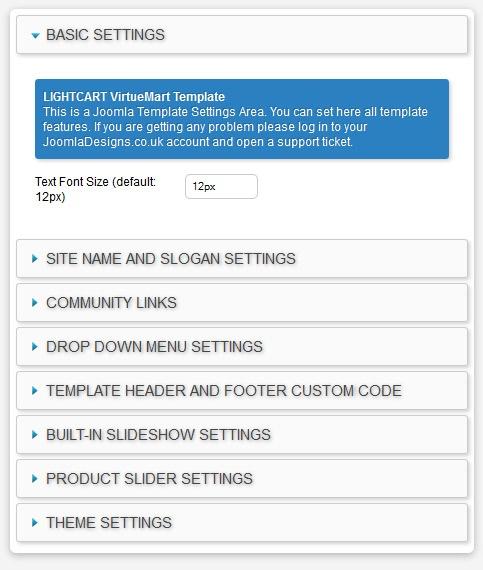
- Select the built-in slideshow settings tab
- Next to the Turn Slideshow ON/OFF slide the button to ON
- Save the changes by clicking on the Save & Close button
You can also change the slideshow show effects and many more options included in the built-in slowshow settings tab.
For more information about how to use the slideshow settings PLEASE HOVER OVER THE TEXT NEXT TO EACH SLIDESHOW SETTING
How Do I Access The Template Settings
To access the template settings please complete the following.
- Log into your Joomla administrator area
- Select the System menu and Site Template Style.
- Open the template you have installed by clicking on the template link from the list of templates
- You will now see the template settings as show in the screen shot below
- For more information about how to use each setting included in the template control panel PLEASE HOVER OVER THE TEXT NEXT TO EACH SETTING
How Do I Update The Template Settings
- After you have made a change to a setting including in the template control panel please select the Save or Save and Close button
- For more information about how to use each setting included in the template control panel PLEASE HOVER OVER THE TEXT NEXT TO EACH SETTING

How Do I Setup The Login & Registration Buttons
To setup the login and registration buttons which appear at the top of the template complete the following
- Log into your Joomla! administrator area
- Select the Module menu
- Open the Joomla login module
- Assign the login module to the loginform module
- Save the changes to the module position
How Do I Setup The Our Partner & Brands
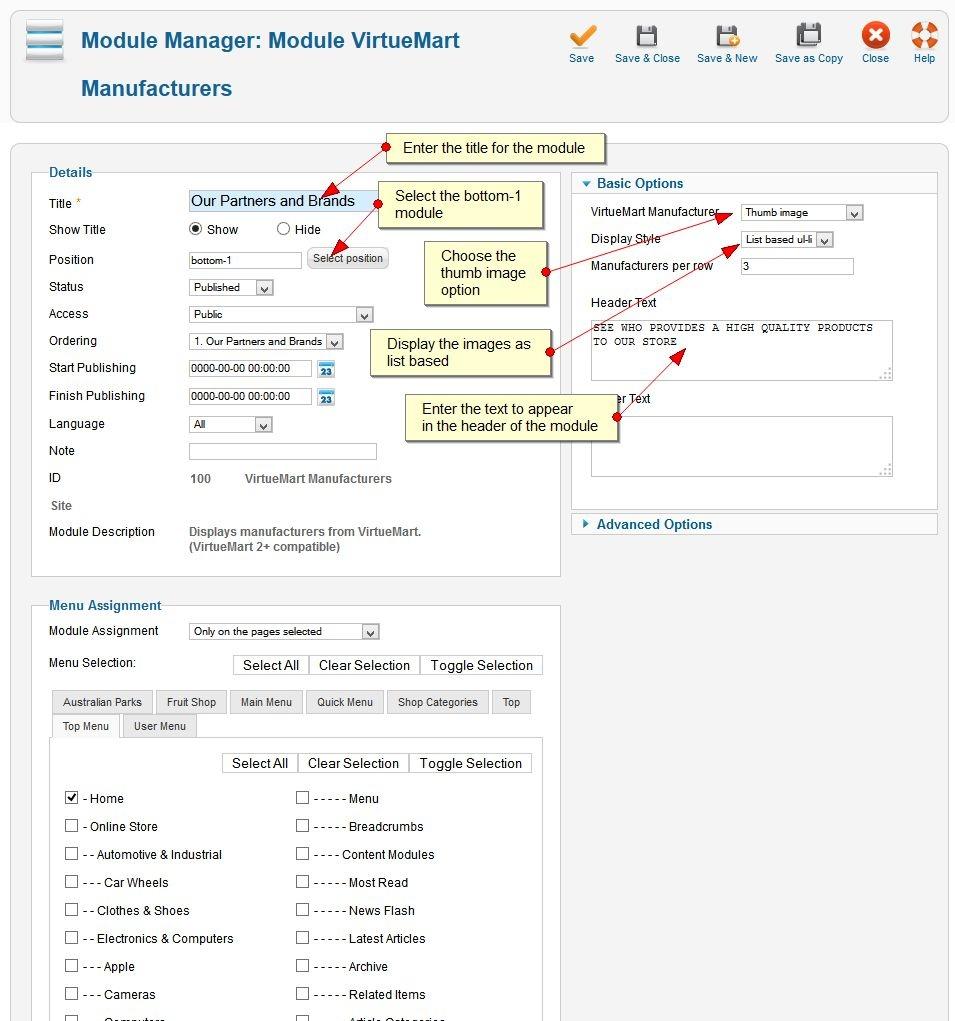
To setup the Virtuemart Manufacturers module (our partner and brands) located at the bottom of the template see the screen shot below.
Please note you need to upload the manufacturers images via the Vistuemart administrator area first before setting up the module.
How Do I Setup The Latest News & Articles Most Read
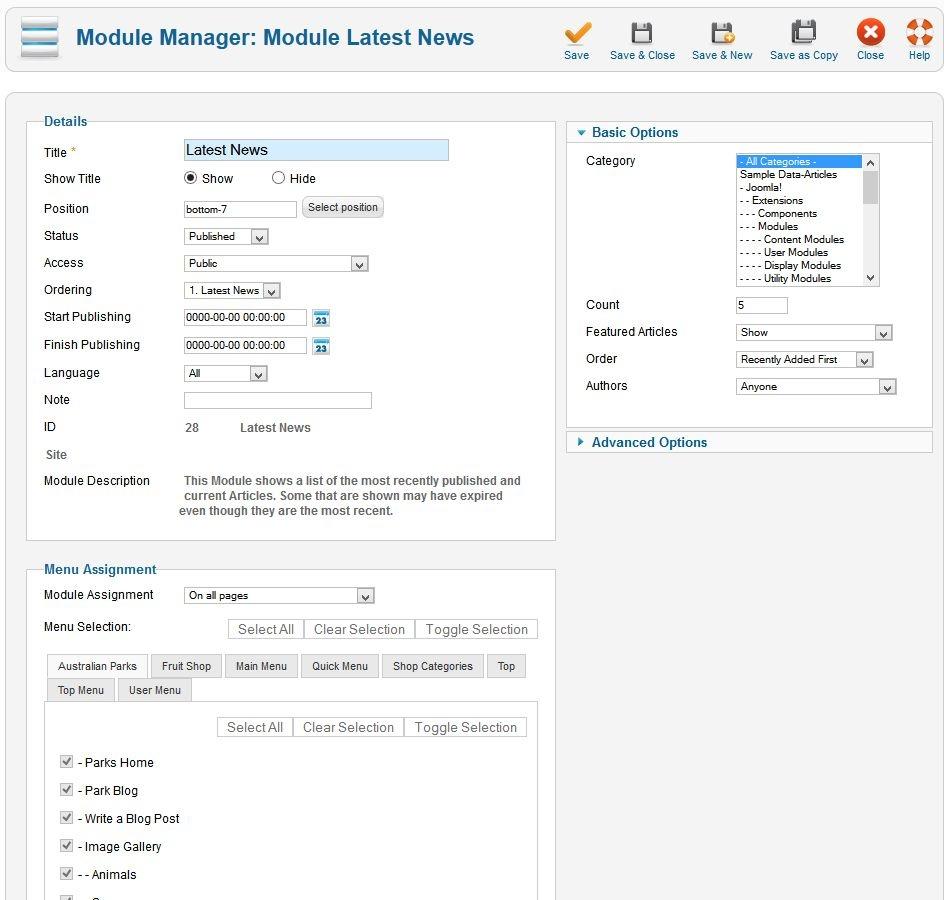
To setup the Latest news and articles most read see the screen shot below
How Do I Setup The Our Services & About Us Menu
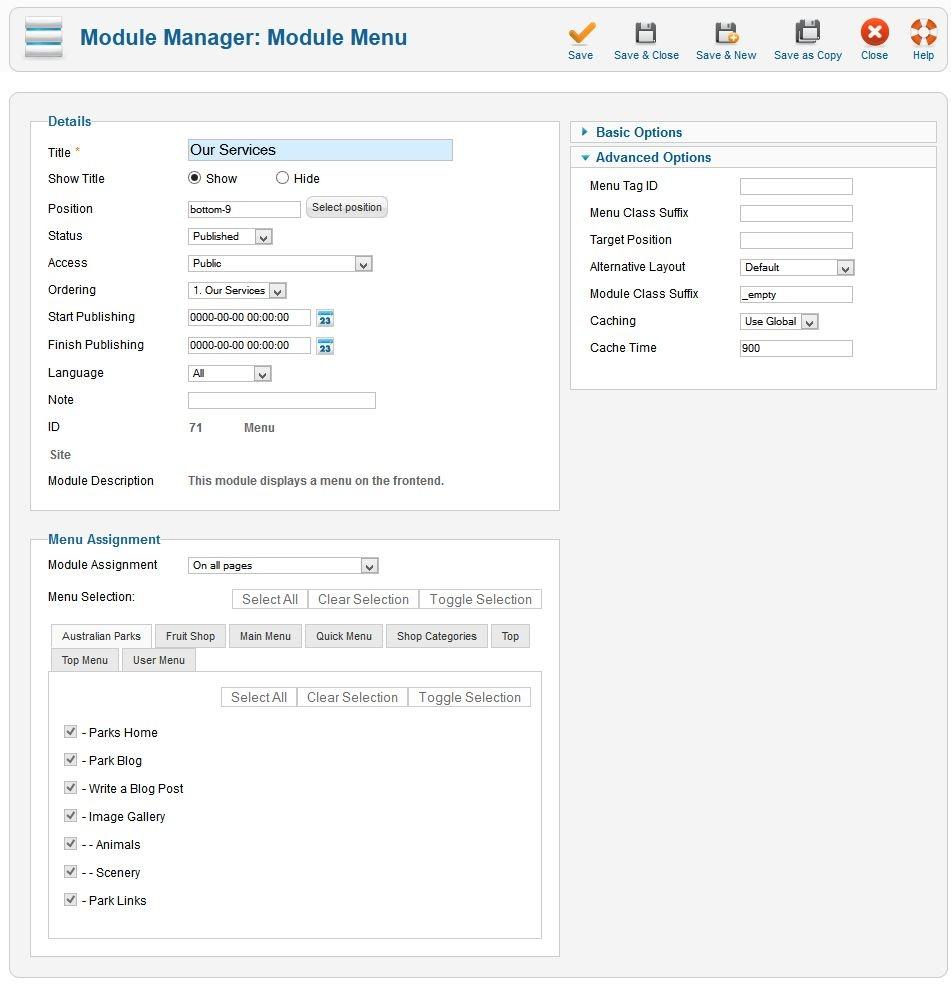
To setup the our services and about us menus you need to log into your Joomla website administrator area and select the menus option and then add new menu
When you have created the new menus please use the settings included in the screen shot show below.
How Do I Setup The Footer Menu
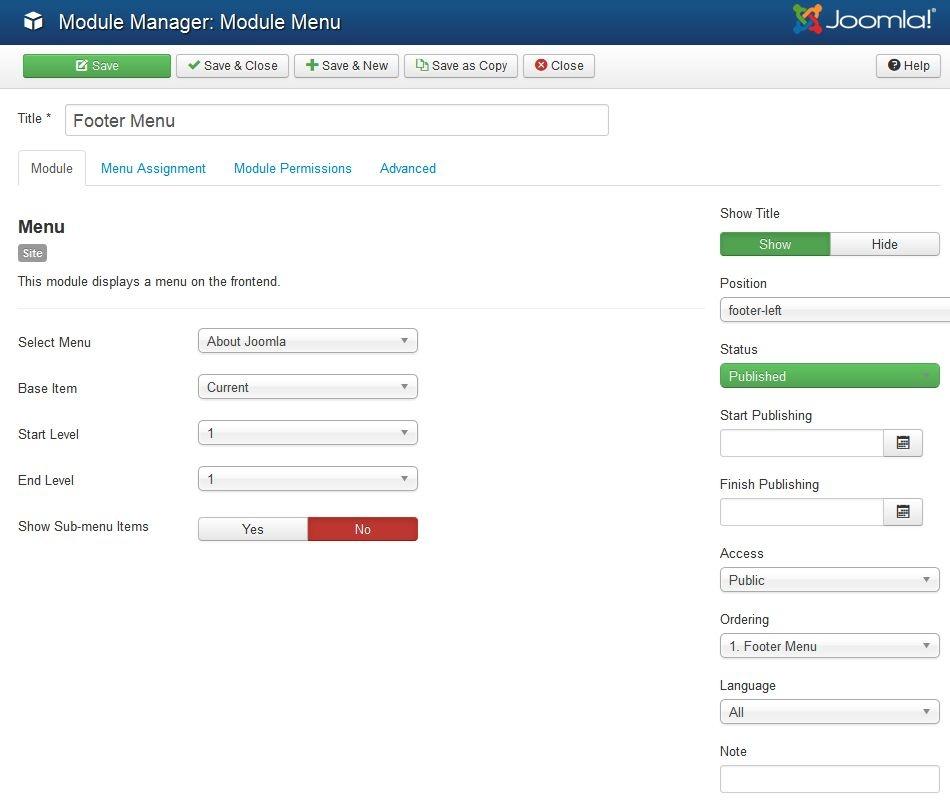
To setup the footer menu you need to log into your Joomla website administrator area and select the menus option and then add new menu
When you have created the new menu for the footer menu please use the settings included in the screen shot show below.
How Do I Add The Footer Copyright Text To The Template
To add and copyright footer text included at the bottom of the template you need to create a custom module position as assign the module to the footer module
- From the Joomla administrator select the Module menu.
- Select the New button
- Select the Custom HTML option
- Now setup the module as per the screen shot.


