

This guide shows you how to install and set up the Rapid VirtueMart template on Joomla 5 with VirtueMart 4.
Current release: Rapid 5.4.10, released 4 November 2026 · built against Joomla 5.4.10 and VirtueMart 4.8.6 (the quickstart ships both) · PHP 8.3 or later · What changed in each release
Table of Contents:
- Template Usage
- Template Support
- Template Package Contents
- Which Should I Install, The Quickstart Or The Template
- Installing The Joomla Template
- How Do I Set The Template As The Default Joomla Template
- How Do I Set Up The VirtueMart Template Settings
- Template Module Positions
- How Do I Access The Template Settings
- How Do I Add My Logo And Slogan
- How Do I Change The Colours
- How Do I Set Up The Favicon
- How Do I Set Up The Main Menu
- How Do I Set Up The Slideshow
- How Do I Add A Header Image To A Category Page
- How Do I Set Up The Sliding Products Module
- How Do I Add My Own Text And Banners
- How Do I Change How A Module Looks
- How Do I Set Up The Login And Register Links
- How Do I Set Up The Cart, Search And Currency
- How Do I Set Up The Footer
- How Do I Set Up The Follow Us Panel
- How Do I Set Up The Product Image Zoom
- How Does The Template Work On Phones
- How Do I Add Google Analytics Or Other Code
Template Usage
Before using or installing this template please read the Terms of Service, which you agreed to when you bought the template.
Template Support
We provide support for using and setting up the template you downloaded from this website.
If you need help with the template
- Install the quickstart package. It gives you an exact copy of the Rapid demo, and it is the easiest way to see how the demo is set up.
- Read the knowledge base.
- Log in and open a support ticket.
If you need help with Joomla or VirtueMart
- Joomla documentation: docs.joomla.org
- Joomla forum: forum.joomla.org
- VirtueMart documentation: docs.virtuemart.net
- VirtueMart forum: forum.virtuemart.net
Template Package Contents
Everything is in My Downloads once you have bought the template. Use the files in the Joomla5 folder.
- Quickstart: rapid-quickstart-J5.4.10.zip in Joomla5 / quickstart. A complete Joomla 5.4.10 site with VirtueMart 4.8.6, the template and the demo content.
- Template: pkg_rapid-5.4.10.zip in Joomla5 / TemplateFiles. Install this on a site that already has Joomla and VirtueMart.
- Adobe Photoshop files in the Photoshop Files folder.
The Joomla3 folder holds the old version of the template for Joomla 3. You do not need it for a Joomla 5 site.
Which Should I Install, The Quickstart Or The Template
Starting a new shop? Use the quickstart. It installs Joomla, VirtueMart, the template and the demo content in one go, so your site starts out looking like the demo and you replace the content with your own. See how to install the Quickstart.
Adding the template to a shop you already have? Install only the template, as shown below. Your content stays as it is, and you set up the modules yourself using this guide. You need Joomla 5.4 from joomla.org and VirtueMart 4.8 from virtuemart.net, on PHP 8.3 or later.
Installing The Joomla Template
- Log in to the Joomla administrator area of your website.
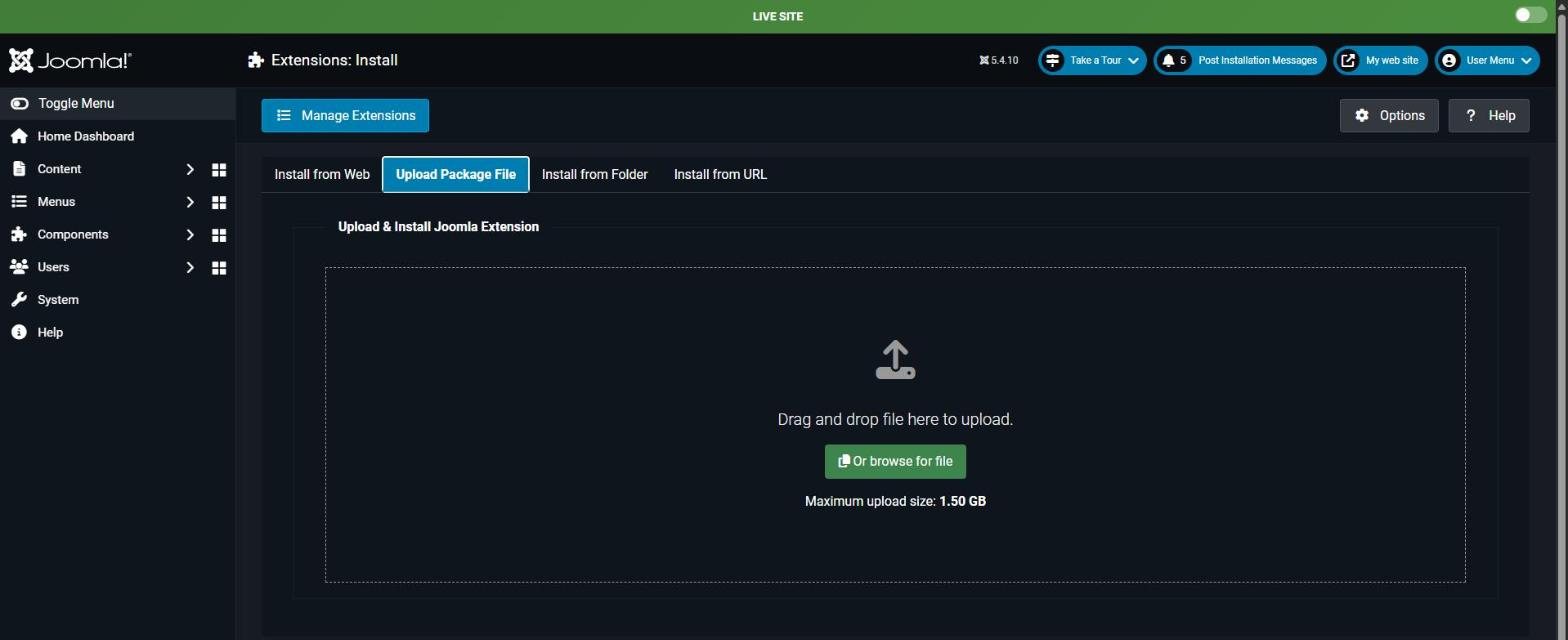
- Open System and, under Install, select Extensions.
- On the Upload Package File tab, drag in the template zip file, or select Or browse for file and choose it.
- Use pkg_rapid-5.4.10.zip from the Joomla5 / TemplateFiles folder. Joomla installs it as soon as the upload finishes.
How Do I Set The Template As The Default Joomla Template
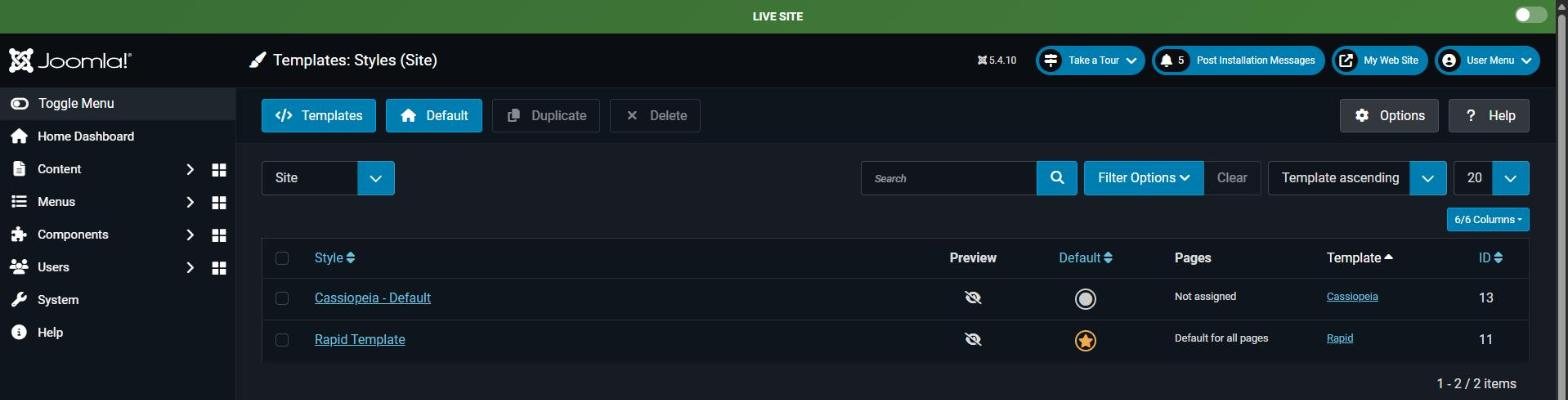
- Open System and, under Templates, select Site Template Styles.
- Tick the check box next to the Rapid style.
- Select the Default button in the toolbar.
How Do I Set Up The VirtueMart Template Settings
The demo uses these settings:
- Open Components, VirtueMart, then Configuration.
- Select the Templates tab.
- In the Template and Layouts box, set Select the default template for your Shop and Category Template to Use joomla default. VirtueMart then uses your default Joomla template, Rapid, for the shop pages.
- Save the changes.
Template Module Positions
The picture below shows where each module position sits on the page. Module positions with nothing published in them collapse, so the page closes up around them.
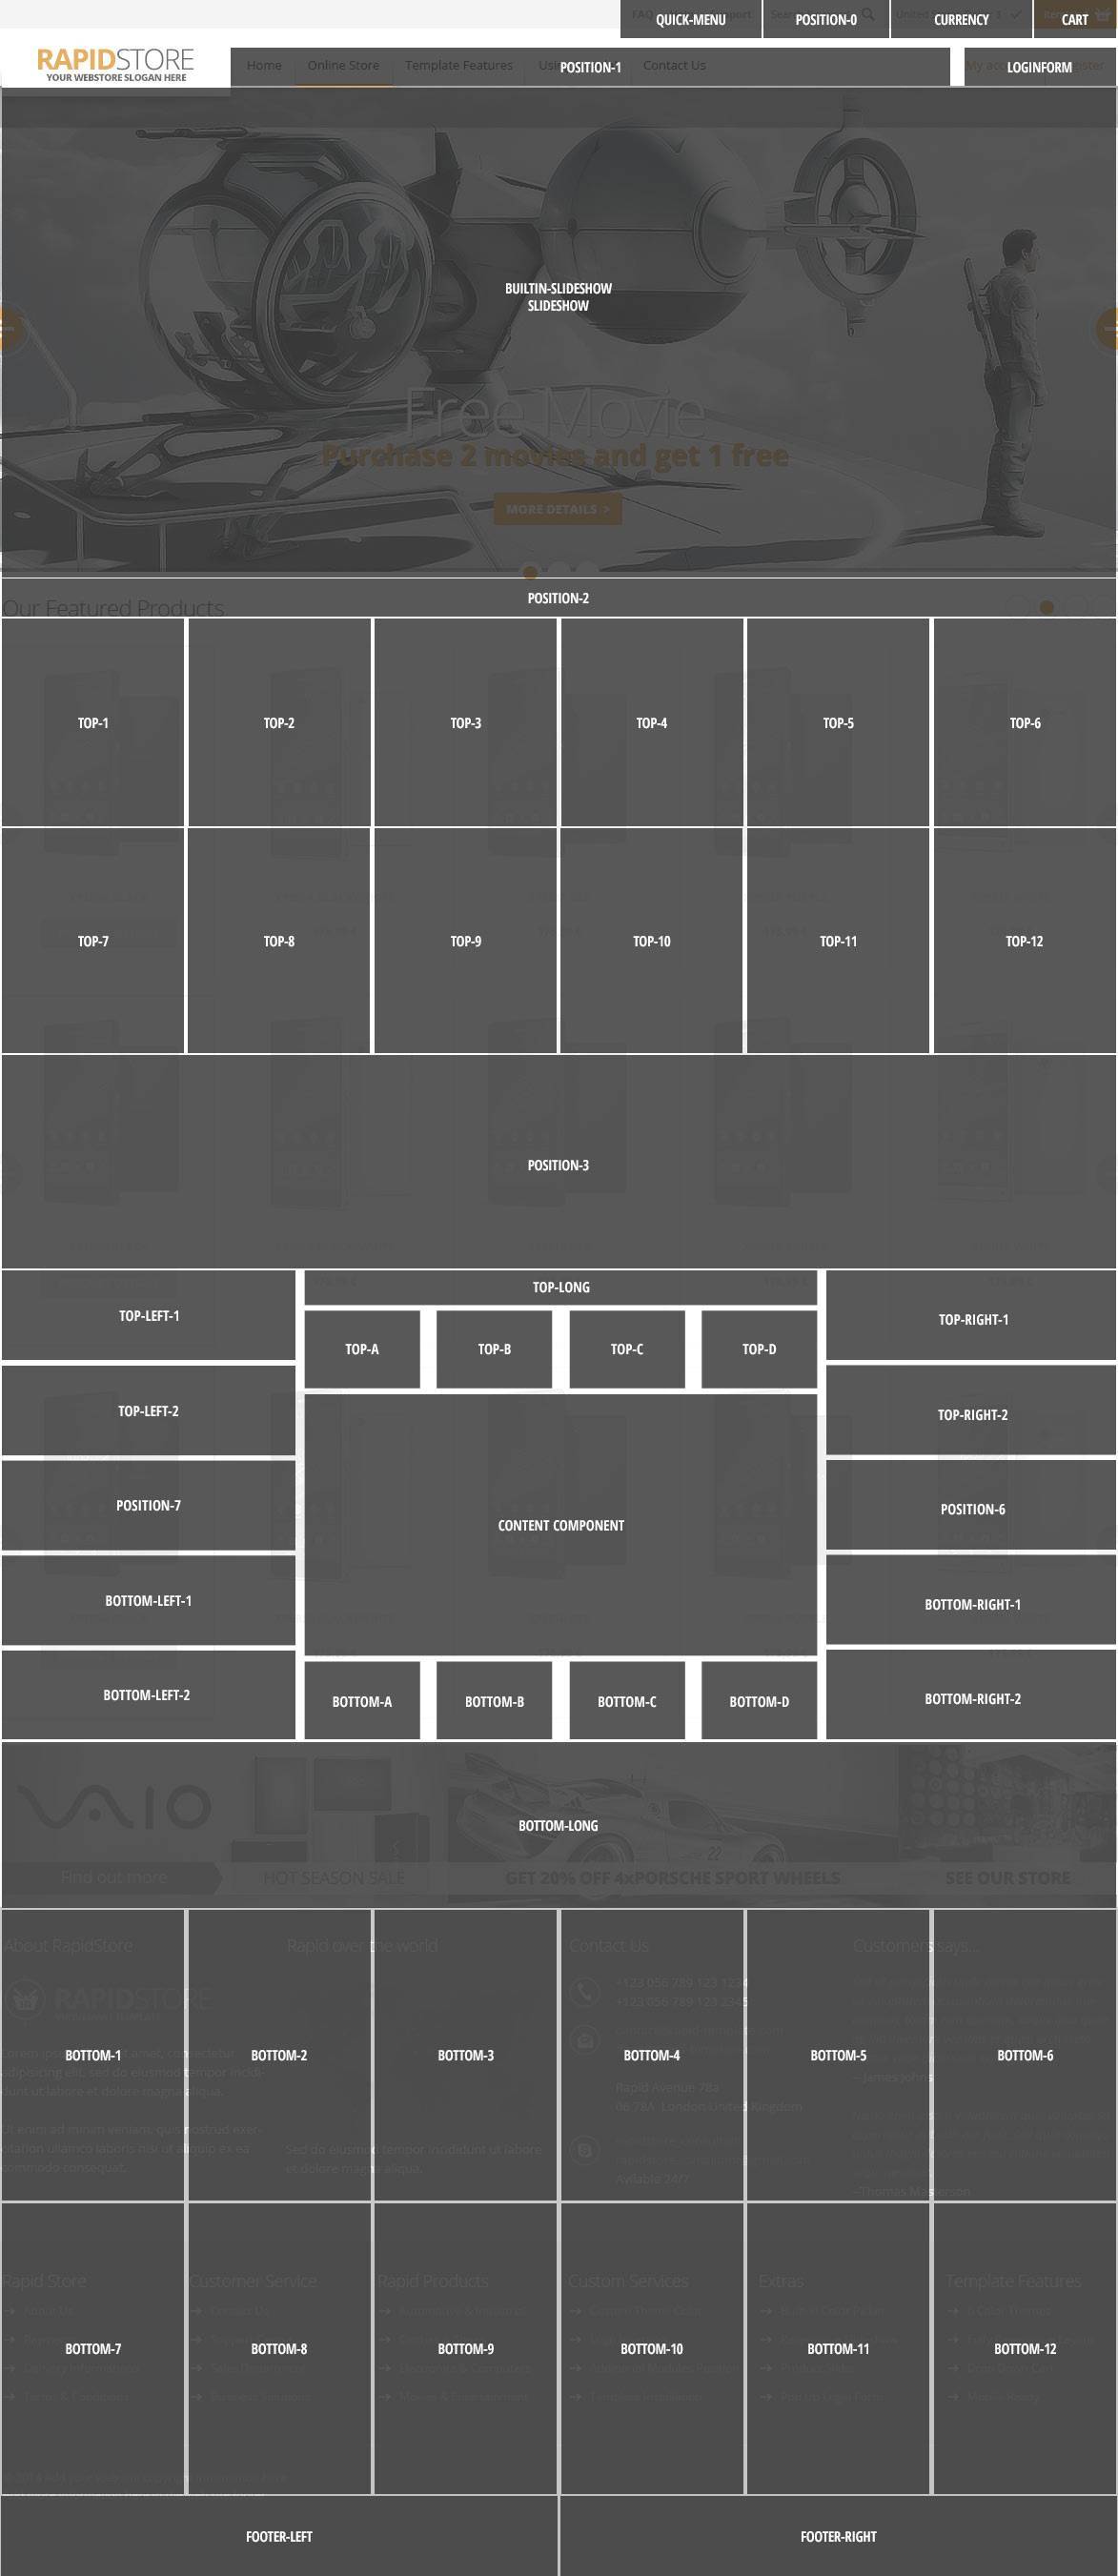
- Top bar: quick-menu, position-0 (search), currency, cart
- Header: position-1 (main menu), loginform (My Account and Register links)
- Under the header: builtin-slideshow or slideshow, then position-2 (breadcrumbs)
- Across the page, above the content: top-1 to top-6, top-7 to top-12, position-3
- Left column: top-left-1, top-left-2, position-7, bottom-left-1, bottom-left-2
- Centre column: top-long, top-a to top-d, your page content, bottom-a to bottom-d
- Right column: top-right-1, top-right-2, position-6, bottom-right-1, bottom-right-2
- Below the content: bottom-long, bottom-1 to bottom-6, bottom-7 to bottom-12
- Footer: footer, footer-left, footer-right
bottom-7 to bottom-12 are not in the Position drop-down list. Type the name into the Position field and press Enter.
Each row shares its width equally between the positions you use, so publishing to top-1 and top-2 gives you two equal columns.
How Do I Access The Template Settings
- Open System and, under Templates, select Site Template Styles.
- Select the name of your template style to open it.
The settings are on these tabs. Hover over a setting to see what it does.
- Favicon: the small icon in the browser tab
- Basic: text size
- Site Name & Slogan: your logo and slogan
- Community Links: the Follow Us panel
- Drop Down Menu: turns the main menu drop-downs on or off
- Header & Footer Custom Code: code for analytics and similar tools
- Built-in Slideshow: the home page slideshow
- Product Slider: the sliding products module
- Product Images: the product image zoom
- Theme: colour themes and your own colours
How Do I Add My Logo And Slogan
- Open System and, under Templates, select Site Template Styles.
- Select the name of your template style to open it.
- Select the Site Name & Slogan tab.
- To use text, type your name in Site Name and your slogan in the slogan field.
- To use an image, set Site Name as Image to on and choose your logo. The slogan has the same options.
- Use the position fields to move the logo and slogan, and Top Handler Height to change the height of the area that holds them.
- Select Save & Close.
How Do I Change The Colours
- Open System and, under Templates, select Site Template Styles.
- Select the name of your template style to open it.
- Select the Theme tab.
- To use a ready-made look, set Built-in Theme to on and pick one of the six in Choose Theme.
- To choose your own colours, set Built-in Theme to off. Click any colour field to open the colour picker. There are 83 colour settings.
- To use a picture behind the page, choose it in Background Image.
- Select Save & Close.
How Do I Set Up The Favicon
- Open System and, under Templates, select Site Template Styles.
- Select the name of your template style to open it.
- Select the Favicon tab and choose an image.
- If it is not square, use the Favicon Crop Tool on the same tab: load the image, drag the square over the part you want, then create the favicon.
- Select Save. The template creates the icon sizes that visitors' devices need.
How Do I Set Up The Main Menu
The main menu is a normal Joomla Menu module, with these settings:
- Open Content, Site Modules, and open your menu module, or create a new Menu module.
- In Position, choose position-1.
- Set Sub-menu Items to Show so the drop-downs work.
- On the Advanced tab, set Menu Tag ID to
navand Menu Class to-nav. - Select Save & Close.
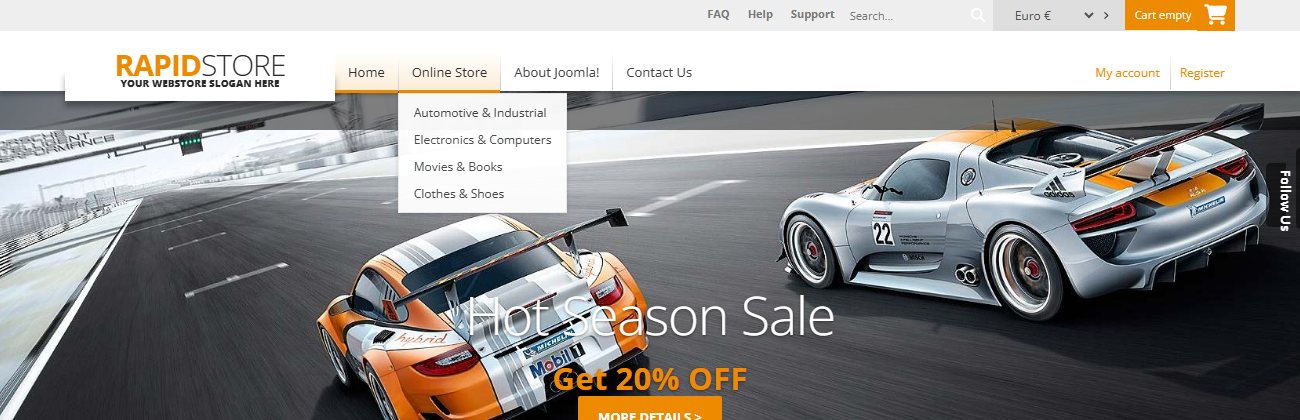
To add a short line of text under a menu item, type it in that item's Note field in Menus. The small menu in the top bar is a separate Menu module in quick-menu.
How Do I Set Up The Slideshow
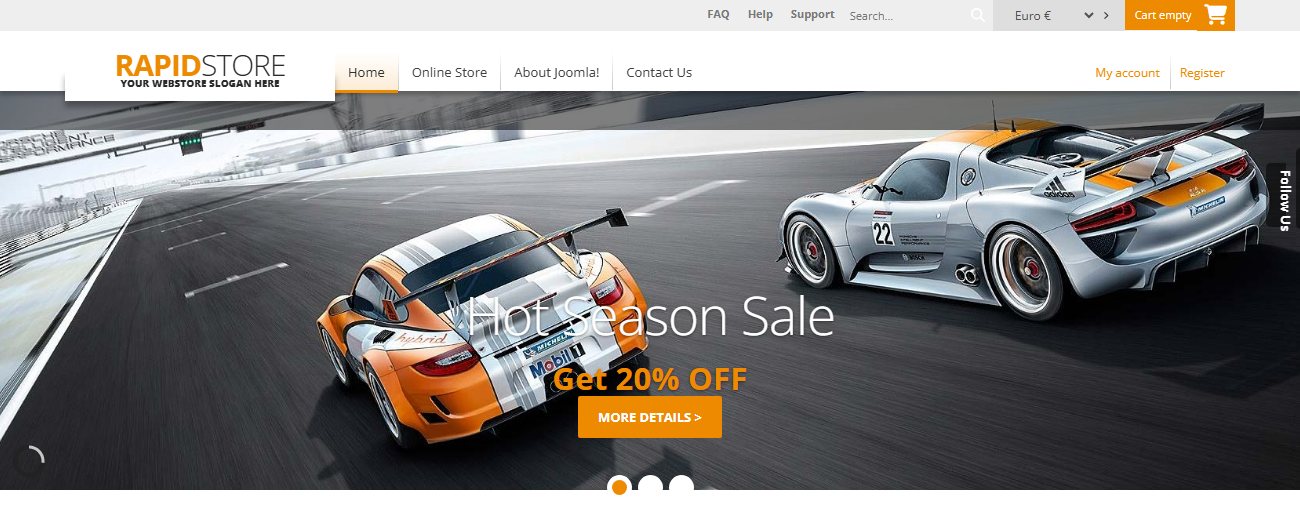
Each slide is a Custom module in the builtin-slideshow position.
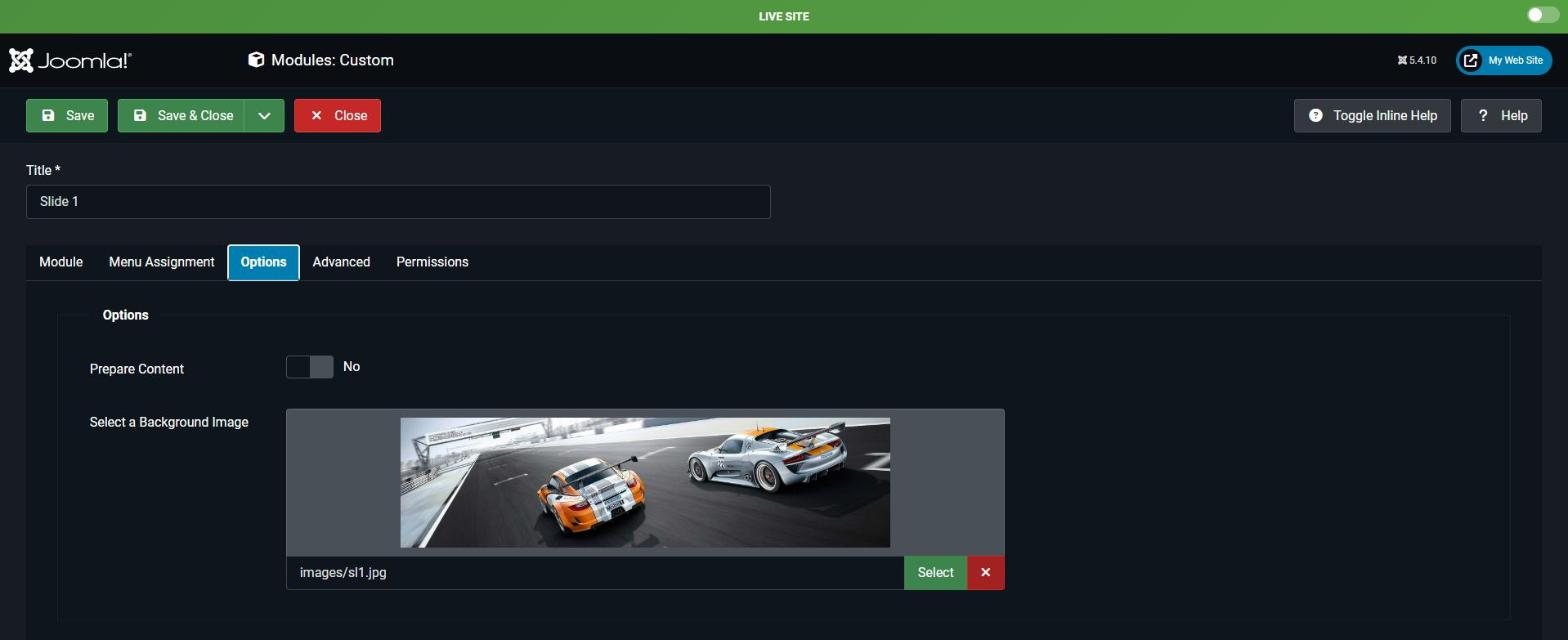
- Prepare a .jpg image for each slide. The demo images are in the quickstart's images folder (sl1.jpg, sl2.jpg, sl3.jpg) if you want to check the size.
- Open Content, Site Modules, select New, then Custom.
- Enter a title. It is only for your reference and does not appear on the slide.
- In the editor, add the caption shown over the image. To add a button, use the markup below in the editor's source view.
- In Position, choose builtin-slideshow.
- On the Options tab, choose your slide in Select a Background Image.
- On the Menu Assignment tab, assign it to the home page, then save.
- Repeat for each slide. The module ordering sets the slide order.
- In the template settings, open the Built-in Slideshow tab and make sure Turn Slideshow ON/OFF is on.
<h1 style="text-align: center;">Hot Season Sale</h1>
<h2 style="text-align: center;"><strong class="custom-color1">Get 20% OFF</strong></h2>
<p style="text-align: center;"><a class="button" href="#">MORE DETAILS ></a></p>The same tab controls the effects, timing, height, arrows and caption position. The demo adds class="hidden-phone" to its captions so that phones show only the picture.
How Do I Add A Header Image To A Category Page
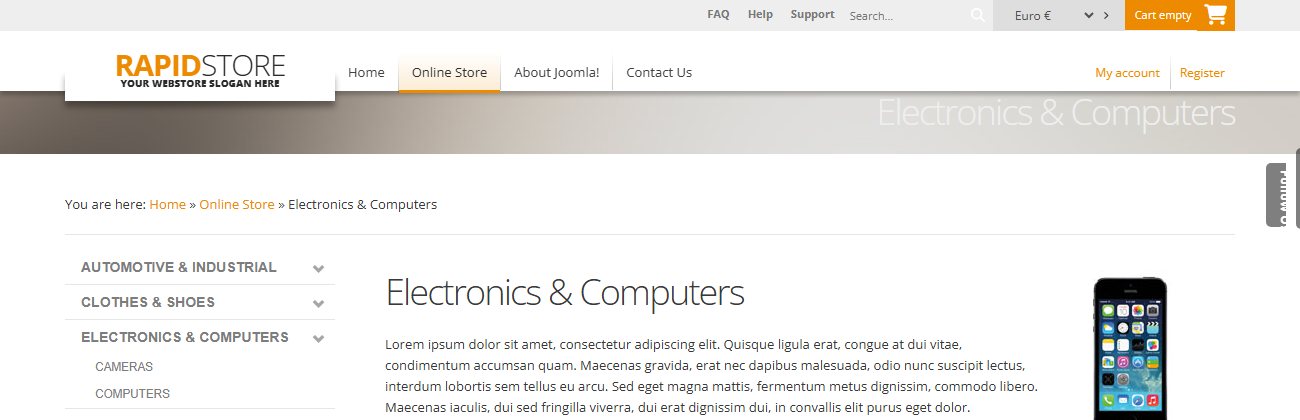
The demo's category pages have a slim header image rather than a slideshow. Use the slideshow position for this.
- Open Content and select Site Modules.
- Select New, then Custom.
- Enter a title and add your text or image in the editor.
- In Position, choose slideshow.
- On the Options tab, choose the picture in Select a Background Image.
- On the Menu Assignment tab, choose the pages it should appear on. Use On all pages if it should show everywhere.
- Select Save & Close.
Assign each one to its own category menu item. In the editor, the demo uses:
<div class="container">
<h1 style="text-align: right; color: #eeeeee;">Electronics & Computers</h1>
</div>The two positions share one space. On a page where builtin-slideshow has a module, the slideshow position does not show. A slideshow extension from another developer also goes in slideshow. If you use one, turn the built-in slideshow off.
How Do I Set Up The Sliding Products Module
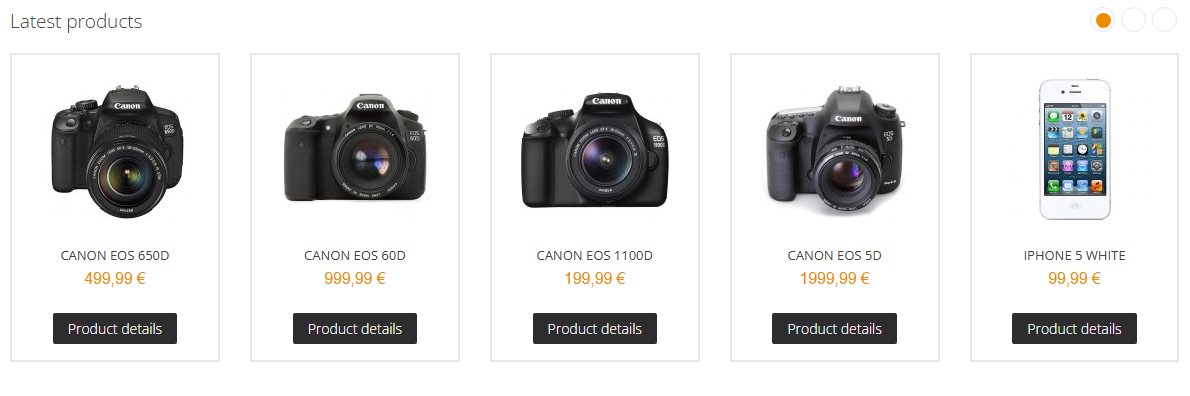
- Open Content, Site Modules, select New, then VirtueMart Products.
- In Display, choose the products to show, for example the latest ones. Set Number of displayed products (the demo uses 15) and Products per row (the demo uses 5).
- Set Display Style to List based ul-li.
- In Position, choose where it goes. The demo uses top-a.
- Set Layout to single. This layout is what makes it slide.
- On the Advanced tab, set Module Class to
_products. - Assign it to your pages and save.
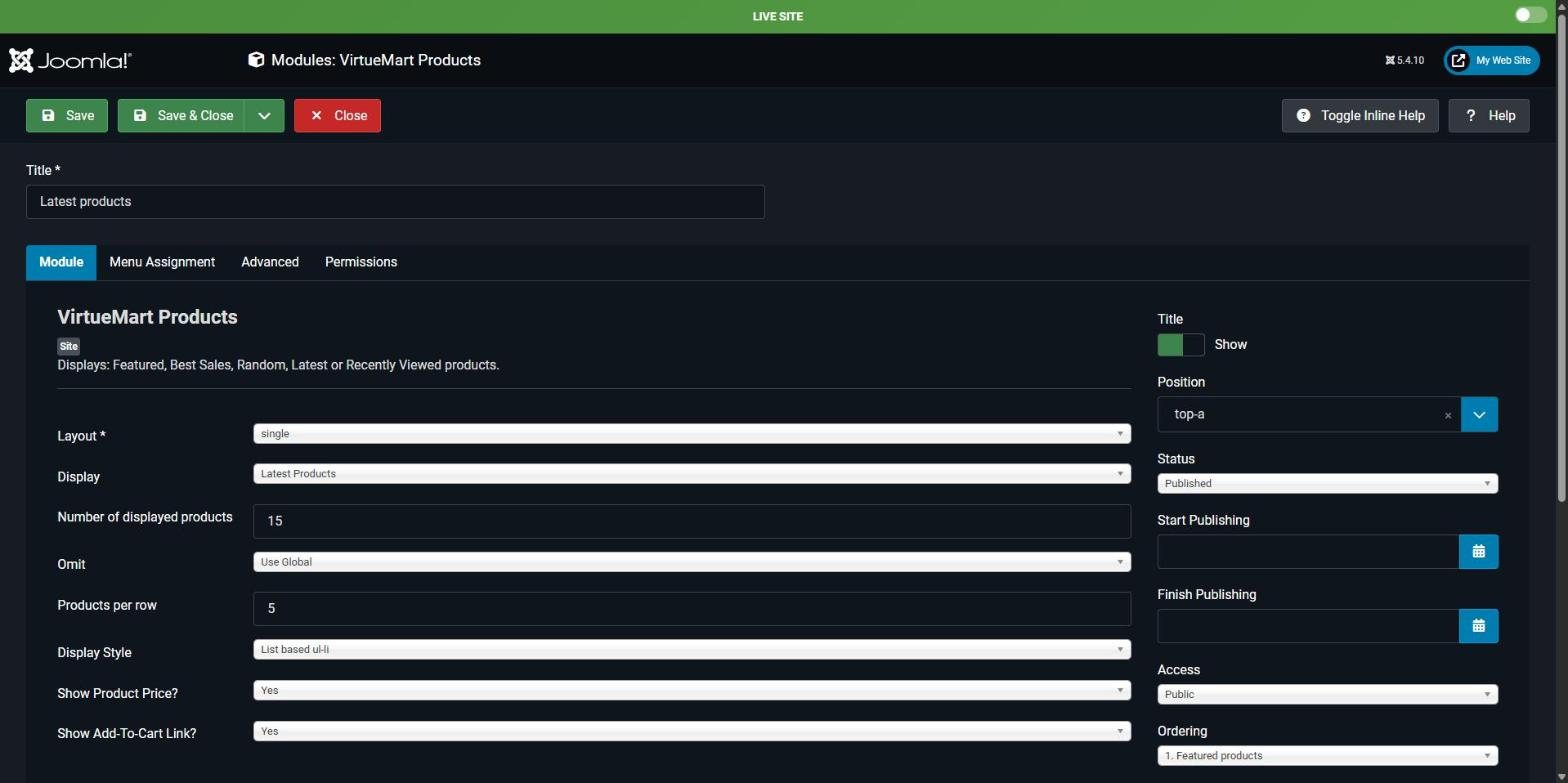
In the template settings, the Product Slider tab controls the animation delay, pause, pagination, arrows, auto play and looping.
How Do I Add My Own Text And Banners
The welcome text at the top of the demo and the banner row at the bottom are Custom modules. Create one like this:
- Open Content and select Site Modules.
- Select New, then Custom.
- Enter a title and add your text or image in the editor.
- In Position, choose the position you want, for example top-1 or bottom-long.
- On the Menu Assignment tab, choose the pages it should appear on. Use On all pages if it should show everywhere.
- Select Save & Close.
To add a button in a module, add this in the editor's source view, and change the # to your link:
<p><a class="button" href="#">Read More</a></p>How Do I Change How A Module Looks
Set these on the module's Advanced tab, in the Module Class field.
_productsfor VirtueMart product modules_menufor menus in the side columns_emptyfor a plain module with no box, as used in the footer columns_style1,_style2and_style3for alternative box styles
To add spacing, add padding-5 or padding-10 after a space, for example _style1 padding-5.
To show or hide a module on certain devices, add one of these with a space in front: hidden-phone, visible-phone, hidden-tablet, visible-tablet, hidden-desktop, visible-desktop.
How Do I Set Up The Login And Register Links
- Open Content, Site Modules, and open the Login module.
- In Position, choose loginform and save.
The module title becomes the link text in the header, for example "My account", and the login form opens in a pop-up window. The Register link appears when user registration is allowed in Joomla's Users options.
How Do I Set Up The Cart, Search And Currency
- Cart: a VirtueMart Shopping Cart module in cart
- Search: a VirtueMart Search Product module in position-0
- Currency: a VirtueMart Currency Selector module in currency
How Do I Set Up The Footer
The demo footer has two rows of columns. The first row, bottom-1 to bottom-4, uses Custom modules. The second row, bottom-7 to bottom-12, uses Menu modules. Set the Module Class of each to _empty.
Remember to type bottom-7 to bottom-12 into the Position field, as they are not in the list. Your copyright text is a Custom module in footer-left.
How Do I Set Up The Follow Us Panel
- Open System and, under Templates, select Site Template Styles.
- Select the name of your template style to open it.
- Select the Community Links tab.
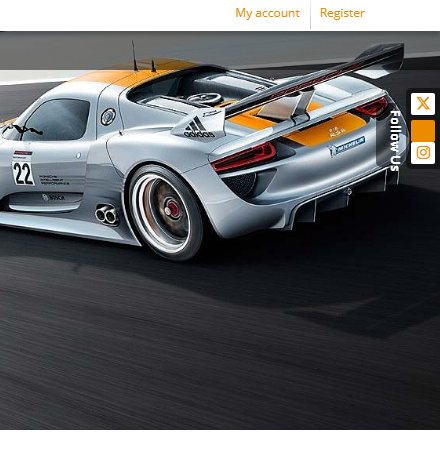
- For each network you use, enter your full profile address and turn on its Show setting. The list includes X, Facebook, Instagram, Threads, Bluesky, Mastodon, LinkedIn, YouTube, TikTok, Vimeo, Pinterest, Discord and RSS.
- Use Show/Hide Button Label to change the "Follow Us" wording, then save.
How Do I Set Up The Product Image Zoom
- Open System and, under Templates, select Site Template Styles.
- Select the name of your template style to open it.
- Select the Product Images tab.
- Turn on ON/OFF Zoom Images Script.
- Choose the zoom type (lens or inner), the lens shape and size, and save.
With the setting off, product pages use VirtueMart's standard image display.
How Does The Template Work On Phones
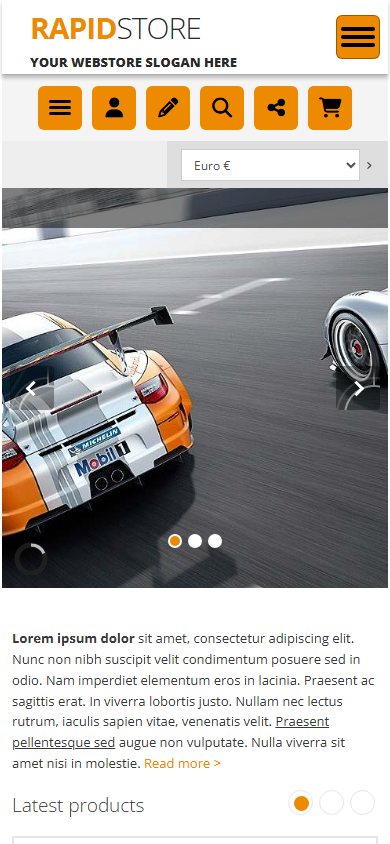
The template adapts to phones without any set-up. The header becomes a row of buttons that open the menu, login, search and cart, using the modules you have already published. Use the device classes under "How Do I Change How A Module Looks" if you want a module to show only on certain devices.
How Do I Add Google Analytics Or Other Code
- Open System and, under Templates, select Site Template Styles.
- Select the name of your template style to open it.
- Select the Header & Footer Custom Code tab.
- Paste the code into Insert code into template header or Insert code into template footer, as your provider instructs, and save.
